Recovering Data
If your Windows system crashes completely and cannot be recovered using the Registry Editor or the boot.ini, you may face some serious problems if important data on the system wasn't backed up. Knoppix can come to your rescue by enabling you to access your Windows partition and save your important data to multiple devices for restoration later. These methods include using USB jump drives (also called flash drives or key drives ), using CD-Rs and DVD-Rs, and copying data over the network. This section explains how to recover and save the data that you'll restore after you have reinstalled Windows following a crash.
Preparing for Data Recovery
The most common mistake when recovering data from a system is failing to retrieve all of it because of haste. What you leave behind is typically the data you end up needing the most, so take your time and ensure that you are capturing everything valuable. The most common area for data storage is in the Documents and Settings folder (usually /mnt/hda1/Documents and Settings), which is Windows' default for saving most user documents, music, pictures, and so on. If there are any nonstandard directories into which you or your users save data, consider those as well.
| Tip | After you have saved all the files you think you need, it is always a good idea to verify that the data you saved is correctly archived. Navigate the backup medium and open random files (those that can be opened) to ensure that the data is valid. |
Saving Data to a USB Jump Drive
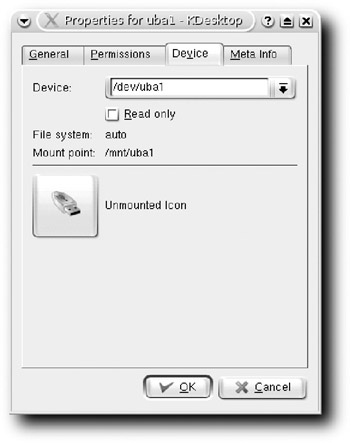
Knoppix recognizes your USB jump drive almost immediately after the drive is plugged in. From that point, it is a trivial matter to save data from your Windows partition to the key drive, which is represented by the USB icon on the desktop. To save to the jump drive, you only need to make it writable by right-clicking the jump drive icon, and selecting Properties. Select the Device tab, which looks much like the dialog shown in Figure 5-12, and then uncheck the Read Only box to enable writing to the drive. Click OK to close the window, and you're good to go.

Figure 5-12: The USB jump drive is set to read-write once you uncheck the Read Only box.
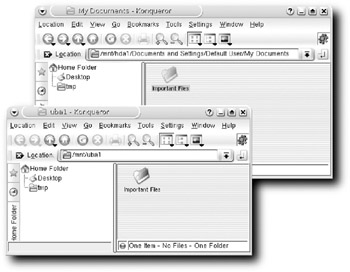
Mount the drive by right-clicking on the drive icon and selecting Mount. You can use the command line in conjunction with the cp command to move files between the hard drive and the jump drive (typically /dev/uba1). Alternatively, you can open two Konqueror windows (see Figure 5-13) and drag and drop.

Figure 5-13: Saving files to the jump drive from Windows
Your only limitation to saving files this way is the speed of the file transfer and the capacity of your jump drive, although 1GB and 2GB jump drives are available for very reasonable prices, and you can use more than one if necessary.
Burning Data to a CD or DVD
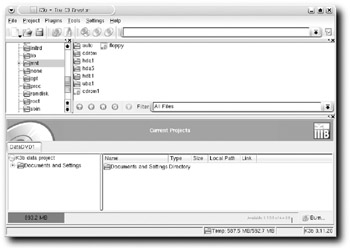
Burning the files you need to a writable CD or DVD is made very simple in Knoppix, which includes K3b (discussed in depth in Chapter 1), a user-friendly CD recorder that's on a par with the most expensive commercial software. Select Knoppix → Multimedia → K3b Program to open it. The application's screen is similar to that shown in Figure 5-14.

Figure 5-14: Burning files to a CD/DVD using K3b
| Note | There's a glitch in K3b's capability to burn DVDs or CDs in Knoppix 3.8.2, but that should be resolved by Knoppix 4.0. |
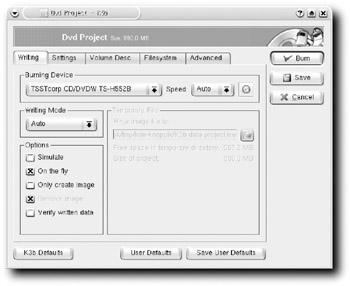
Select New Data CD Project or New Data DVD Project from the window. Navigate to the files you want to save and drag and drop them to the Current Projects section of the screen. Figure 5-14 shows the /mnt/hda1/Documents and Settings file already being saved to a DVD. The graph near the bottom of the screen shows the size of the file (more than 890MB). After you have put all the files you want to save into the Current Projects section, click the Burn icon at the top left corner of the application window. A dialog box similar to the one shown in Figure 5-15 appears.

Figure 5-15: Starting the backup process
After you have set any user-specific settings you need (see Chapter 1 for all the gory details), click the Burn button to begin the writing process. When K3b finishes, navigate the finished CD/DVD to ensure that the data is properly encoded.
Emailing Data to Yourself
Another option that many people don't think of is to email the data to yourself. With today's large-capacity sizes of both Web-based email services (thank you, Gmail!) and personal email services, you can generally send any data you need backed up via email with no worries about the capacity of the mail account. You do, however, still need to take into account that your email service probably has some limit on the size of attachments. For example, Gmail limits attachments to a maximum of 10MB.
To save data by email, simply use KMail (covered in Chapter 2) or Thunderbird, available via Knoppix → Internet. Set these up to use your POP or IMAP account, and then attach your recovered files and send the mail. If you use a Web-based email account such as Yahoo! or Gmail, you can simply use Firefox or another Web browser and attach the files as you would normally.
| Caution | Be aware that email is not typically an encrypted method of transmission, meaning that someone intercepting your files will be able to read the data. |
Copying Data over the Network
Knoppix includes the capability to transfer your important files over a network if that is the method you prefer. By far the easiest way to accomplish this is to have your Knoppix system run an SSH server for you. SSH provides the capability to interactively log into your Knoppix system as well as transfer files, all over an encrypted transmission, meaning that should anyone intercept your communication, he or she would have a very difficult time deciphering the actual data. If the system to which you are transferring the files resides on a Linux or Knoppix system, the capability to SFTP files is already built into the system. If you are transferring your files to a Windows system, you need to download an SFTP client (one recommend free version is WinSCP, available at http://winscp.net.)
| Note | For more about SFTP, see Chapter 3. |
To enable a remote Linux or Windows system to connect to the Knoppix system you want to back up, start the SSH server on the Knoppix system by selecting Knoppix → Services → Start SSH Server. A key used for encryption is generated in the window that opens. Enter a strong password, and then enter it the second time the same way. The password you enter here is used when logging into the system via SFTP, and it is case sensitive, so make sure that you remember your exact password.
You need to know your system's IP address (use the command ipconfig eth0 to determine your IP address; it is four sets of numbers separated by dots, such as 192.168.1.1). Using WinSCP or another SFTP/SCP client, connect to your Knoppix machine with the IP address. Enter knoppix as the username, and then enter the password you created earlier. Now you can navigate the filesystem to find the files you want to copy to the remote system using SFTP commands if you are connecting via the command line or by dragging and dropping if you are using a graphical application such as WinSCP.
EAN: 2147483647
Pages: 118