3.2. Setting Up File Sharing Services To configure a machine as a file server, open the Manage Your Server Wizard from the Start menu. Adding a file server role to a machine involves the following tasks.
- Configuring the machine as a file server
-
This process involves turning on file sharing and creating the first shared folder. Windows also creates a few of its own shares by default, which I'll discuss in more detail as the chapter progresses.
- Establishing disk space limits by enabling disk quotas, if necessary
-
Disk quotas are a simple way to limit and control the amount of disk space your users take up with their data. Quotas monitor and limit a user's disk space on a per-partition or per-volume basis; quotas do not stretch across multiple disks. The wizard can configure Windows to apply default quota settings that you select to any new users of any NTFS filesystem. This is not required to set up file sharing services, but you might find the feature useful.
- Turning on the Indexing Service, if necessary
-
The Indexing Service reads the contents of most files on the server and makes a catalog of their contents for easy search and retrieval at later points in time. Because the user interface for the Manage Your Server Wizard presents this option, I mention it here, but I cover it in detail in Chapter 13.
- Installing the File Server Management MMC console
-
This console snap-in provides an easy way to create, modify, edit, and generally administer shared folders, and I'll talk about it in this chapter.
- Creating shared folders and setting share permissions for each folder
-
Finally, you'll want to create the shared folders and apply permissions to them. After all, that's why you started the process, right?
Start up the Manage Your Server utility from the Start menu and click Add or remove a role. On the Server Role page, select File server and click Next. The Configure Your Server Wizard appears, as shown in Figure 3-1. Figure 3-1. The Configure Your Server Wizard 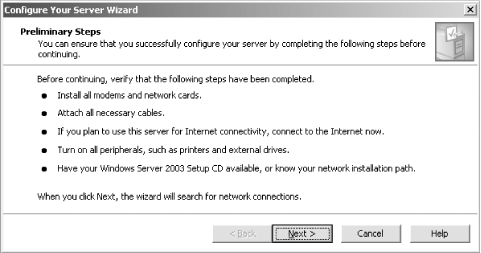
The following procedure steps you through the rest of the process. To assign disk space to a user on a particular disk, use disk quotas. The wizard will first ask you if you want to configure user disk quotas. To let users know when they have exceeded their disk quota, and to prevent them from using additional space, set a warning, or soft quota. This writes an error to the event log when the user exceeds a certain amount of space to let him know he's approaching his quota limit. Also, configure the final quota, or hard quota. Check the Deny disk space to users exceeding disk space limit checkbox to enable disk quotas; otherwise, Windows will simply track disk usage by user but will not enforce the limits you configured. You also can set Windows to write to the event log when a user exceeds his hard or soft quota, or even when he exceeds both. Figure 3-2 shows the quota configuration process. Figure 3-2. Configuring disk quotas 
Next, decide whether to enable the indexing service. If you turn on the service, users can search in files in different formats and languages, through either Search on the Start menu or the HTML pages they view in a browser. (More on that in Chapter 13.) Turn on the indexing service only if users will need to frequently and consistently search the contents of this particular server. The service requires a good bit of CPU horsepower and memory resources despite the enhancements made in Windows Server 2003, and it can slow network request performance if you leave it on. It's best to use it only if you need it. Figure 3-3 shows the indexing service configuration screen. Figure 3-3. Configuring the indexing service 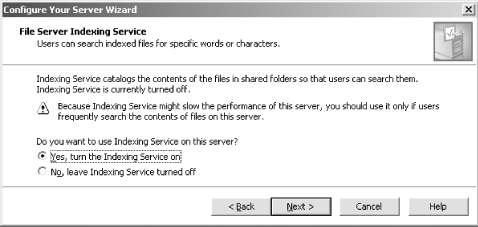
At this point, the wizard will summarize your selections thus far. Acknowledge this by clicking Next. Windows will install the File Server Management console, where you can access information on open shares, open files, and connections to the server, disk fragmentation analysis, and disk volume management tools. Then, the Share a Folder Wizard will be started to enable you to add your first shared folder to the new file server. I explain the procedure for using this wizard later in this section. Once the Share a Folder Wizard finishes, you will see the This Server Is Now a File Server page. Click the Configure Your Server log link to view the changes the wizard made to the machine. (Alternatively, you can find this file at %systemroot%\Debug\Configure Your Server.log.) Click Finish to finalize all the changes.
3.2.1. Creating a Share Manually Only members of the Administrators, Server Operators, or Power Users groups can share folders by default. However, you can configure network-based GP settings to restrict other users and groups from doing so as well. Shares created using Windows Server 2003 are, by default, configured to allow the Authenticated Users groupall users who logged into the machine or networkread-only access. This is a result of the new security consciousness at Microsoft; in previous releases, all users were allowed full control of a share by default, which made for some sticky situations on compromised machines. Share permissions are different from file- and folder-level permissions, which are more granular. File- and folder-level permissions (also known as NTFS permissions) are covered later in this chapter. If you have a smaller business with fewer employees and less emphasis on security, you might find simple share-level permissions sufficient for protecting content that should be confidential. However, in larger organizations, share-level permissions often don't provide enough manageability and flexibility. Also, their storage and shared folder hierarchies often are more complex than they are in smaller businesses, which makes administering share-level protection on lots of shares very tedious and unwieldy.  | Some file-sharing options might be limited if simple file sharing is enabled. When this option is enabled on workstations running Windows XP Professional, creating, managing, and changing permissions on shares is impossible to do remotely because all remote connections authenticate to that computer using the Guest account. It is recommended that, in a business networking environment, you disable simple file sharing. Consult a good Windows XP book for more information on simple file sharing under Windows XP. |
|
You can create a share in three ways: using the Share a Folder Wizard, using the Explorer GUI, and using the command-line. To share a folder using the Share a Folder Wizard, follow these steps: Launch the Share a Folder Wizard through the Manage Your Server utility. On the Folder Path page, select the folder for sharing. Click Browse to access a directory tree. Then, click Next. The Name, Description, and Settings page appears, as shown in Figure 3-4. Enter the following data for the new shared folder: Figure 3-4. Creating a shared folder manually 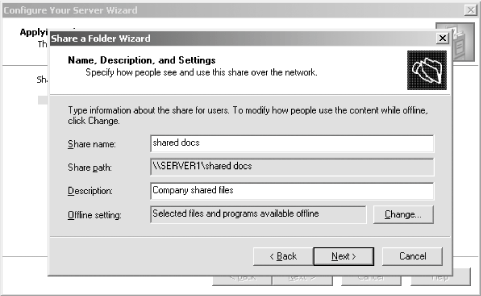
In Share name (a required field), type the name you want to use for the shared resource. This should be short and descriptive, such as "ACCNTG" for accounting or "SCRATCHPAD," so users can quickly see a share's purpose. In Description (an optional field), type a description of the shared resource. Descriptions can assist you, as an administrator, and your users with understanding the purpose of a share. Use something clear, such as "Accounting documents for Q3 1999" or "Inactive Proposals." In Offline setting, specify how you want to make the contents of the shared folder available to users when they are not connected to the network. Click the button to make further tuning adjustments. The three options are fairly self-explanatory: the first option gives the user control over which documents are available offline, the second makes all documents available, and the third prevents any documents from being used offline. Note that checking the Optimized for performance checkbox automatically caches documents so that users can run them locally, which is helpful for busy application servers because it lowers overall traffic to and from the server. After you finish, click Next. On the Permissions page, configure the permissions for the shared folder. Share permissions apply only to users who access the share from the network; users at the console still will be able to look at the contents of the share unless file-level NTFS permissions restrict them from doing so. The available permissions are as follows:
- All users have read-only access
-
Both administrators and normal users will only be able to read files from this share; no writing or modification is allowed.
- Administrators have full access; other users have read-only access
-
Members of the Administrators group retain full control over the share, including the ability to set new NTFS file permissions; everyone else has only read privileges. This is the best setting for a share that contains a program to be run over a network.
- Administrators have full access; other users have read and write access
-
All users can read and write. Only members of the Administrators group retain the ability to change NTFS file permissions, however.
- Use custom share and folder permissions
-
Using the custom permissions feature, you can assign specific permissions and deny permissions to users and groups. This is how a user would remove the default read-only access for all users, a wide-open door in effect that might not be desired for sensitive materials. Figure 3-5 shows the shared folder permissions page. Figure 3-5. The shared folder permissions page 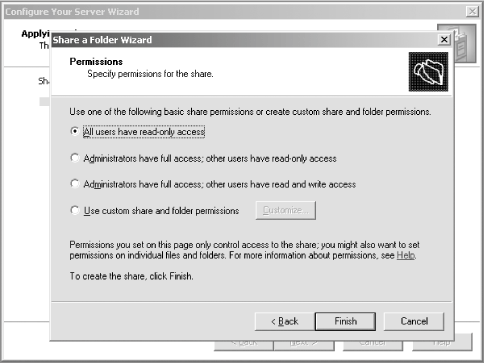
Click Finish when you're done. The wizard completes by showing the Sharing was Successful page. You can share another folder immediately by checking the When I click Close, run the wizard again to share another folder checkbox. Click Close to exit.
To share a folder using Windows Explorer, follow these steps: Find the folder you want to share, and right-click it. Select Sharing and Security from the context menu. Fill in the form: In Share name (a required field), type the name you want to use for the shared resource. This should be short and descriptive. In Description (an optional field), type a description of the shared resource. Descriptions can assist you, as an administrator, and your users with understanding the purpose of a share. In User Limit, enter the maximum number of users that can simultaneously connect to this share, or check the Maximum allowed checkbox to permit as many connections as your OS license allows. The best choice really depends on the purpose of the share, its contents, the hardware of your server, and the bandwidth on your network. The completed form is shown in Figure 3-6. Figure 3-6. Sharing a folder through Windows Explorer 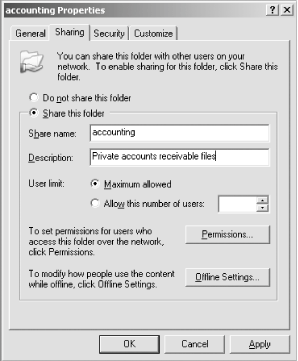
Click the Permissions button to tune the restrictions users have on this share. On that screen, click Add to select the users to whom the permissions you assign will apply, and then click their names in the top pane and select the appropriate permissions using the checkboxes in the bottom pane. Click OK when you're done. Click the Offline Settings button. Adjust the settings for how offline files are used for this share (see the descriptions later in this chapter), and then click OK. Click OK to finish sharing the folder.
To share a folder using the command-line, follow these steps: Open a command-line window by selecting StartRun, typing CMD, and pressing Enter. Type net share sharename=drive:path, where sharename is the name of the share and drive:path is the location of the folder to be shared. Add any switches you need to further customize the share. Here is a list of available switches.
- /GRANT:user,perm
-
This creates the share with a security descriptor that gives the requested permissions to the specified user. In place of perm, use READ for read-only access, CHANGE for read and write access, and FULL for full control of a share. You can use this option more than once to give share permissions to multiple users.
- /USERS:number
-
This sets the maximum number of users who can simultaneously access the shared resource.
- /UNLIMITED
-
This specifies that an unlimited number of users can simultaneously access the shared resource.
- /REMARK:"text"
-
This adds a descriptive comment about the resource. Be sure to enclose the text in quotes.
- /DELETE
-
This stops sharing the resource.
- /CACHE:Manual
-
This enables manual client caching of programs and documents from this share. /CACHE:Documents enables automatic caching of documents from this share. /CACHE:Programs enables automatic caching of documents and programs from this share. /CACHE:None disables caching from this share. (I provide a thorough description of each offline setting later in this chapter.)
Creating a Hidden Share You might need to share a resource but not make it publicly known. For example, the Payroll department might need its own file share, but the rest of the company doesn't require access to it, and in the interest of confidentiality, you might want to hide it from public display. You can do this by typing $ as the last character of the shared resource name. Users can map a drive to this shared resource by naming it explicitly (including the $ appended to the end), but the share is hidden in Explorer, in My Computer on the remote computer, and in the net view command on the remote computer. |
3.2.2. Default Shares Upon installation, Windows Server 2003 creates several default shares that serve various purposes. You can examine these using the Computer Management tool inside the Administrative Tools applet in the Control Panel. Open that applet, and then navigate through System Tools and Shared Folders in the left pane. Click Shares, and in the right pane, you will see all the shares that currently exist on that machine. Figure 3-7 shows this screen. Figure 3-7. The Shared Folders portion of the Computer Management applet 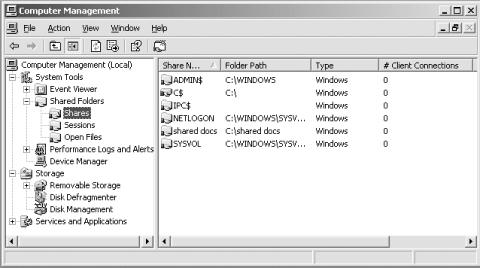
Let's step through the default shares and list their function and purpose.
- C$ and other similar drive letters
-
These shares are known as administrative shares, and they provide a quick way for you to, over the network, map a drive to a certain computer and inspect the contents of the drive. Windows Server 2003 creates one of these administrative shares for each local drive in a system. You can't get rid of these shares permanently because they are re-created upon reboot if they are not present. You can't adjust the share permissions on them either. Still, they're a handy tool in your toolbox for remote management and troubleshooting.
- ADMIN$
-
This also is an administrative share that maps directly to the location of the Windows Server 2003 system files; this is the same as the %systemroot% environment variable. This is useful for spreading out operating system updates, especially across different operating systems. Recall that Windows 2000 used \WINNT, whereas Windows Server 2003 uses good old \WINDOWS. If you write a script to pass a file to all of these servers, you don't have to account for this difference if you use ADMIN$ on each machine as the location.
- IPC$
-
This share is part of Windows Server 2003's method of sharing resources, not files, with other machines. Any type of remote management function other than sharing files uses this share.
- NETLOGON
-
Mandatory on domain controllers, this share is a place to put logon and logoff scripts, programs, and profile information for users to read and access before they are logged on to the network. It's located at %SystemRoot%\sysvol\domainname\SCRIPTS on the filesystem of the server.
- PRINT$
-
Print drivers that are shared to the network, usually for previous versions of operating systems, are stored in this share and requested by clients at the time of printer installation on the clients. It's located at %SystemRoot%\System32\spool\drivers on the filesystem of the server.
- SYSVOL
-
This is used for internal domain controller operations and shouldn't be modified or deleted. It's located at %SystemRoot%\Sysvol\Sysvol on the local filesystem of the server.
3.2.3. Publishing Shares to Active Directory By publishing shares to Active Directory, your users can use the Find feature on the Start menu on their Windows desktops to find remote shares based on their identifier or description. This is handy for using a new piece of simple software that's being run directly from the network. It is equally handy for retrieving an electronic PowerPoint presentation that might have been given earlier in the day. Note that you must use an account with domain administrator or enterprise administrator privileges to publish a share to Active Directory. To publish a share, follow these steps: From the Administrative Tools applet in the Control Panel, open Active Directory Users and Computers. Right-click the appropriate organizational unit (OU). Select Shared Folder from the New menu. Enter a name and description of the share. Enter the path (network location) to the folder you want to share, and then click Finish.
The share has now been added to the directory. 3.2.4. Using Shares from the Command-Line Sometimes it's inconvenient to use the Windows GUI to map a drivethis is a problem particularly in logon scripts. How do you use a batch file to tell the mouse pointer to move over to My Network Places? Instead, there's a better way. The net use command enables you to map any drive to any server on your network, and in some cases, outside networks, too. The syntax is: net use drive \\server\share
Here are some common examples that you should find useful. To map drive H to Lisa Johnson's home directory on server MERCURY: net use H: \\mercury\users\lmjohnson
To map the first available drive letter to the same directory: net use * \\mercury\users\lmjohnson
Sometimes you might need to connect to a share on a domain that isn't trusted by your home domain. If you have an account on that domain, you can use it to connect, like so: net use H: \\foreignmachine\sharename /user:foreigndomain\username
(If you need to use a password, you'll be prompted for it.) If you need to terminate a connection or map to a server, use the /d switch: net use \\mercury\users\lmjohnson /d
To disconnect all maps: net use * /d
To connect to a foreign machine (152.1.171.133 in this example) over the Internet or an intranet without relying on name resolution: net use H: \\152.1.171.133\c$
You also can use a different account with the IP address: net use H: \\152.1.171.133\c$ /user:hasselltech\hassell
And you can specify that this mapping be for the current session only and not be restored upon logon. This is a feature called map persistencykeeping the same mappings across login sessions, a big timesaver for your users. To do so: net use H: \\152.1.171.133\c$ /persistent:no
|