Section 11.2. Virtual Private Networks


11.2. Virtual Private Networks

A virtual private network, or VPN, provides a secure connection over the public network infrastructure. VPNs give an organization the same access capabilities for remote connectivity as owned or leased connections, but at a much lower cost. (Of course, leased lines have their own benefits, but as far as private access is concerned, VPNs are a good solution.) Today, companies look to VPNs for extranet and wide-area intranet services.

11.2.1. How It Works

VPNs encrypt data before sending it through the public infrastructure, and then they decrypt the data at the receiving end of the network. For additional security, you can encrypt originating and destination network addresses. The VPN provides a point-to-point connection between the remote user's computer, the VPN client, and the organization's server, with data being passed through a "tunnel" that shields the data from the public network. In a sense, the public network's logistics don't matter because the data looks as if you sent it across a dedicated private link. Although the pathway doesn't matter to the VPN user, that pathway's performance does matter.

VPNs based on Microsoft technology first used the Point-to-Point Tunneling Protocol (PPTP) to create a secure environment in which to tunnel through the network, while VPNs on Cisco equipment used the proprietary Layer 2 Forwarding (L2F) protocol. However, as the popularity of VPNs grew, each company merged the best parts of its standard with the other, and the Layer 2 Tunneling Protocol (L2TP) was born. L2TP is the modern VPN protocol and will be used in all examples in the remainder of this section.

11.2.2. Configuring the Routing and Remote Access Server

To begin our exploration of VPNs, let's first set up the Routing and Remote Access Service (RRAS), which controls all remote connections attempting to connect to your server. The RRAS effectively serves as the endpoint to connections coming to and from your servers, routing them through the proper subnets and gateways, answering remote connection requests and sending authentication credentials to trusted sources, and enforcing encryption requirements. Think of RRAS as the manager for all things related to remote connectivity with your server.

Your server will need two network cards for a basic, automated VPN configuration: one for connectivity to your internal network, and another for basic IP connections to the Internet. You can configure a VPN with only one network adapter, but you must do so manually. In this section, I will cover the former method, which does require two network adapters.

Some of the most common setup scenarios for RRAS are as follows.


NAT routing

NAT (an acronym for Network Address Translation) allows for one public, routable IP address to be shared by clients behind a router or firewall. In this scenario, each client has a private, nonroutable IP address and sends all traffic to the gateway, which replaces the private IP address with the public address. This is an efficient and reasonably secure way to provide multiple clients with a shared Internet connection.


NAT routing with VPN access

This scenario is the same as the previous configuration, with the exception that incoming VPN connection requests are supported. A private IP address is assigned to a successful VPN connection.


Secure private connection

A secure private connection is simply an encrypted tunnel between two endpoint connections. It does not provide any sort of client IP address assignment or routing through gateways to the Internet; it simply exists to securely connect two endpoints to each other.


Remote access endpoint

This scenario allows external clients to attempt to connect through dial-up or through a VPN to the current server. It simply functions as an "answering service," taking connection requests and providing remote access to the current server only.

Let's begin:

  1. From the Administrative Tools folder, open the Routing and Remote Access console.

  2. Right-click the server name in the left pane of the console, and select Configure and Enable Routing and Remote Access.

  3. The Routing and Remote Access Server Setup Wizard will appear. Click Next to move off the introductory screen.

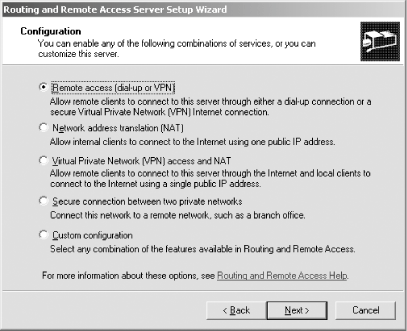
  4. The Configuration page will appear next, as shown in Figure 11-13. On this page, you can choose to configure a dial-up or VPN inbound connector, a NAT-based router, NAT with VPN, a secure connection between two remote sites, or a custom configuration consisting of any of the above. For our demonstration, select the first option, and click Next.

    Figure 11-13. The Configuration screen


  5. The Remote Access screen appears next. Choose here to offer a VPN connection by selecting the first option, and then click Next.

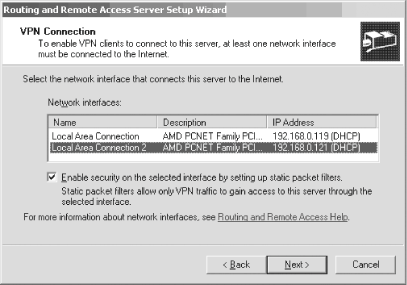
  6. The VPN Connection screen appears next, as shown in Figure 11-14. Here, you select the network card that connects to the Internetthe public interface. You also can choose for the wizard to automatically set up packet filters that stop all traffic except for VPN traffic from coming into the network through that card. Check the appropriate card, and then enable the packet filters, and click Next.

    Figure 11-14. The VPN Connection screen


  7. The IP Address Assignment screen appears next. Here, you select how to assign IP addresses to remote clientseither automatically from an existing DHCP server or a private address bank that RRAS generates itself (the first option), or from a select group of IP addresses that you specify (the second option). Use the first option, and click Next to continue.

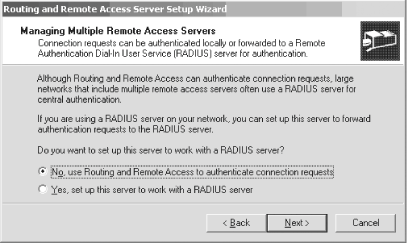
  8. The Managing Multiple Remote Access Servers screen appears next, as shown in Figure 11-15. Here, the wizard is asking if you want RRAS to be responsible for verifying usernames and passwords or if you want to delegate that to a RADIUS server. If you have multiple VPN connection points and use a RADIUS server to authenticate requests for these multiple points, choose Yes here. Otherwise, let RRAS handle authentication and choose the first option, No. Click Next.

    Figure 11-15. The Managing Multiple Remote Access Servers screen


  9. The summary screen appears next. Verify your settings, and then click Finish.

The RRAS service will be stopped and then restarted, and your new settings will be in place. You'll be dumped back to the RRAS console with the service now started and ready for business.

Now, just make sure the virtual VPN ports are ready for use by your clients. From the RRAS console, expand the node with your server's name and right-click the Ports entry. Select Properties from the pop-up context menu and you'll see the screen shown in Figure 11-16.

Figure 11-16. Double-checking port configuration
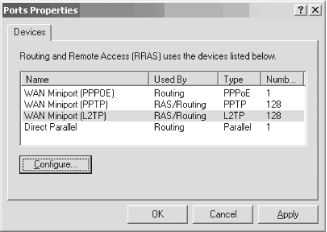

Select the WAN Miniport (L2TP) port, and then click the Configure button to ensure that inbound calls are allowed. You'll see the Configure Device screen appear, as shown in Figure 11-17.

Figure 11-17. The Configure Device screen
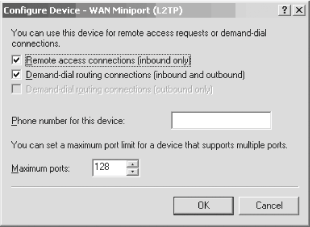

Make sure the first option, Remote access connections (inbound only), is checked. Then, in the Phone number for this device field, enter the public IP address for this VPN server. This address is the one clients will use from their remote locations to connect to your corporate network. You also can adjust upward or downward the number of connections you want to make availableanywhere from 1 to 128 simultaneous VPN tunnels. Click OK when you're finished.

Congratulations! Your RRAS server is set up to handle incoming VPN connections.

11.2.2.1 Granting access to users

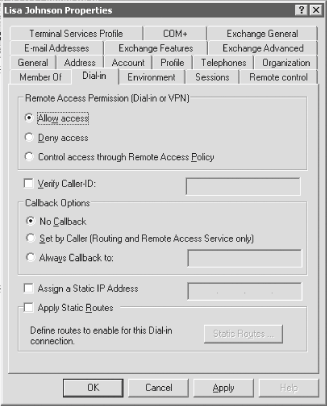
Before your users can successfully use a VPN connection to your new RRAS server, you need to give them permission to dial in. You can do this through Active Directory Users and Computers. Simply open the tool and navigate through the console to the user for whom you want to enable access. Then right-click that user and select Properties.

Finally, navigate to the Dial-in tab. Click the Allow access option, which will grant access permission to the user. This is shown in Figure 11-18.

Figure 11-18. Granting permission to a user

11.2.3. Authentication and Encryption Methods

VPNs in Windows Server 2003 support several different authentication and encryption methods, which you can configure on each RRAS server by right-clicking the server name in the left pane of the RRAS console and selecting Properties. The Security tab is command central for these settings, as you can see in Figure 11-19.

Figure 11-19. The Security tab
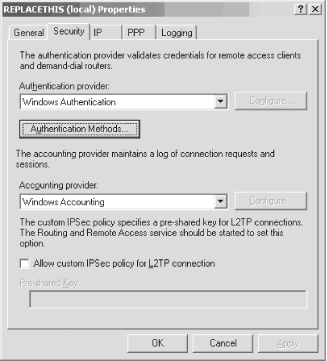

You can choose the different protocols by which to authenticate a user by clicking the Authentication Methods button. Doing so brings up the Authentication Methods screen, as shown in Figure 11-20.

Figure 11-20. The Authentication Methods screen
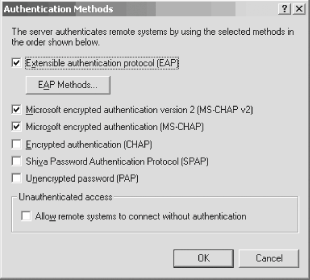

On this screen, you can select the different authentication methods to use when a server is touched by a user attempting to connect. A short discussion of each method follows.


Extensible authentication protocol (EAP)

EAP is a protocol that allows you to "plug in" different schemes for authenticating a user. EAP in Windows Server 2003 supports the MD5-Challenge method, Smart Cards, Certificates (with TLS), Protected EAP (PEAP), and Secure Password (EAP-MSCHAPv2). The great aspect of EAP is that when newer, more secure authentication methods are discovered, you simply can plug them into your existing architecture using EAP.


Microsoft encrypted authentication version 2 (MS-CHAP v2)

MS-CHAP v2 allows you to encrypt an entire connection, not just the initial authentication portion, which provides a more robust way to transmit sensitive information over a VPN.


Microsoft encrypted authentication (MS-CHAP)

Plain-vanilla MS-CHAP is simply a way to encrypt the initial authentication of a session. The remainder of the session is passed unencrypted. Although MS-CHAP v2 is more secure, its support across networking gear is not as broad; MS-CHAP is less secure but is an Internet standard and is supported by a wide variety of equipment.


Shiva Password Authentication Protocol (SPAP)

SPAP is a vendor-specific authentication method used when Shiva LAN Rover clients and servers are attempting to connect to your network. Use this option only if that is the case.


Unencrypted password (PAP)

The Password Authentication Protocol, or PAP, is one of the least secure options available because it passes all authentication in clear text. There isn't any sort of password encryption, so all someone needs to do is sniff traffic between the client and your server to obtain credentials that likely are valid. This isn't a good choice except in isolated test labs.


Unauthenticated access

You also can choose to allow any systems to connect without any sort of authentication. Although in the past it was possible to make this reasonably secure with some sort of caller ID or callback verification, I no longer recommend this option. It is just too much of a security hole in today's Internet environment.


    Learning Windows Server 2003
    Learning Windows Server 2003
    ISBN: 0596101236
    EAN: 2147483647
    Year: 2003
    Pages: 149

    flylib.com © 2008-2017.
    If you may any questions please contact us: flylib@qtcs.net