Creating a Source Adapter
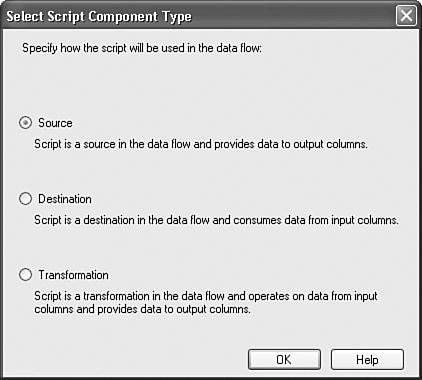
| When you drop the Script Component onto the Data Flow designer, the first dialog box you'll see is the one shown in Figure 21.1. You can choose the type of component the script will implement from one of three options: Source, Destination, and Transformation. Figure 21.1. The Select Script Component Type dialog box
Select the Source option and the click the OK button. Double-click on the component and select the Inputs and Outputs node in the left pane. If you open the Output node in the middle pane, you'll notice that there are no defined output columns on Output 0. Also, there are no inputs. Creating the ComponentThe source's responsibility is to get data from the medium where the data is stored and place it into the buffer for the downstream transforms to process. The default template for the transform and destination adapters provides a function for processing rows on an input. This is the fundamental difference between sources and other components. Sources have no inputs, only outputs, because they are the components that generate rows and place them in the buffer. To get to the code, select the Script node in the left pane and click the Design Script button. You should see the default template code, as follows: Public Class ScriptMain Inherits UserComponent Public Overrides Sub CreateNewOutputRows() ' Add code here End Sub End Class You can also override several other methods if you want, as explained in the following section, but this is the one method you must implement in sources and it's where you add rows to the outgoing buffer. Implementing CreateNewOutputRowsIt's important to understand that sources block on the call to CreateNewOutputRows, which means that the method is called exactly once on each source adapter for each execution of the package. So, the Data Flow Task knows that the source adapter is done adding rows only when it calls the buffer's SetEndOfRowset method and returns from the call. Consequently, for source adapters, you only need to implement this one method. Tip As a rule, if you don't call end of rowset, the Data Flow Task does not know if the transform is finished adding rows to the output buffer and, therefore, never finishes. However, in the Script Component there is an exception. The base class sets the end of rowset automatically when you return from the CreateNewOutputRows method. So, strictly speaking, you don't need to call SetEndOfRowset, but you should as a matter of practice. Implementing PreExecute and PostExecuteThe PreExecute and PostExecute methods are not strictly necessary, but if you have any costly startup or shutdown processing that needs to happen, you can do it here. These two methods are useful for any pre- and postprocessing you might want to perform, such as creating member variables, and so on. The idea is that you can initialize and instantiate objects in the PreExecute method and release the objects in the PostExecute method. Tip To see what methods you can override, type in the words "Public Overrides" and then press the spacebar; IntelliSense pops up with a list of available methods. Implementing AcquireConnections and ReleaseConnectionsAs a rule, you should use connection managers to access files or servers and you should implement this method to call AcquireConnection on each connection manager you're using. By implementing this method, you ensure that you're calling AcquireConnections at the right time because the Data Flow Task calls AcquireConnections at the appropriate time. Connections should only be established in the AcquireConnections method. AcquireConnections is called during both component design and execution. Any connection established during this method should be stored in a member variable and released in the ReleaseConnections method. Creating the Email SourceMicrosoft provides an interop assembly for working with Outlook. The assembly allows you to control Outlook and retrieve email, task, schedule, and other Outlook data into your code using the Outlook object model. You'll use it in the Script Component to retrieve email. Caution If you have Microsoft Office 2003 installed, this should work for you. The Email Source has not been thoroughly tested and you might experience issues with other versions of Office. Adding the OutputsWhen creating the source, you must first add at least one output. When you create an output, the Script Component generates the code for accessing the buffers so that you can add data row by row. The following steps explain how to add an output:
The Script Component generates code for each of these columns. As you'll see in a minute, it creates accessor functions as well so that it is very easy to access each column's value. Open the script by selecting the Script node in the left pane and clicking the Design Script button. Adding a Reference to the Interop AssemblyThe first thing you need to do is add a reference to the Outlook interop assembly so that the Script Component can interact with the native Outlook object model library.
Adding RowsNow you're ready to implement the CreateNewOutputRows method. This method is only called once. When you return from this method, the data flow considers the source complete and begins clearing out buffers. Most of the code in this source is just to get the Outlook objects set up and ready to start reading email. The following code retrieves the Inbox object: ' Create an Outlook application object Dim oApp As Outlook.Application oApp = New Outlook.Application() 'String used for comparison with mail item. Dim sClassComp As String = "IPM.Note" 'Get Mapi NameSpace. Dim oNS As Outlook.NameSpace = oApp.GetNamespace("MAPI") 'Get Messages collection of Inbox. Dim oInbox As Outlook.MAPIFolder ' Get the default inbox folder oInbox=oNS.GetDefaultFolder(Outlook.OlDefaultFolders.olFolderInbox) ' Get the inbox messages Dim oItems As Outlook.Items = oInbox.Items Me.Log("Total email items : " + oItems.Count.ToString(), 1001, Nothing) At this point, you have the Inbox and the collection of email objects. You are ready to start creating new rows and reading the contents of the email into the columns, as shown in the following code: 'Loop each message. Dim oMsg As Outlook.MailItem ... For i = 1 To oItems.Count oMsg = oItems.Item(i) ... Tip This code is simplified to make it easier to read; however, if you were to do this for a production solution, the code to this point should be placed in the PreExecute method and cleaned up in the PostExecute method. As a general rule, expensive, one-time, and preparation logic should be handled in the PreExecute and PostExecute methods. Next, as you loop through the collection of email objects, you'll create a new row for each. The way you create a new row is to call the buffer object AddRow() method. The buffer object name is a combination of the output name followed by the word "Buffer." In this case, the output is named "Email," so the buffer object name is "EmailBuffer." As mentioned earlier, the Script Component creates special accessor methods for you to get and set the values of the columns in each row as you add it. The following code adds the Subject line: ' Add the subject EmailBuffer.Subject = oMsg.Subject For each of the columns, you have some code that retrieves the value from the Outlook message object and places it into the buffer object. Note Note that Binary Large Object (BLOB) columns must be added as an array of bytes. For certain types, you need to convert the data into an array of bytes and then use the column's AddBlobData method to insert the array. When retrieving data from BLOB columns, you need to use the GetBlobData method. That's how you create a source. Simple, isn't it? |
EAN: 2147483647
Pages: 200