Let Others Access Your Resources
|
| < Day Day Up > |
|
The other side of the networking equation is sharing the resources on your Mac so that others can use them. This includes sharing your files, folders, and disks, as well as sharing your printers and other resources, such as an Internet connection.
Share Your Folders
Mac OS X makes sharing your folders with other users as straightforward as possible. The procedure for sharing with Mac users differs from sharing with Windows users. You start both sharing processes, however, from the Sharing sheet in System Preferences:
-
Open
 and click System Preferences. The System Preferences window will be displayed.
 -
Click Sharing. The Sharing sheet will be displayed.
-
Click the Services tab if it isn’t displayed (see Figure 10-4).
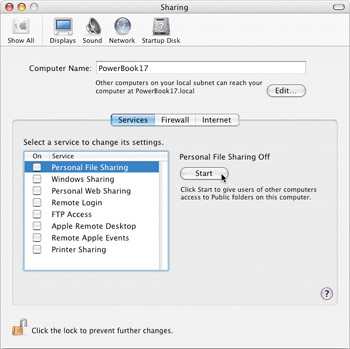
Figure 10-4: The Sharing sheet in System Preferences lets you specify what to share on the network.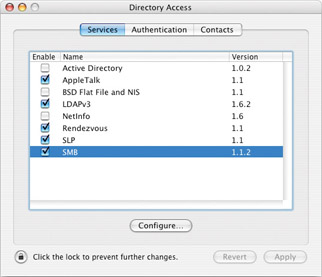
Figure 10-5: Use Directory Access to tell Mac OS X which workgroup your Mac belongs to. -
Check the name displayed in the Computer Name text box. If you want your Mac to appear on the network under a different name, click Edit, type the new name, and click OK.
To connect to a folder that a Windows computer is sharing, use the procedure for connecting to a SMB/CIFS shared folder. Before you can connect, however, you must set up sharing on the Windows computer. To make sharing easier, you should also use the Directory Access Utility to tell Mac OS X which workgroup your Mac belongs to.
Share a Folder on Windows
-
On the Windows computer, click Start | My Computer. A Windows Explorer window will be displayed showing the My Computer view.
-
Navigate to the folder you want to share.
-
Right-click the folder and click Sharing And Security on the shortcut menu. The Properties dialog box for the folder will be displayed, with the Sharing tab foremost.
-
Select the Share This Folder On The Network check box.
-
If necessary, change the default name in the Share Name text box to describe the shared folder more clearly. You must keep the name to 12 characters or fewer; otherwise, Mac OS X will not be able to access it.
-
Select the Allow Network Users To Change My Files check box if you want network users to be able to change the files rather than just read them.
-
Click OK. Windows will close the Properties dialog box and apply the changes.
-
Open File and click Close to close the Windows Explorer window.
Specify Your Windows Workgroup
To tell Mac OS X which workgroup to connect to:
-
Activate the Finder.
-
Open Go and click Utilities. A Finder window showing the Utilities folder will be displayed.
-
Double-click Directory Access. Directory Access will open.
-
Click the Services tab if it isn’t displayed (Figure 10-5).
-
If the controls are grayed out, click the Lock icon, enter your password in the Authenticate dialog box, and click OK.
-
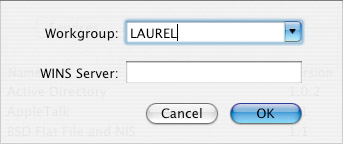
Double-click the SMB item to display the dialog box shown here:
-
Choose or type the workgroup in the Workgroup drop-down list.
-
Click OK.
-
Click the Lock icon if you want to lock Directory Access again.
-
Click Directory Access | Quit Directory Access to close Directory Access.
Sharing Folders with Other Macs
Mac OS X provides folders specifically for sharing files with other users securely. In each user account that you set up, Mac OS X creates a Public folder that’s accessible to other users but that can’t be changed by them. By putting files in this folder, which you’ll find in your Home folder (~/Public, where ~ is UNIX shorthand for your Home folder) and turning on Personal File Sharing (see the following section), you can provide them to other network users. Each Public folder also contains a Drop Box folder (~/Public/Drop Box) that other users can drop files in, even though they’re not allowed to see the contents of the folder (let alone access them).
Turn On Personal File Sharing
To turn on Personal File Sharing:
-
Click Personal File Sharing in the Select A Service To Change Its Settings list. (Just click the entry, not its check box. Selecting the check box starts or stops the service.)
-
Click Start. Mac OS X makes the contents of your Mac’s Public folders available on the network.
| Tip | Remember to turn off sharing (click the Stop button that replaces the Start button on the Sharing sheet) when you want to stop sharing your folders on the network. |
Users of other Macs can see your Public folder when they:
-
Activate the Finder.
-
Click Network. Aliases for the servers on the network will be displayed.
-
Double-click the alias that represents your Mac.
-
In the resulting dialog box, double-click the volume with your name. Mac OS X displays a Finder window showing the contents of your Public folder, including the Drop Box folder (to which users can drag files to make them available to you).
Share Your Folders and Printers with Windows Users
To share your folders and printers with Windows users, click the Windows Sharing entry (not the check box) in the Select A Service To Change Its Settings list, and then click Start. Windows XP users can then access your Mac when they:
-
Open Start and click My Network Places.
-
Click View Workgroup Computers in the Network Tasks pane.
-
Double-click the entry for your Mac.
-
Enter the name and password in the Connect To dialog box, and then click OK. The Explorer window lists the shared folders and printers available on your Mac.
Share Your Printers
You can share the printers attached to your Mac with other users of your network. To share the printers with other Mac users:
-
Open
and click System Preferences. The System Preferences window will be displayed. -
Click Sharing. The Sharing sheet will be displayed.
-
Click the Services tab if it isn’t displayed.
-
Click Printer Sharing in the Select a Service To Change Its Settings list box, and then click Start.
To share your printers with Windows users, follow the procedure described in “Share Your Folders and Printers with Windows Users,” earlier in this chapter.
Share Your Internet Connection
Chapter 4 describes how to set up a dial-up Internet connection. Once you’ve made such a connection, you can share it with other computers on the network by using Mac OS X’s Internet Sharing feature. You can also use Internet Sharing to share a broadband connection that connects directly to your Mac rather than connecting to the hub, switch, or router on your network. The Mac that runs the Internet connection is called the “host,” and the other computers that use the connection are “clients.” Both the host and the clients need to be set up independently.
Configure the Host
To configure the host for sharing the Internet connection:
-
Open
and click System Preferences. The System Preferences window will be displayed. -
Click Sharing. The Sharing sheet will be displayed.
-
Click the Internet tab (see Figure 10-6).
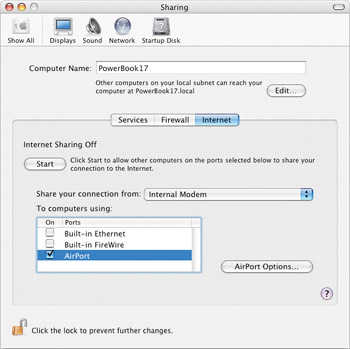
Figure 10-6: Set up Internet sharing on the Internet tab of the Sharing sheet in System Preferences. -
In the Share Your Connection From drop-down list, select the network connection that you’re using to connect to the Internet:
-
Select Internal Modem for a dial-up connection.
-
Select Built-In Ethernet for a broadband connection connected to your Mac via Ethernet.
-
-
In the To Computers Using list box, select the check box for each network interface you’ll use for sharing your Internet connection with your other computers. For example, select AirPort if you’ll use an AirPort connection to share the Internet connection.
-
If you’re sharing over an AirPort, click AirPort Options and set options in the resulting dialog box (see Figure 10-7). You’ll recognize these options (for naming the network, choosing the channel, and applying encryption) from the Computer To Computer dialog box (discussed in “Set Up an Ad-Hoc Wireless Network” in Chapter 9). Click OK to close this dialog box and return to the previous dialog box.
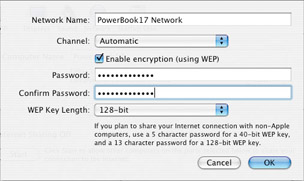
Figure 10-7: Choose wireless network options if you’re sharing your Internet connection via AirPort.Note You can select multiple connections in the To Computers Using list box. For example, if you have a combination wired and unwired network, you might select both Built-In Ethernet and AirPort. You can’t use the same connection as you’re using to connect to the Internet.
-
Click Start. Mac OS X will display a message box warning you that sharing your Internet connection may disrupt your network settings.
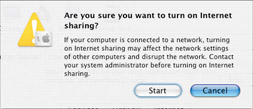
Note To stop sharing your Internet connection, click Stop on the Internet tab of the Sharing sheet in System Preferences.
-
Click Start. Mac OS X starts the sharing.
-
If your Mac is configured to go to sleep, click Energy Saver and configure it to not go to sleep. (If your Mac goes to sleep, the other computers will not be able to access the Internet through the shared connection.)
-
Click System Preferences | Quit System Preferences to close System Preferences.
Configure the Clients
-
To configure each client Mac to use the shared Internet connection:
-
Open
and click System Preferences. The System Preferences window will be displayed. -
Click Network. The Network sheet will be displayed.
-
In the Show drop-down list, select the item for the connection you’re using to share the Internet connection. This example uses AirPort.
-
Click the TCP/IP tab button.
-
Click the Configure IPv4 drop-down list and click Using DHCP. This setting will make your Mac request its IP address from the Mac that’s sharing the Internet connection.
-
Click Apply Now.
-
Click System Preferences | Quit System Preferences to close System Preferences.
|
| < Day Day Up > |
|
EAN: 2147483647
Pages: 68