Chapter 7: Working with Multimedia
|
| < Day Day Up > |
|
Multimedia is the combination of audio and video. Mac OS X, as an operating system, has to be able to handle audio and video and accept their input from various different devices. In addition, the iLife suite included with Mac OS X has major applications that enable you to work with multimedia and write these files onto CDs or DVDs. This chapter looks first at sound by itself, then at video with sound.
Work with Audio
Audio is sound. Mac OS X works with and uses sound in several ways, the simplest being to alert you to various events, such as when you dump an object into the Trash, receive an e-mail message, or try to take an action that isn’t possible. “Change Sounds,” in Chapter 2, shows you how to customize the use of sound for these purposes.
The second use of sound is to entertain or inform you—allowing you to listen to music or lectures from CDs, Internet Radio, or another Internet site. This use of sound is the subject of this section, together with the third use of sound—to express yourself audibly.
To choose what Mac OS X does when you insert a CD or DVD:
-
Open
 and click System Preferences. The System Preferences window will be displayed.
 -
Click CDs & DVDs. The CDs & DVDs sheet will be displayed (see Figure 7-2).
-
Use the five drop-down lists to choose what Mac OS X should do when you insert a blank CD, a blank DVD, a music (audio) CD, a picture CD, or a video DVD.
-
Click System Preferences | Quit System Preferences to close System Preferences.
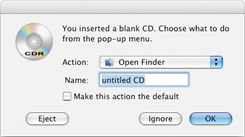
The When You Insert A Blank CD and the When You Insert A Blank DVD drop-down lists offer an Ask What To Do choice that makes Mac OS X display a dialog box asking you what to do (as in the example here). From this dialog box, you can choose which action to take with the CD or DVD.
Play CDs
Playing an audio CD is as easy as inserting the CD in an optical drive. When you insert an audio CD, Mac OS X takes the default action for CDs, which is to launch iTunes (or activate iTunes if it’s already running) so that you can play the CD or copy it to your Mac’s hard disk. You can change Mac OS X’s default actions for optical discs; see the “Configuring Actions for CDs and DVDs” QuickSteps on this page.
How you insert a CD depends on the optical drive in your Mac:
-
In a slot-loading optical drive (such as those used on PowerBooks, iBooks, and some desktop Macs), you simply slide the CD into the slot until the mechanism grabs the CD and pulls it in the rest of the way.
-
In a tray-style drive (such as those used on iMacs and eMacs), press the eject button on your keyboard or (in some Macs) the Eject button on or near the drive itself to make the tray appear, put the CD in the tray, and then press the same button to close the drive.

After you insert the CD, iTunes will automatically look it up in the Gracenote CDDB (CD Database) if your Mac is connected to the Internet. If the CD is widely distributed, iTunes will display a listing of tracks on the CD along with their titles and artists. iTunes will select all tracks to play (the check marks on the left). Click the Play button in the upper left and the first track will begin to play. On your screen iTunes should look like Figure 7-1, shown with a CD inserted and playing.
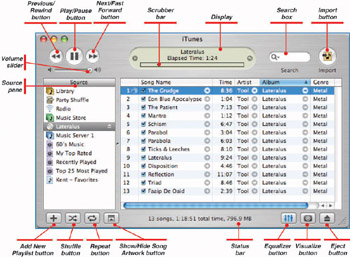
Figure 7-1: iTunes lets you easily play music CDs.
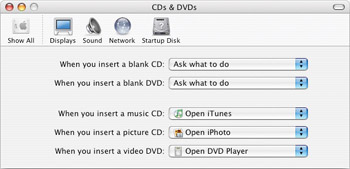
Figure 7-2: Use the CDs & DVDs sheet in System Preferences to tell Mac OS X how to handle CDs and DVDs you insert.
You can easily control iTunes:
-
Click the Play/Pause button to start the selected song playing and to pause play (Play becomes Pause after you start playing a track).

-
Click the Previous/Rewind button to move to the previous song. Click Previous/Rewind and hold down the mouse button to rewind through the current song.
-
Click the Next/Fast Forward button to move to the next song. Click Next/Fast Forward and hold down the mouse button to fast forward through the current song.
-
The Scrubber bar displays a diamond that you can drag to move quickly through the current song.
-
Drag the Volume slider to change the volume iTunes is outputting. (The volume control on your Mac controls the overall volume output.)
-
The Search box allows you to type the criterion for selecting just the songs that you want to play.
-
The Source pane allows you to switch among different music sources: your Music Library (the Library item), Party Shuffle (which selects music automatically for you), Internet radio (see “Listen to Radio Stations,” later in this chapter), any CD that’s loaded, any music libraries other iTunes users are sharing, and the playlists you’ve created. Click Add New Playlist to create a new playlist.
-
Click the Import button to copy the CD in your optical drive to your Mac. (See “Copy CDs to Your Mac,” later in this chapter.)
-
Click the Shuffle button to randomize the order of the songs. Click it again to restore the normal order.
-
Click the Repeat button once to repeat all the songs in the current CD or playlist. Click it again to repeat just the current song. Click it a third time to turn off repeating.
-
Click the Show/Hide Song Artwork button to toggle the display of the picture or pictures associated with the current song. Songs you download from the iTunes Music Store typically have artwork. For other songs, you can add your own pictures manually.
-
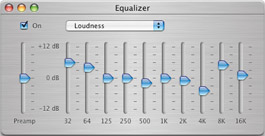
Click the Equalizer button to display the Equalizer window (shown here), in which you can apply both preset equalizations and custom equalizations to change the sound of the songs. Click the Close button (the red button) to close the Equalizer window when you’ve finished using it.
-
Click the Visualizer button to display visualizations, automatically generated graphics to accompany the music. To control the size of the visualizations, open the Visualizer menu and choose how you would like the visualizations displayed—Small, Medium, or Large. Open the Visualizer menu and choose Full Screen to display your chosen size of visualizations full screen; press esc to cancel full-screen visualizations.
Control the Volume
You can control your Mac’s audio volume in several ways:
-
Turn the physical volume control on your receiver or speakers.
-
If your Mac’s keyboard includes volume keys, press them to change your Mac’s overall output volume. For example, on most PowerBooks and iBooks, you can press f3 (without pressing the fn key) to mute the sound, press f4 to reduce the volume, and press f5 to increase the volume. These same keys are across the top of the numeric keys on the right of the many Apple desktop keyboards.
-
Click the Volume icon on the menu bar and drag the slider to set the volume.
Note If the Volume icon isn’t displayed on the menu bar, open
and click System Preferences, click Sound, select the Show Volume In Menu Bar check box, and then click System Preferences | Quit System Preferences. -
Drag the Volume slider in iTunes itself. Changing the volume in iTunes changes iTunes’ output volume but doesn’t change your Mac’s overall output volume. So if, for example, you turn the volume in iTunes up to its maximum setting but your Mac’s overall output volume is set very low, the music output will be low.

-
Drag the Output Volume slider on the Sound sheet in System Preferences (open
and click System Preferences, and then click Sound). This is the least convenient method of changing the volume unless System Preferences is already open.
Listen to Radio Stations
iTunes’s Radio feature lets you listen to radio stations around the world that broadcast their programs across the Internet, either in addition to conventional broadcasting or instead of it. Internet radio works best over a broadband connection that delivers at least 128 Kbps (see Chapter 4 for details of Internet connections), but you can also listen to lower-quality radio broadcasts over a dial-up connection.
| Note | The quality of Internet radio is controlled by the bitrate used—the amount of bits used for each second of audio, measured in kilobits per second (Kbps). 128 Kbps is considered high quality; 64 Kbps and 56 Kbps, around FM-radio quality; and 32 Kbps and 24 Kbps, low quality (but adequate for spoken audio). For Internet radio to play without interruptions, the bitrate of a station must be less than the bitrate supplied by your Internet connection. For example, if you have a 768 Kbps Internet connection, you can easily play 128 Kbps stations. If you have an analog dial-up connection (which typically delivers 48 Kbps or less), you won’t be able to play stations faster than 32 Kbps without interruptions. |
To use the radio:
-
If iTunes isn’t running, open it by clicking the iTunes icon on the Dock.

-
Click Radio in the Source pane. iTunes will display the available categories of radio stations.
-
Click the right-pointing gray triangle on a category to expand it (see Figure 7-3). Click the resulting down-pointing gray triangle to collapse the category again.
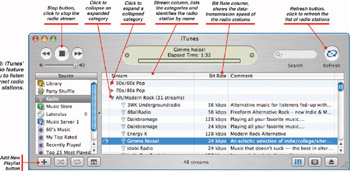
Figure 7-3: iTunes’ Radio feature allows you to listen to Internet radio stations. -
Double-click a radio station to start it playing.
-
Click the Stop button to stop the radio.
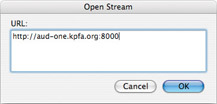
You can also open MP3 audio streams that iTunes doesn’t list. To do so, open Advanced and click Open Stream, type or paste the stream address in the Open Stream dialog box (shown here), and click OK. Add the stream to a playlist so that you can access it more easily next time.
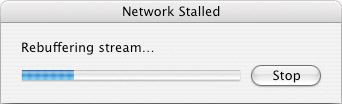
| Tip | Click the Bit Rate column heading to sort the stations in ascending order by bitrate. Sorting this way can help you identify the stations using the bitrates you prefer (or that your Internet connection can handle). If the radio frequently stops and iTunes displays the Network Stalled dialog box (shown here), you need to switch to a lower-bitrate station. |
Buy Music from the iTunes Music Store
If you’re planning to buy music online for use with the Mac, your first stop should be Apple’s iTunes Music Store, which is tightly integrated with iTunes. The iTunes Music Store offers a wide selection of music—more than 700,000 songs at this writing—for around $0.99 a song.
| Tip | To access your favorite radio stations more quickly, add them to a playlist. Click the Add New Playlist button, type a name (for example, My Radio Stations) in place of the default name, and press return. Then drag each of your favorite radio stations to the playlist to add them. When you want to play a radio station, click the playlist to display its contents, and then double-click the radio station you want. |
To use the iTunes Music Store, click Music Store in the Source pane. iTunes will access the iTunes Music Store and display its home page (see Figure 7-4). From here, you can browse or search to find songs that interest you. Double-click a song to play a 30-second preview of it and help you decide whether you want to buy it.
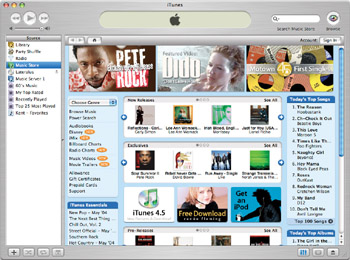
Figure 7-4: The iTunes Music Store offers more than 700,000 songs for purchase.
Before buying a song, you’ll need to create an Apple account and specify the details of the credit card with which you want to pay. When you click a Buy Song link, the iTunes Music Store walks you through the process of creating an account.
Locate Music on the Internet
Apart from Internet radio and the iTunes Music Store, there are many other sources of music on the Internet. Some locations, such as the Internet Underground Musical Archive (IUMA; www.iuma.com), provide legal audio files for free download; others provide illegal audio files for free download; and an ever-increasing number of online music stores sell legal audio files for download.
| Note | iTunes 4.5 and later versions enable you to import files in the Windows Media Audio (WMA) format and convert them to the AAC format. This feature works only with unprotected WMA files, not with the protected WMA files that most of the major online music stores other than the iTunes Music Store sell. |
At this writing, major online music stores include BuyMusic.com (www.buymusic.com), Walmart.com (www.walmart.com), MusicMatch Downloads (www.musicmatch.com), RealPlayer Music Store (www.real.com/musicstore), and Listen.com RHAPSODY (www.listen.com). These stores provide an increasing variety of music—but all are aimed at users of Windows computers and do not work with the Mac. Smaller online music stores, such as Wippit (www.wippit.com), offer some music in the widely used MP3 format, which you can use with iTunes on the Mac.
Copy CDs to Your Mac
iTunes gives you the ability to copy songs from your CDs to your hard disk, to build and manage a library of music, and to copy this material to recordable CDs or recordable DVDs. To copy from a CD:
| Tip | Copying songs from a CD to digital files on your computer is usually much quicker than playing the CD in real time. Although iTunes stores the songs in a compressed format, the song files take up a lot of space on your hard disk if you create a large music library. You can adjust the settings by opening the iTunes menu, clicking Preferences, and then clicking the Importing button to display the Importing tab. iTunes’ default settings are to use the AAC (Advanced Audio Coding) format and the 128 Kbps bitrate, which delivers high audio quality at an acceptably compact file size. For higher audio quality, choose a higher bitrate; for smaller files, choose a lower bitrate. For the highest quality audio in compressed files, use the Apple Lossless Encoder format. |
-
Insert the CD from which you want to copy songs. Mac OS X will automatically open iTunes. If iTunes doesn’t automatically display the CD’s contents, click the CD’s entry in the Source pane.
-
If you have an Internet connection, iTunes will automatically connect to the Gracenote CDDB (CD Database) music server and download the CD’s details.
-
iTunes will automatically select the check boxes for each song the CD. Clear the check boxes for any songs you don’t want to copy.
Note The material on most CDs and DVDs is owned and copyrighted by some combination of the composer, the artist, the producer, and/or the publisher. Copyright law prohibits using the copyrighted material in ways that are not beneficial to the copyright holders, including giving or selling the content without giving or selling the original CD or DVD itself. iTunes provides the ability to copy copyrighted material to your hard disk and then to a recordable optical disc or a portable player (such as an iPod) with the understanding that the copy is solely for your own personal use and that you will not sell or give away copies.
-
Click Import in the upper-right corner. iTunes will start copying the audio from the CD (see Figure 7-5) and storing it in compressed audio files on your hard disk.

Figure 7-5: iTunes enables you to copy songs from CDs to compressed files on your hard disk so that you can build a music library. -
When the copying is finished, click the Eject button to eject the CD.
-
If you’ve finished using iTunes, open the iTunes menu and click Quit iTunes to close it.
| Caution | To prevent people from violating copyright law, some CDs (and most DVDs) are protected to make copying difficult. Such CDs typically carry a warning, such as “Copy Protected,” or a notice such as “Will not play on PC or Mac.” Don’t put such CDs in your Mac, because it may be unable to eject them. Even if the copy protection doesn’t work and your Mac can copy the CD, it’s illegal to do so because of provisions in the Digital Millennium Copyright Act (DMCA). |
Organize Music
Once you have copied several CDs and have, perhaps, downloaded other songs to your hard disk, you will want to organize them. iTunes’ Music Library feature helps by automatically indexing the songs you add to your Music Library. To view your Music Library, click Library in the Source pane.
| Tip | When playing a playlist, you can randomize the order of the songs by clicking the Shuffle button once. |
The easiest way to browse through your Music Library is to use the Browser panes at the top of the window (see Figure 7-6). You can toggle the display of the Browser panes by clicking the Browse button (shown here) in the upper-right corner when the Library is displayed.
![]()
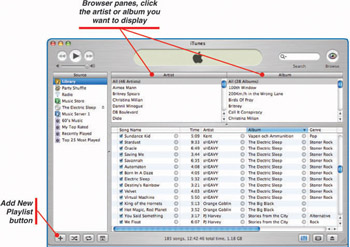
Figure 7-6: The Music Library provides a way to manage the songs on your Mac.
| Tip | You can also create a smart playlist—a playlist that automatically selects its own contents. Open File, click New Smart Playlist, and then work in the Smart Playlist dialog box. You can create one or more conditions to match, set a limit on the number of songs, and choose whether to use live updating to automatically update the playlist as your Music Library changes. |
You can also combine songs into a new playlist so that you can play songs from different CDs in your preferred order. To create a new playlist:
-
Click the Add New Playlist button. iTunes will add a new entry in the Source pane and display an edit box around it.

-
Type the name for the playlist and press return.
-
Browse to each desired song in turn, and then drag it to the playlist.
-
Click the playlist to display its contents.
-
If you want, drag the songs into a different order.
-
Click the first song, and then click the Play button to start playing the playlist.
Make an Audio CD
Once you have created a playlist (see the previous section), you can burn it to a writable or rewritable CD or to a DVD. You can create either an audio CD—one that you can play in most CD players—or an MP3 CD, a CD that contains only MP3 files and that will play only in a computer CD drive or an MP3 CD player. You can also create a data CD or data DVD to back up your music in case your Mac’s hard drive gets corrupted or stops working.
To create an audio CD:
-
In the Source pane, click the playlist you want to burn to CD.
-
Click Burn Disc (it may be gray, but it is active). iTunes will prompt you to insert a disc.

-
Insert a blank CD. iTunes will prompt you to click Burn Disc.

-
Click Burn Disc. iTunes will burn the CD and will select it in the Source pane.
-
Click Eject to eject the CD.
The resulting CD should be playable in most music CD players and all computer CD drives.
Copy Music to an iPod
If you have an iPod or iPod mini, you can synchronize its contents automatically with those of your Music Library. By doing so, you can put your entire Music Library on your iPod so that you can listen to it anywhere.
| Tip | For full coverage of the iPod and iPod mini, see How to Do Everything with Your iPod & iPod mini, also published by Osborne McGraw-Hill. |
The first time you connect your iPod to your Mac via the supplied FireWire cable, the iPod Setup Assistant will be displayed. Type the name for your iPod in the The Name Of My iPod Is text box, select the Automatically Update My iPod check box if you want to use automatic updating, and then click Done.
Mac OS X will then launch iTunes and will update your iPod automatically (see Figure 7-7). When iTunes displays the message, “iPod Update Is Complete,” click the Eject iPod button to “eject” the iPod. You can then unplug the iPod from your Mac and start using it.

Figure 7-7: You can copy your Music Library automatically to an iPod so that you can take your music with you.
Compose Your Own Music with GarageBand
| Note | GarageBand is a powerful application with a steep learning curve. For detailed treatment of this and the other iLife ’04 applications (iTunes, iPhoto, iMovie, and iDVD), see How to Do Everything with iLife ’04, also published by Osborne McGraw-Hill. |
If you have iLife ’04, you can use the GarageBand application (see Figure 7-8) to compose your own original music. You can:
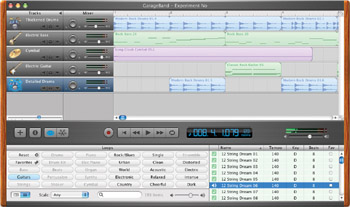
Figure 7-8: GarageBand lets you compose original music by using prerecorded loops and recording your own performances.
-
Use prerecorded loops to build tracks quickly
-
Play software instruments by using a MIDI (musical) keyboard that you attach to your Mac via USB
-
Record physical instruments that you plug into your Mac or that you record via microphones plugged into your Mac
-
Mix your music to professional standards and export it to iTunes
|
| < Day Day Up > |
|
EAN: 2147483647
Pages: 68