Working with NSS Volumes The first NSS volume, SYS: , was created automatically when you installed NetWare 6.5. However, you can also create additional storage structures as needed, both during the installation process and after the server installation is complete. Given that, it is probably a good idea to understand the technology and storage concepts a little before you start doing a lot of storage management. You can configure and manage NSS after installation with iManager or the console-based NSS Management utility (NSSMU). With NSS, you use partitions, storage pools, and logical volumes. You create logical volumes in storage pools that are composed of free space from the various storage devices in your server. NSS uses free space from multiple storage devices. NSS allows you to mount up to 255 volumes simultaneously and store up to eight trillion files in a single volumeup to 8TB (terabytes) in size. The main components of the NSS file system were introduced at the beginning of this chapter. The following sections explain how to create and work with NSS resources. NetWare Partitions With NSS, you probably won't have to manage NetWare partitions directly because they are automatically created to support the storage pools you define. However, if you want a partition-level view or you want to create non-NSS partitions, you can do so from NoRM by following these steps: -
Launch NoRM and select Partition Disks from the left navigation frame. -
At the Partition Disks page, you can create a new partition by clicking the Create link next to any of the listed available free space (see Figure 8.2). Figure 8.2. Using partition disks to manage partitions from NoRM. 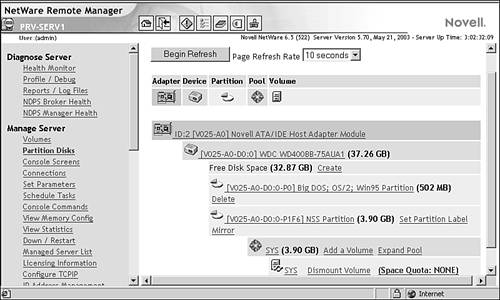 -
At the File System Creation Operations page, specify the type of volume you want to create, and click the creation operation you want to perform. You can choose from NSS, traditional NetWare, and iSCSI partition types. Based on your choice, you will see different options for proceeding with the partition creation process. It's easier to work with NSS partitions through iManager because all the tools for pool and volume management are there as well. iSCSI is discussed later in this chapter. For more information on traditional NetWare volumes, see the NetWare 6.5 online documentation. Storage Pools A storage pool is a specific amount of space you obtain from one or more storage devices in your server. NetWare 6.5 has integrated the partition-creation process into the process for creating storage pools. NSS storage pools provide the flexibility of NSS. They can be created to span one or multiple partitions on the hardware side, and can be divided into one or multiple logical volumes on the user side. After a pool is created, you can add storage devices to your server and then expand the pool to include the space available on the new storage device. To create a new storage pool, complete the following steps: -
Launch iManager, open the Storage link, and select Pools in the left navigation frame. -
At the Pool Management page, specify the server with which you want to work. This will bring up the storage pool information for that server, as shown in Figure 8.3. Figure 8.3. Managing storage pools from iManager.  -
Click New to create a new storage pool. -
Specify the name of the storage pool and click Next. Make sure to follow the naming conventions as outlined. -
At the Select Device and Space page, choose the storage device(s) from which the new storage pool will get its space, and specify the amount of space for each device, and then click Finish. Check Activate on Creation if you want the pool to be available as soon as it is created. Once created, you will be returned to the Pool Management page, from which you can perform various configuration tasks on storage pools and view the characteristics of pools that have been created. Configuration options include the following: -
New: Lets you create new storage pools, as described previously. -
Delete: Lets you delete an existing storage pool. You cannot delete the SYS pool in this way because that would remove the NetWare operating system. -
Rename: Lets you rename an existing storage pool. -
Activate: Makes a pool, and all volumes associated with that pool, available for use. -
Deactivate: Removes a pool, and all volumes associated with that pool, from service. Users cannot access data on an inactive pool. This might be done so you can perform maintenance on the pool or its associated volumes. -
Increase Size: Lets you add space to a storage pool. -
Snapshot: Creates a point-in-time view of an active storage pool. This is very helpful for backing up pool data because your backup application can back up the snapshot so you do not have to worry about open file issues and other snags that can make backing up network data so difficult. A pool snapshot will be visible from the Pools view in iManager as a separate storage pool. Information about backing up network data with Novell's Storage Management Services (SMS) is provided later in this chapter. -
Update eDirectory: If you have modified or renamed a storage pool, use this option to update the eDirectory pool object with the new information and characteristics. -
(Conditional) Deleted Volumes: If you have deleted volumes from a storage pool, you can use this option to salvage or purge those deleted volumes. -
(Conditional) Offline: If you select a pool snapshot, this option is available to take the selected snapshot offline. These options give you granular control over the management and performance of the storage pools on your NetWare server. Logical Volumes Once a storage pool has been created, you are ready for NSS logical volumes. NSS volumes can be set to a specific size or set to grow dynamically within the storage pool according to the amount of storage space that is needed over time. When set to grow dynamically, NSS volumes can automatically take advantage of new storage devices once their space is added to their associated storage pool. After you've created the volume, you must mount it before network users can access it. To create and mount a new NSS volume, complete the following steps: -
Launch iManager, open the Storage link, and select Volumes in the left navigation frame. -
At the Volume Management page, specify the server with which you want to work. This will bring up the volume information for that server, as shown in Figure 8.4. Figure 8.4. Managing server volumes from iManager.  -
Click New to create a new volume. -
Specify the name of the volume and click Next. Make sure to follow the naming conventions as outlined. -
At the Select a Pool and Volume Quota page, provide the required information and click Next. -
Storage pool: Check the box next to the storage pool from which the volume will be created. You can also click the New Pool button to create a new storage pool for this volume. Doing this will drop you into step 4 of the storage pool creation process, discussed previously. -
Allow Volume Quota to Grow to Pool Size: If you don't want to specify a volume quota, check this box to let the volume grow dynamically to fit the available pool space. -
At the Attribute Information page, make your desired selections and click Finish. -
Backup: This option marks the volume data for backup, similar to setting the Archive bit on a file or directory. -
Compression: Turns data compression on for this volume. Compression will use volume space much more efficiently at the cost of read performance. If volume data is not used constantly, compression can be a good idea. -
Data shredding : Instructs NetWare to overwrite deleted data with random characters to prevent recovery with disk reader software. Specify how many overwrite passes to make (17). -
Directory quotas: Sets a limit on the amount of space that any directory can occupy. This might be useful for restricting the size of application, log, or user directories you don't want to grow beyond a certain point. -
Flush files immediately: Instructs NetWare to write data to disk immediately upon file close, rather than waiting for the next write cycle. -
Migration: Enables support for near-line storage, such as optical subsystems. Migration creates a look-up key in the volume's File Allocation Table (FAT) that describes how to retrieve the data from the near-line storage system. -
Modified file list: Displays a list of files modified since the last backup cycle. This is useful for archive utilities, so they don't have to scan the entire volume for changed files. -
Salvage files: Instructs NetWare to keep deleted files until the space is needed for new data, so they can be recovered if necessary. -
Snapshot file level: Instructs NetWare to keep a copy of the last closed version of each open file in this volume. That way, archive utilities can save the copy to provide some protection in the event of data loss. -
User space quotas: Allows you to set usage limits for individual eDirectory users. When a quota is reached, users will be unable to save any more files until they have made space for them by removing other files. -
User-level transaction model: Enables NetWare's Transaction Tracking System (TTS) for the volume. This helps protect databases from corruption that might occur if a failure happens during a database transaction. With TTS turned on, an incomplete transaction is completely backed out and restored to its original state prior to the transaction. TTS protects data by making a copy of the original data before it is overwritten by new data. Then, if a failure of some component occurs in the middle of the transaction, TTS restores the data to its original condition and discards the incomplete transaction. NOTE TTS is enabled on volume SYS: by default because it is used to protect the eDirectory database from corruption. -
On creation: Allows you to specify whether to activate and/or mount the new volume upon creation. Activating a volume is what makes it available for use. Mounting a volume is a trivial exercise that sets a pointer in the Volume Mapping Table so that NetWare knows how to access it. If left unchecked, you can activate and mount a volume from the Volume Management page in iManager. Once the volume has been created, you will be returned to the Volume Management page, from which you can perform various configuration tasks on existing volumes and view the characteristics of volumes that have been created. Configuration options include the following: -
New: Lets you create new volumes, as described previously. -
Delete: Lets you delete an existing volume. You cannot delete volume SYS: in this way because that would remove the NetWare operating system. All data on a deleted volume is removed, but salvage and purge options for deleted volumes are available at the storage pool level. -
Rename: Lets you rename an existing volume. -
Activate: Makes a volume available for mounting and use by the server. -
Deactivate: Makes a volume temporarily unavailable for use by the server. A volume cannot be mounted while it is deactivated. -
Mount: Makes a volume available for use by network users, who can then access the volumes through any of the access methods supported by NetWare 6.5. -
Dismount: Makes a volume temporarily unavailable for use by network users. -
Move: Made possible by the NetWare Distributed File System (DFS), the Move option allows you to move an existing volume from its current storage pool to another pool, either on the same server or a different server in the same eDirectory tree. After a move operation, all data is moved automatically, but users can continue to access the data as if it were still in its original location. DFS performs a transparent redirection of requests to the new volume location. DFS is discussed in more detail later in this chapter. -
Split: Also leveraging DFS, the Split option allows you to select any portion of an existing volume, at the directory level, and install it into a new volume, either on the same server or on another server in the same eDirectory tree. After a split operation, all data is moved automatically, but users can continue to access the data as if it were still in its original location. DFS performs a transparent redirection of requests to the new volume location. DFS is discussed in more detail later in this chapter. -
Properties: This option lets you make changes to volume attributes, as defined when the volume was created. Volume attributes were discussed previously, during the volume creation process. -
User quotas: If you have enabled the User Space Restrictions attribute on a volume, use this option to set those space restrictions. This is often useful for limiting the amount of space available to users' home directories. For more information on user home directories, see Chapter 6. -
Update eDirectory: If you have modified or renamed a volume, use this option to update the eDirectory volume object with the new information and characteristics. These volume configuration options give you granular control over the management and performance of the volumes on your NetWare servers. Mounting a DOS Partition as an NSS Volume If desired, you can mount a server's DOS partition as an NSS volume so that you can access its files like any other network volume. To do this, you need to load DOSFAT.NSS on the NetWare 6.5 server. Type the following command at the server console: DOSFAT.NSS This command loads the necessary NLMs to support the DOS partition as a logical volume. It also mounts the DOS partition as a volume with the name DOSFAT_ x , where x is the drive letter of the DOS partitionusually C. Repairing NSS Pools with REBUILD When a problem occurs in the NSS environment, repairs are made at the storage pool level rather than at the volume level. This is a change for those of you familiar with VREPAIR.NLM from older versions of NetWare. NSS provides two tools to perform these repair operations: -
VERIFY : This utility checks the file system integrity for an NSS pool by searching for inconsistent data blocks or other errors. This utility indicates if there are problems with the file system. -
REBUILD : This utility actually makes repairs to the NSS storage pool should they prove necessary. You need to deactivate pools (and all the volumes in the pools) before you run REBUILD so that users do not attempt to access the volumes you are rebuilding. When you deactivate a storage pool, all the volumes in the pool automatically deactivate. REBUILD also copies errors and transactions into an error file called volume_name .RLF at the root of the DOS drive on your server. Every time you rebuild a particular NSS volume, the previous error file is overwritten. If you want to keep old error files, move them to another location. You can check the error file whenever an NSS volume does not come up in active mode after a rebuild. NOTE REBUILD should be a last resort and is seldom necessary. The NSS file system is journaled , meaning that it keeps a log of disk activities while they are executing. When a disk crash or other problem occurs, NSS automatically rolls the file system state back to a known good state and then re-executes the operations in the journal to bring the system back up to date.
To run VERIFY , which is a read-only assessment of the storage pool, type the following command at the server console: nss /poolverify NSS provides a list of pools from which you can select. The VERIFY operation will return a summary screen of storage pool information, as shown in Figure 8.5. Figure 8.5. Summary report from the console-based VERIFY .  Should it become necessary, you can run REBUILD by typing the following command at the server console: nss /poolrebuild NSS provides a list of pools from which you can select. REBUILD verifies and accounts for all data blocks in the storage pool. If there are any errors, the errors appear on the screen; otherwise , it reverts to the active state. You must re-activate the pool and remount volume(s) before users can access them again. NOTE There are many other NSS options available from the command line in addition to REBUILD and VERIFY , but much of this functionality is more easily accessible from your Web-based management tools. For more information on NSS command-line functions, see the NetWare 6.5 online documentation.
 |