Data Security
| The whole point of eDirectory-based security concepts such as authentication and authorization is to provide a secure environment within which data can be used and protected. The mantra of the 21st century is "information is power," and you want to be sure you aren't sharing your competitive advantage with your competitors . NetWare 6.5 leverages eDirectory to extend the idea of authorization to the server file system. The NetWare file system is manageable through the Server, Volume, Folder, and File objects in eDirectory. In this way, you can manage file access through the same tools used to manage the rest of your network. You can implement two types of security tools in the file system, either together or separately, to protect your files:
File System Trustee RightsFile system trustee rights allow users and groups to work with files and directories in specific ways. Each right determines whether a user can do things such as see, read, change, rename, or delete the file or directory. File system rights obey inheritance rules just like directory rights. When rights are assigned to a file, they define a user's allowable actions for that file only. When rights are assigned to a directory, they affect a user 's allowable actions on not only the directory itself but also everything stored within that directory. Although file system rights are similar in nature to the eDirectory rights for objects and properties (described earlier in this chapter), they are not the same thing. File system rights are separate from eDirectory rights. They affect only how users work with files and directories. eDirectory rights affect how users work with other eDirectory objects. There are eight file system trustee rights. You can assign any combination of those file system rights to a user or group, depending on how you want that user or group to work. Table 6.4 describes the available file system rights and how they affect directory and file access. Table 6.4. File System Rights
Inheriting File System RightsJust like eDirectory rights, file system rights can be inherited. This means that if you have file system rights to a parent directory, you can also inherit those rights and exercise them in any file and subdirectory within that directory. Inheritance keeps you from having to grant users file system rights at every level of the file system. You can block inheritance by removing the right from the IRF of a file or subdirectory. As with directory objects, every directory and file has an inherited rights filter, specifying which file system rights can be inherited from a parent directory. By default, file and directory IRFs allow all rights to be inherited. Inheritance can also be blocked by granting a new set of trustee rights to a subdirectory or file within the parent directory. As with the eDirectory rights, inherited and explicit file system rights are not cumulative. Explicit assignments replace the inherited rights from a parent directory. File System Security EquivalenceSecurity equivalence for file system rights works the same way as security equivalence for eDirectory rights (explained earlier in this chapter). You can assign one user to have the same eDirectory rights and file system rights as another user by using the Security Equal To Me tab in an object's properties page. NOTE Remember: You are still subject to the shortcomings of security equivalence as described previously. File System Effective RightsJust as with eDirectory rights, determining which file system rights a user can actually exercise in a file or directory can be confusing at first. A user's effective file system rights are the file system rights that the user can ultimately execute in a given directory or file. The user's effective rights to a directory or file are determined in one of two ways:
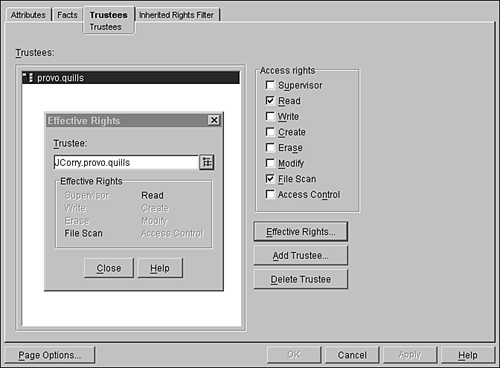
Working with File System Trustee RightsiManager can't yet take you into the NetWare file system. You can assign rights at the volume level, but not at the directory or file level. Use ConsoleOne to work with file system rights. To see or change a user's trustee assignments, complete the following steps:
You can make a user a trustee of a File System object by doing the following:
If the user is already a trustee, simply highlight the appropriate User object in the Trustees window and perform step 2. Changes to explicit security equivalence are done using the same process described previously in the "Authorization" section of this chapter. File and Directory AttributesAnother important NetWare security tool for securing files and directories is attributes. Attributes are properties of files and directories that control what can happen to those files or directories. Attributes, which are also called flags , are different from trustee rights in several ways:
Knowing these distinctions between file attributes and trustee rights will help you better understand the behavior of the NetWare file system. File and Directory Attribute TypesThere are eight attributes that apply to either files or directories. There are an additional six that apply only to files. These attributes are listed in Table 6.5. Table 6.5. File and Directory Attributes
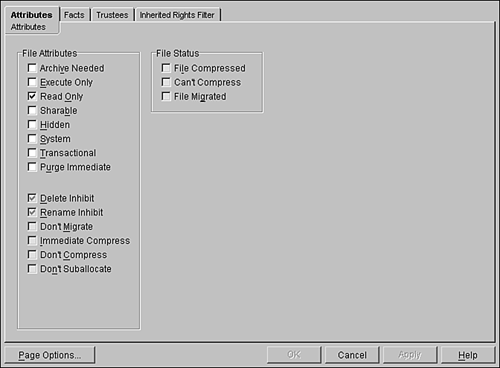
Assigning File and Directory AttributesTo assign attributes to a file or directory, complete the following steps:
There are three File Status boxes on the Attributes page. These are informational and indicate the following:
Login ScriptsOne other point of interaction between directory and file system is the login script. The eDirectory login script is a batch file that outlines basic operations that should be performed every time the user logs in to the network. Login script operations can include environment variables , drive mappings, program execution, and message display. Details of login script operation and configuration are available in Appendix B. NCP Packet SignatureNCP Packet Signature is a feature designed to prevent a would-be hacker from spoofing a network connection. Spoofing involves hijacking a connection by forging network packets that appear to be from a legitimate user connection. This feature requires workstations and servers to automatically "sign" each NCP packet with a signature and to change the signature for every packet. Packet Signature is an optional security feature and can slow down network performance on busy networks. Because spoofing requires access to a physical network connection, you might prefer not to use packet signatures if your network is in a relatively trusted environment, or if the threat of intruders stealing sensitive information is low. There are four levels of NCP Packet Signature, which must be set on both workstations and servers. If the levels on the workstation and server don't form an allowable combination, the two computers will not be able to communicate with each other. To set the signature level on a server, launch NoRM and select Set Parameters in the left navigation frame. Select NCP in the right frame. Look for NCP Packet Signature Option. You can also set the packet signature level from the server console prompt by typing: SET NCP PACKET SIGNATURE OPTION= number Replace number with the signature level (0 through 3) you want the server to use. After the server has been booted , you can execute the SET command to increase the signature level. If you want to decrease the level, however, you have to reboot the server. Table 6.6 shows the NCP Packet Signature levels. Table 6.6. Server Levels for NCP Packet Signature
To set the signature level on a Windows workstation, complete the following steps:
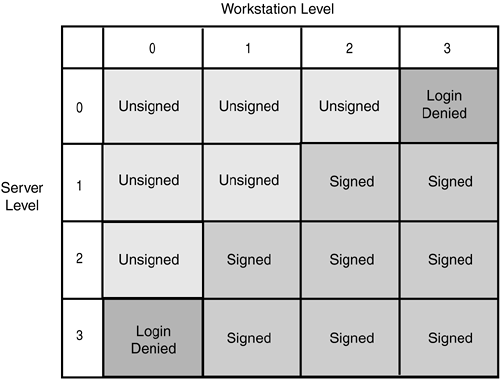
Figure 6.12 shows how the signature levels on servers and workstations combine to either allow unsigned packets, force signed packets, or deny login. Figure 6.12. Packet signature interactions between server and client. |
EAN: 2147483647
Pages: 172


