Hack69.Enable WiFi Encryption
|
Hack 69. Enable WiFi Encryption
Using an unencrypted WiFi network is like putting a big sign on your front door saying, "Burglars: the door's open and no one's home. Come in and help yourself." Here's how to put a virtual lock on your WiFi network to stop snoopers from coming in. WiFi networks are incredibly convenientand incredibly easy to snoop on. All that data going out over the air between your PCs and between your PCs and the Internet can easily be snooped on by anyone nearby using simple, off-the-shelf software such as packet sniffers. Virtually every keystroke and piece of data that goes out across your network can be read. [Hack #68] discusses a variety of precautions that will help protect your wireless network. Those hacks will help keep out most snoopers. But the most determined ones might be able to bypass them, so your best bet for the most security is to use encryption. You can use two encryption standards to protect your network: Wireless Equivalent Protocol (WEP) and WiFi Protected Access (WPA). The WEP protocol is older and less secure than the WPA protocol. But you might be forced to use WEP because older hardware doesn't support WPA. Keep in mind that all your hardware has to support the encryption standard you choose. So, for example, if you have a newer router that uses WPA, but your WiFi network adapters don't support it, you won't be able to use WPA. Instead, you'll have to use WEP.
How you turn on encryption varies from manufacturer to manufacturer, and even from model to model from the same manufacturer. It also varies depending on your wireless adapter. This hack shows how to set up encryption on a Linksys router. If your hardware supports both WEP and WPA, choose WPA because it's a more secure form of encryption. But even though WEP has gotten a bad name among security experts because it isn't as secure as WPA, for most home networks it's perfectly suitable. Home networks are not targeted by serious, dedicated intruders, so WEP is perfectly suitable for keeping out passersby. Business networks, though, should upgrade to WPA hardware because valuable information is sent across their networks. 7.6.1. Setting Up WEP EncryptionTo use WEP encryption, you must configure your router to use it, choose an encryption key, and then configure all your wireless network adapters to use the encryption with the proper key. First, go to the Setup screen of your router. For a Linksys router, open a browser, type http://192.168.1.1 in the address bar, and press Enter. A login screen appears. Leave the "User name" field blank; in the Password field, type admin and press Enter. If you've changed the username and password, use those instead. From the Setup screen, choose Wireless Select WEP from the Security Mode drop-down list. In the Default Key section, choose any key from 1 through 4. (It doesn't matter which you choose.) Next, select the wireless encryption level you want to use. You have a choice of 64 bits or 128 bits. Using 128-bit encryption is much more secure than 64-bit encryption, although it will slow down your network to a certain extent. Businesses should absolutely use 128-bit encryption, and home users should consider using it as well, despite potential network slowdowns. But before choosing 128-bit encryption, make sure your WiFi adapter supports it. Some WiFi adapters support only 64-bit WEP encryption. Check your documentation or the manufacturer's web site for details.
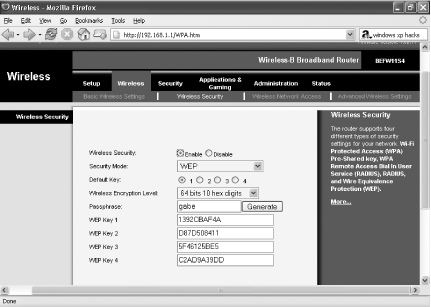
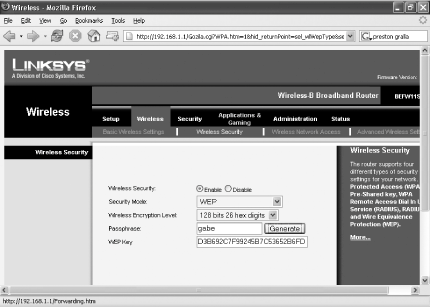
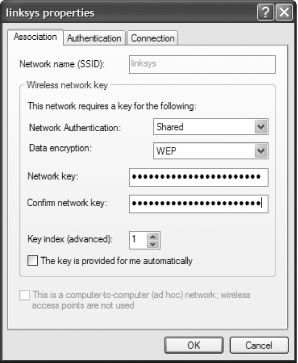
From the Wireless Encryption Level drop-down box, choose either "64 bits 10 hex digits" or "128 bits 26 hex digits." Depending on which you choose, the form you have to fill out will change, as illustrated in Figures Figure 7-15 and Figure 7-16. Figure 7-15. Using 64-bit WEP encryption rather than 128-bit (for WiFi network adapters that don't support 128-bit encryption) Figure 7-16. Choosing 128-bit WEP (a better bet than 64-bit because of its increased security, despite slight network slowdowns) If you chose 64-bit encryption, type a phrase in the Passphrase box and click Generate. That will generate the WEP key you'll use on your router and each PC on the network. Four keys will be created in the WEP Key boxes. You'll use only one of these keys at a time, but you generate four of them because you can manually switch between them at regular intervals, for added security. You don't have to generate your keys this way; you can create them yourself and type them in manually. But, chances are, it will be far easier to crack than one randomly generated by the router's software, so it's a good idea to use one the router will create for you. If you instead selected 128-bit encryption, you'll be sent to a new screen. In the Passphrase box, type a phrase and click Generate. This will generate a 128-bit encryption key. Regardless of whether you created a 64-bit key or a 128-bit key, copy the key (or keys, in the case of 64-bit) onto a piece of paper. You'll use this key for each PC that is going to access the network. Click Save Settings. That applies the key to your network. From now on, only PCs that use WEP encryption and the key you just generated will be able to get onto your network. Now that you've configured your router to use WEP, you have to configure each wireless computer on your network to use WEP and the key you just generated. On each PC, click the wireless connection icon in the system tray. Then, click Properties, click the Wireless Network tab, highlight your network, click Properties, and then click the Association tab. The dialog box shown in Figure 7-17 appears, although it won't yet be filled out. Figure 7-17. Choosing the right key number for 64-bit encryption In the Network Authentication drop-down box, select Shared. In the Data Encryption dialog box, choose WEP. When you do that, the box that reads "The key is provided for me automatically" is checked. Uncheck this box.
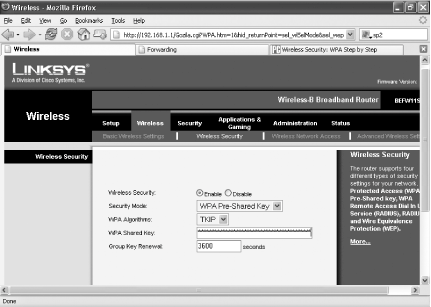
Enter your WEP key in the "Network key" box and type it again in the "Confirm network key" box. From the Key Index, choose the key number that you'll be using. Click OK and then OK again. Now the PC can connect to your network using WEP encryption. For added security, change the key number and associated network key on each PC regularly. You shouldn't need to change the number on your router because it will recognize all the keys you generated. If you use 128-bit encryption, you'll have only one key to use. 7.6.2. Setting Up WPA EncryptionThe process for turning on WPA encryption is similar to that for turning on WEP, with a few differences along the way. First, you need to make sure your version of XP supports WPA. SP2 does; earlier versions don't. To check whether you have SP2 installed, right-click My Computer, choose Properties, and look on the General tab. If you have SP2 installed, it will tell you at the bottom of the System section near the top of the tab. If you don't have SP2, go to http://www.microsoft.com/downloads/details.aspx?FamilyId=009D8425-CE2B-47A4-ABEC-274845DC9E91 and download a system patch that will install WPA on your system. Or, you can update your entire system to SP2 by going to http://windowsupdate.microsoft.com. Now that your system supports WPA, you need to make sure all your hardware supports it as well, by checking the documentation and manufacturers' web sites. If not, see if firmware updates are available, and download and install them. Remember, you'll have to upgrade your router and wireless networking adapters, not just a few components. Also download the latest driver for your network adapters. Once your system and hardware are WPA-enabled, go to the Setup screen of your router. For a Linksys router, open a browser, type http://192.168.1.1 in the address bar, and press Enter. A login screen appears. Leave the "User name" field blank; in the Password field, type admin and press Enter. If you've changed the username and password, use those instead. From the Setup screen, choose Wireless Select WPA Pre-Shared Key from the Security Mode drop-down list. In the WPA Algorithms drop-down list, choose TKIP, which is the approved, certified algorithm for WPA. Some products support Advanced Encryption System (AES), but that hasn't been certified for interoperability among different vendors' hardware. In the WPA Shared Key box, type a key between 8 and 63 characters in length. The longer it is and the more random the characters, the more secure it will be. Write down the key. You'll need to use this on each wireless PC on your network. Leave the Group Key Renewal row at 3600. Click Save Settings. That applies the key to your network. Figure 7-18 shows what the screen should look like when you're done. Now, only PCs that use WPA encryption and the key you just generated will be able to get onto your network. Figure 7-18. Creating a long and random WPA shared key for a more secure network Now that you've configured your router to use WEP, you have to configure each wireless computer on your network to use WEP and the key you just generated. On each PC, click the wireless connection icon in the system tray. Then, click Properties, click the Wireless Network tab, highlight your network, click Properties, and then click the Association tab. In the Network Authentication drop-down box, select WPA-PSK. In the Data Encryption dialog box, choose TKIP. When you do that, the box that reads "The key is provided for me automatically" is checked. Uncheck this box. Enter your WPA key in the "Network key" box, and type it again in the "Confirm network key" box. Click OK and then OK again. Now the PC can connect to your network using WPA encryption.
7.6.3. See Also
|
|
EAN: 2147483647
Pages: 191

 Wireless Security. Select Enable next to Wireless Security. The Wireless Security options, which will have been grayed-out when you came to the page, will now be live so that you can fill them out.