Hack63.Gmail Hacks
|
Hack 63. Gmail Hacks
The best search engine on the planet now has the best web-based email on the planet. Here's how to get more out of it. If you're looking for a free, web-based email service, the best one, hands down, is Gmail. It offers more storage than any of the others (as of this writing, a whopping 1GB's worth), lets you search through your mail using all of Google's searching syntax, lets you use your normal email software to receive mail via POP3...the list could go on. Suffice it to say, it's the one to use. Because there's so much to Gmail, you might not know all of its features, or how to get the most out of it. In this hack, you'll learn how to import contacts from your existing email software into Gmail, how to use your normal email software to receive Gmail, and how to use Gmail as a virtual drive so that you can use the service as if it were an extension of your hard drive. 6.6.1. Import Your Contacts into GmailYou've most likely got dozens or hundreds of contacts in your existing email software. It would be nice to get them into Gmail. It's not that tough to do; it's essentially a two-stage process. Gmail can import contacts in the comma-separated values (CSV) format, so first you have to export your contacts into a CSV file and then import them into Gmail. How you export your contacts varies according to your email software. In Outlook, choose File Figure 6-11. Choosing the Contacts folder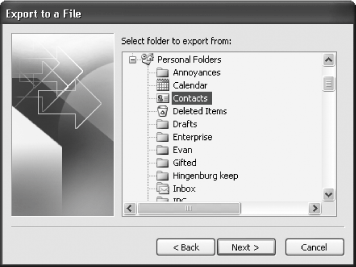 From the next screen, give the file a name (a .csv extension will be automatically added to it), browse to the folder where you want to save it, and click Next, and then Finish. Now that you have the file ready, go to your Gmail account and click Contacts on the left side of the screen. Click Import Contacts from the upper-right side of the page that appears. Click the Browse button, then navigate to the folder where you've exported your contacts, select it, and click Open. Now you should be at the screen pictured in Figure 6-12, with your information filled in. Click Import Contacts. Figure 6-12. Importing contacts into Gmail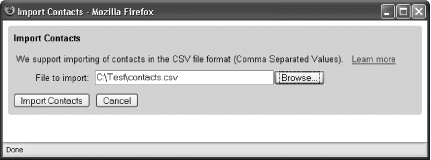 After a minute or more, depending on the speed of your Internet connection and how many contacts you're importing, you'll get the message shown in Figure 6-13, telling you that your contacts have been imported, and listing the total number of contacts you've imported. Click the Close button. Now your contacts will be available. To see them, on the Contact screen click All Contacts. Figure 6-13. All of your contacts exported into Gmail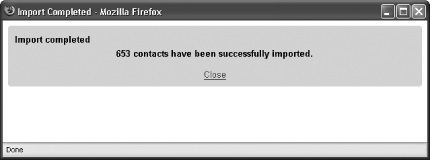 6.6.2. Use Gmail as a POP3 AccountUnlike other web-based email services, you can use your regular email software to receive mail using a POP3 mail server. (To do this with Yahoo! Mail or Hotmail, you'll need add-in software [Hack #62] .) You'll first have to configure Gmail to let you do it, and then you'll have to tell your email software to retrieve the mail. In Gmail, click Settings and then click the Forwarding and POP link at the top of the page. The screen shown in Figure 6-14 appears. Figure 6-14. Configuring Gmail for POP3 access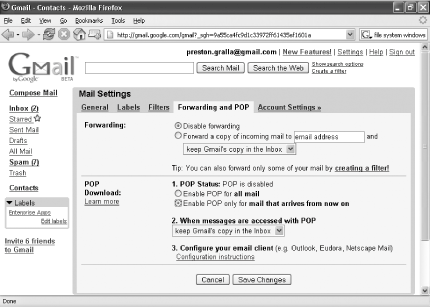 If you want your email software to retrieve all the email you've ever received on Gmail, choose Enable POP for all mail. Be very careful before making this selection. Remember, Gmail gives you up to 1GB of storage, so if you've received a lot of mail, you could end up downloading hundreds of megabytes of mail when you make your first connection to Gmail using your email software. Also keep in mind that even if you have only a little mail in your Inbox, that's not all the email you have in your Gmail account. Most of your mail is in the Archive folder, and you might have hundreds or thousands of messages there, even if they're not currently showing in your Inbox. If you choose Enable POP only for mail that arrives from now on, only those messages you receive after this point will be downloaded to your email software. It's a much safer choice. If you want some old mail downloaded, you can always go into your Gmail account and forward the mail to yourself. That way, the forwarded mail will be treated as new mail and will be downloaded, while all the rest of your old mail won't be downloaded. Next, make your choice about what should happen to your Gmail messages: should they be kept on the Gmail server, and if they are, should they be kept in the Inbox or in the Archived mail? Here are your choices:
This will leave all new mail on the Gmail server, and leave it in your Inbox. That way, even after you download it to your PC, it will stay in the Gmail Inbox on the Web, as if you hadn't read it.
This will leave all new email on the Gmail server, but instead of putting it into your Inbox, it will move it to your Archived mail. So, whenever you visit Gmail on the Web, if you want to see the mail, go to your Archive.
This will move all the messages to your Trash, where it will be cleaned out by Gmail on a regular basis. Now it's time to configure your email program to get your Gmail mail. You set it up as you do any other new mail account. For your POP3 server, use pop.gmail.com, and for your SMTP server, use smtp.gmail.com. When setting it up, make sure to tell your software to use a secure connection (SSL) for both SMTP and POP3. So, for example, here's how you would set up Outlook for POP3 Gmail. After you've enabled POP3 access in Gmail, launch Outlook and choose Tools Figure 6-15. Setting up POP3 access in Outlook 2003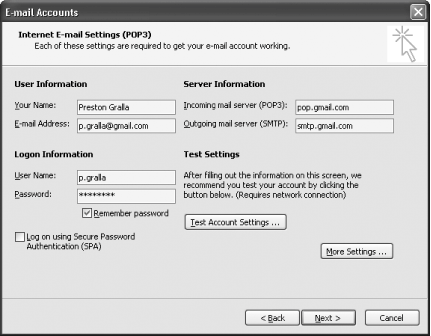 Now, click More Settings and then choose the Advanced tab. In both the POP3 and SMTP sections, check the box next to "This server requires an encrypted connection (SSL)." When you do that, the port numbers for the servers will change. For POP3, the port number should change from 110 to 995. If it doesn't, type 995 in the Incoming Server (POP3) box. For SMTP, type 465 in the Outgoing Server (SMTP) box. Now click the Outgoing Server tab. Check the box next to "My outgoing server (SMTP) requires authentication." Select "Use same settings as my incoming mail server." Click OK. You'll come back to the screen pictured in Figure 6-15. Click Next and then Finish. Now you should be able to send and receive mail using Gmail. 6.6.3. Use Gmail as a Virtual Hard DriveWith all of that extra space on Gmail, wouldn't it be nice to use some of it for storage rather than mail? You can, with a free piece of software called GMail Drive shell extension. Download it from http://www.viksoe.dk/code/gmail.htm and install it. (It works only with Internet Explorer, Version 5 and above.) After you install it, run Windows Explorer. Under My Computer, a new drive will have been created, called the Gmail Drive. Click it, and type in your Gmail password and username. If you don't want to have to log in every time you click the drive, check the box next to Auto Login. You can use the Gmail drive as you can any other folder on your hard drive. (You'll of course have to be connected to the Internet for it to work.) This means you can copy files to it using Windows Explorer in the same way that you do any other files, and you can create subfolders as well.
But when you view the contents of your Gmail drive, the icons for the files won't look like the normal ones, as you can see in Figure 6-16. Instead of showing the native icons for each file type (such as pieces of paper for Word files), they'll show as gear-type icons. Figure 6-16. The Gmail drive in action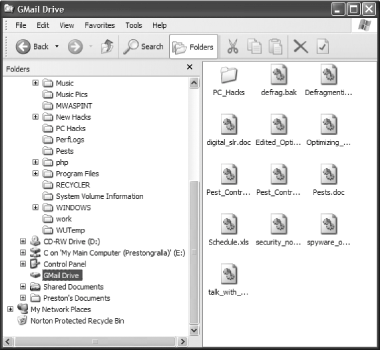 When you copy a file to your Gmail drive, you're actually creating an email and posting it to your account. The email will appear in your Inbox, with the file as an attachment, as shown in Figure 6-17. If you want to open any of the files from inside Gmail, click the email to view it, and then click the Download button. The file will be downloaded to your PC. Of course, you don't want to do this because the file is already on your PC. Figure 6-17. What the files look like from within Gmail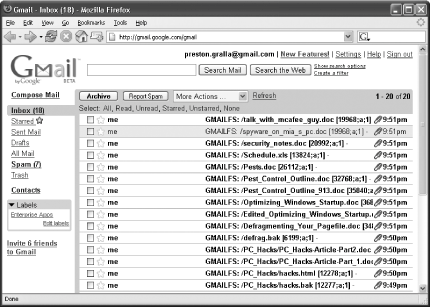 As you can see from Figure 6-17, using Gmail as a virtual drive can make your Inbox pretty messy. Luckily, you can create a filter that will automatically route the files to your archived mail folder. That way, you'll never see them in your Inbox, and they'll be in your archives. The emails with the files attached to them all show up preceded by the letters GMAILFS. So, create a filter that will move all files with that prefix to your archived mail by first clicking Create a Filter from the top of the Gmail screen. In the Subject box, type GMAILFS, check the box next to "Has attachment," and then click Next Step. Then check the box next to Skip the Inbox (Archive it) and then click Create Filter, and all your files will be sent straight to your Archive, bypassing the Inbox. You can also have them labeled so that you know at a glance which files you copied from your hard disk. Before clicking Create Filter, check the box next to "Apply the label." From the drop-down box next to it, select New Label, and from the screen that appears, type in the label name (such as Hard Drive), and click OK. From the drop-down list, choose your new label. Now click Create Filter. The files will be archived, but will also have the label next to them, so you can easily view only your files by clicking the Hard Drive label when you log in to Gmail.
6.6.4. See Also
|
|
EAN: 2147483647
Pages: 191
- Integration Strategies and Tactics for Information Technology Governance
- Assessing Business-IT Alignment Maturity
- Linking the IT Balanced Scorecard to the Business Objectives at a Major Canadian Financial Group
- Measuring and Managing E-Business Initiatives Through the Balanced Scorecard
- Technical Issues Related to IT Governance Tactics: Product Metrics, Measurements and Process Control
 Import and Export, and the Import and Export Wizard launches. Choose "Export to a file," click Next, and from the screen that appears choose Comma Separated Values (Windows). From the next screen, choose your Contacts folder, as shown in Figure 6-11, and click Next.