Hack20.Instant Linux
|
Hack 20. Instant Linux
Want to know what all the fuss is about when it comes to Linux? Here's an easy way to try it out and use it, without installing software on your PC; it runs straight from a CD. The Linux operating system inspires intense devotion among its adherents. There's good reason for that: it's fast, it's free, it isn't subject to the same kinds of security woes that bedevil Windows computers, and it can be just plain fun. Of course, it can be just plain maddening as well. And the thought of installing an entirely new operating system alongside XP, or reformatting your hard disk...let's just say that unless you really know you want to use Linux, you don't want to go there. But there's a way to get instant Linux: use the free software called Knoppix. It runs straight from a CD, so you don't need to do any installation at all. Just boot your computer from your CD, and voilà: instant Linux.
2.14.1. Download KnoppixThe simplest way to get started with Knoppix is to download a CD image, burn it to a CD, and then boot from the CD. To obtain the latest version of Knoppix, download the CD image from one of Knoppix's mirrors or send away for a CD. If you have an unmetered broadband Internet connection and a CDR/RW drive, simply download the CD image; it's the best way to get Knoppix. A collection of mirrors listed at http://www.knopper.net/knoppix-mirrors/index-en.html provides CD images in ISO form over HTTP, FTP, or rsync. If you use Bittorrent (a peer-to-peer file-sharing application designed for sharing large files), you can use the Knoppix torrent link on this page. When you click a mirror you are taken to a licensing agreement page. Have your lawyer read through the software license (your lawyer reviews all of your software licenses before you accept, right?), click Accept to proceed, and then choose a file from the list that is presented. In addition to the latest version of Knoppix, most mirrors host a few past CD images with their MD5sum (explained in a moment). When trying to decide which CD to choose, it helps to understand the scheme Knoppix uses for naming CD images. Here is an example ISO filename: KNOPPIX_V3.4-2004-05-17-EN.iso Deciphering the filename isn't tricky and can be quite informative. In the aforementioned example, KNOPPIX is followed by the current version, in this case 3.4. Following the version is a date stamp, which indicates the CD image's release date; in our example, the CD was released on May 17, 2004. These date stamps indicate the incremental version. After the date stamp, there is a language code, in this case EN for English. Knoppix is a German project, and while the default language can be changed with cheat codes at boot time, the Knoppix project releases both German and English CDs to save English-speaking users from having to enter a language cheat code at every boot. English-speaking users want to get images with the EN language code, and German-speaking users want to get images with the DE language code. Everyone else can choose either of the images and use a language cheat code at boot time. Select the latest version of Knoppix by clicking the filename. The 700MB file can take anywhere from a few hours to a day to download, depending on the speed of your broadband Internet connection and the current load of your mirror. Once the image is downloaded, you might want to confirm that the full file has been downloaded correctly and is an exact copy of the original file. An MD5sum is a checksum created from a large stream of data using the MD5 algorithm and is often used to verify that large files downloaded correctly. Practically speaking, an MD5sum-generating program takes your Knoppix ISO file and creates a fingerprint that only that one file is capable of making. Changing even a single bit affects the MD5sum; therefore, if any errors occur during the download process, the generated sum is different from the one listed on the mirror. If both MD5sums match, the file you have is exactly like the file on the mirror. A number of utilities are available for creating an MD5sum under Windows. One such tool can be found at http://www.md5summer.org. Once you install this program, run it and navigate to the Knoppix ISO you want to verify, and click OK. On your Linux machine you will probably find that the md5sum utility is already installed. You'll need to install it if it is not. Once md5sum is installed, make sure the .md5 file from the mirror is in the same directory as the image, and then type: greenfly@clover:~$ md5sum -cv KNOPPIX_V3.4-2004-05-17-EN.iso.md5 KNOPPIX_V3.4-2004-05-17-EN.iso OK greenfly@clover:~$If the MD5sums match, you are dropped back to a prompt; otherwise you receive the following error: greenfly@clover:~$ md5sum -cv KNOPPIX_V3.4-2004-05-17-EN.iso.md5 KNOPPIX_V3.4-2004-05-17-EN.iso FAILED md5sum: 1 of 1 file(s) failed MD5 check greenfly@clover:~$You can also generate an MD5sum from the command line by typing: greenfly@clover:~$ md5sum KNOPPIX_V3.4-2004-05-17-EN.iso 7ee0382655abf194aa300a98100cacde KNOPPIX_V3.4-2004-05-17-EN.isoCompare the MD5sum you generate to the corresponding .md5 file from the mirror. If both match, you have a complete ISO and are ready to create a CD. You can burn the Knoppix ISO to a CD using your favorite CD burning software. It is important that you select Burn Image or an equivalent option on your CD burning software. Do not select the option to burn a data CD; you will end up with a CD containing a single ISO file, which will not boot.
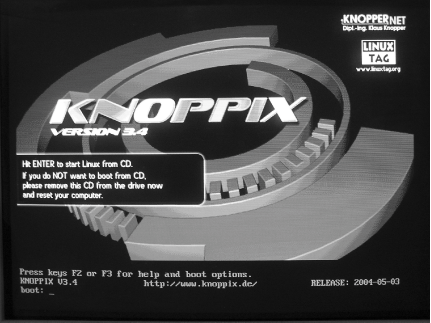
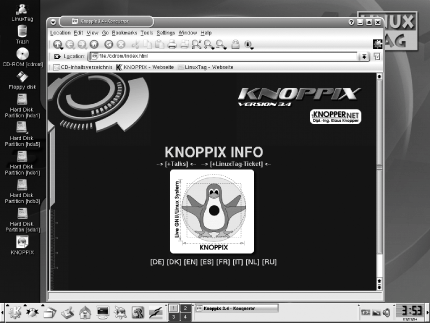
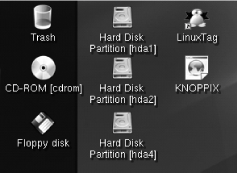
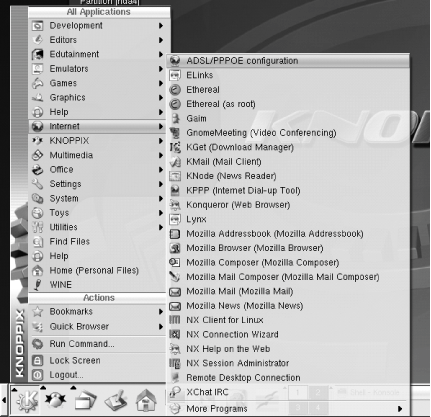
2.14.2. Boot Knoppix from a CDFor computers purchased in 2000 and after, booting Knoppix is as simple as putting the CD in the CD-ROM drive and restarting the computer. For some computers, however, booting Knoppix might require changing the boot order in the BIOS. The BIOS is the screen that appears when you first boot a machine, and it usually lists the amount of RAM and the hard drives it detects. Older systems that don't support booting from a CD require that you boot from a floppy. If your computer supports booting from a CD-ROM, but won't boot the Knoppix CD by default, your problem is probably the system boot order setting in the BIOS. To change the boot order and save it, you must enter the BIOS setup, which you can do at boot time by pressing a special key. Some BIOSes tell you at boot time the key to press to change BIOS settings; the common ones are Esc, F1, F2, F10, and Del. Once in the BIOS, find the section that changes boot device order. On some BIOSes you change this setting by selecting a tab along the top labeled Boot, while on others the option might be named "Boot device order" or something similar. Once you have found this setting, move the CD-ROM device so that it is listed before any hard drives. If you can't find or change this option, or you need other information specific to your system, refer to the BIOS manual that should have come with your computer or motherboard. Once you have changed the boot device order, save your settings, which should reboot the computer, and after detecting the Knoppix CD, you should be placed at the Knoppix boot prompt. 2.14.3. Boot Knoppix from a FloppySome older computers do not support booting directly from a CD-ROM. For these computers, you must first create a boot floppy that enables the system to boot off of the Knoppix CD-ROM. Fortunately, Knoppix has made this process easy. The boot floppy process has changed between Knoppix 3.3 and 3.4. Knoppix 3.4 uses a new boot process that requires two floppy disks. To create these floppies, first boot Knoppix from a machine with a floppy drive that is capable of booting from a CD-ROM. Once the machine has booted, insert a blank floppy into the drive and click K Menu Once the floppies have been created, put the first floppy in the floppy drive, leave the CD in its drive, and reboot. The floppy contains a boot loader and kernel image that your system can use to boot far enough along that the CD-ROM can then be loaded. 2.14.4. The Knoppix Boot PromptOnce you have booted from either a CD or a floppy, you are presented with the Knoppix boot screen, as shown in Figure 2-33. Figure 2-33. The Knoppix boot screen To boot directly into Knoppix, either press Enter or wait a few seconds, and Knoppix starts the boot process. At this boot prompt, you can enter special Knoppix cheat codes to control the boot process. Press F2 and F3 at this prompt to display some of the cheat codes. As Knoppix boots, it displays colorful output while it detects your hardware. Once it has detected and set up your hardware, it automatically launches into the desktop environment and finishes by opening a web browser showing Knoppix documentation. At this point, you can launch programs, browse the Web, and play games. When you log out of the desktop environment, Knoppix shuts down and ejects the CD for you. If you use a floppy to boot Knoppix, remember to eject it, or the next time you start your computer, it will try to boot into Knoppix again. 2.14.5. Explore the DesktopNow you've booted from Knoppix. What's next? It's time to figure out what these windows, icons, and strange panels are for, and then to explore on your own. After you boot, you should be looking at the default Knoppix desktop, as shown in Figure 2-34. Figure 2-34. The default Knoppix desktop 2.14.5.1 The desktopProbably the first thing that grabs your attention is the Konqueror web browser window that opens when the K Desktop Environment (KDE) is started. KDE is one of the two most popular desktop environments for Linux (Gnome being the other). KDE's job is to manage your complete desktop environment. It draws your wallpaper, provides you with access to your programs through the menus and icons on the desktop, and manages the windows that appear once you launch an application. Once KDE starts, the first thing you see is the Knoppix help page. This web page contains information and help for Knoppix in many different languages and includes links to sites to purchase Knoppix CDs as well as get additional information. The help is available offline, which makes it very useful even when your network connection isn't working. The desktop itself contains shortcuts to the hard drives, CD-ROMs, and floppy drives on your system (Figure 2-35). Click any of the drive icons to automatically mount the drive as read-only and open up the mounted filesystem in Konqueror. Under KDE, the default is to open a directory or launch a file with a single click, which might take some adjustment if you are used to double-clicking icons on the desktop. As Knoppix defaults to mounting these filesystems as read-only, you can view and open the files you see, but you can't edit, delete, or move any of the files on these filesystems. You can, however, copy the files to your desktop and edit them from there. To make these filesystems writable, right-click the drive icon and select Actions Figure 2-35. Desktop icons 2.14.5.2 The K MenuThe KDE panel spans the entire bottom portion of your screen. On the left of the panel is the K Menu, represented by the K Gear icon. Click this icon to display the K Menu which contains most of the graphical applications and some of the command-line applications within Knoppix organized into categories like Editors, Games, Internet, and Settings (Figure 2-36). If you are new to KDE, Linux, or Knoppix, you will want to explore each category in this menu and get acquainted with how all the applications on the CD are organized. Figure 2-36. The K Menu At the top of the K Menu is a section reserved for recently used applications. As you run programs from within the K Menu, their icons will show up in this section to provide quick access if you want to run them again. Below this section is the Applications section with submenus for more items. After Utilities, instead of more application submenus, you will find icons that run specific KDE applications. The K Menu is worth getting familiar with. Browse through the different categories and try out the huge library of programs Knoppix includes. Since everything runs from CD, you can't really harm anything with your experiments. Now that you are familiar with the K Menu, let's move on to the other parts of the Knoppix desktop. 2.14.5.3 The panelThe panel is the gray bar along the bottom of the screen containing the K Menu and other items. The panel is like an extensible Windows taskbar. It allows for applets to be embedded in it; the default Knoppix panel (Figure 2-34) has several of these. To the immediate right of the K Menu are two other menus. The first has a penguin icon and is a shortcut to the Knoppix submenu. The next menu lists all the applications open across all desktops. To lower all visible applications, click the next icon, which looks a bit like a desk with a pencil on it. Click the icon again to raise all application windows. Next to those icons you will find many shortcut icons for applications in the K Menu. These are meant to provide quick access to applications you commonly run. Right-click any of these icons to display a context menu that gives you the option to move or delete the icons. Drag-and-drop icons from the K Menu to add them to the panel. To the right of the application icons you will see a box with the numbers 1, 2, 3, and 4 in it. This is known as a desktop pager, and it allows you to quickly switch desktops by clicking the appropriate number, or, if you prefer, Ctrl-Tab cycles through your applications, and Ctrl-Shift-Tab cycles through the desktops. By default Knoppix has four virtual desktops that allow you to reduce clutter by grouping open programs onto different desktops. The pager highlights the active desktop so that you don't get lost. Next to the pager is the task list, which shows all your open applications. Click the program name to raise and lower the program window. Right-click any of the windows in the task list to see a list of actions you can perform on that window such as closing, maximizing, and moving the window to a different desktop. After the task list are a few useful applets grouped in the system tray. Many applications that run in the background will put an icon here to give you quick access to the program's options. First you see a flag to represent the KDE keyboard tool that lets you change which keyboard locale you are using on the desktop. Next you will see a screen display applet that is new to Knoppix 3.4. Click this applet to change screen resolution and monitor frequency on the fly. The speaker icon represents the KDE mixer applet, which lets you change your volume settings. If Knoppix was unable to configure your sound card, you will notice that the mixer applet has a red slash through it. Finally at the far right of the panel is a clock. Before you can adjust the date and time you will need to create a root password. To do so, open a terminal window and type: knoppix@ttyp0[knoppix]$ sudo passwd Enter new UNIX password: Retype new UNIX password: Passwd: password updated successfully Experiment with the panel. Click and drag icons to move them around on the panel. Drag the applet handles to move them. Right-click icons and applets to see a list of options for the applet including removing it from the panel completely. Drag icons from the desktop or the K Menu and drop them on the panel to add them. To resize the panel, right-click it and choose your size from the Size menu. 2.14.6. See Also
Kyle Rankin |
|
EAN: 2147483647
Pages: 191

 KNOPPIX