The brochure is really taking shape. Now you'll add most of the text to the brochure, so you can fit the text into the layout before you size the remaining elements.
Page 1 is a good place to start. Page 1 contains the brochure's front cover, back cover, and inside fold.
1. | Open the file 09Brochure Text.pages from the Lesson 09 folder.
This file contains all of the text you need to complete the brochure.
|
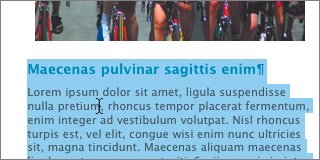
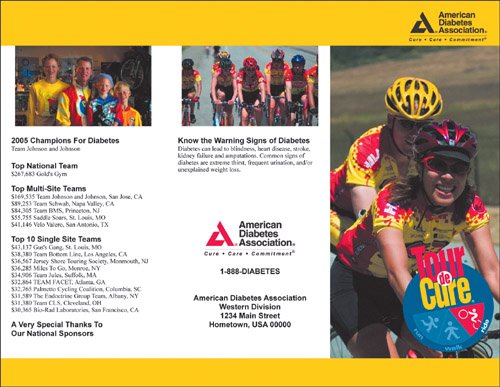
2. | Select the text beneath the words "Inside Fold" (from "2005 Champions..." through "...Our National Sponsors"). Choose Edit > Copy.
|
3. | Switch to your brochure and select page 1. Drag in the first column of text to select all of the text in column 1; then choose Edit > Paste.
The new text is added, but as it is currently formatted; it is too large for the column.
|
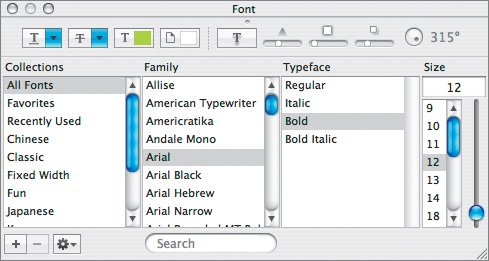
4. | Select the first text line ("2005 Champions For Diabetes"). Open the Font panel and change the font to Arial Bold at 12 points.
 |
5. | In the Text Inspector, click Text; then drag the Spacing: After Paragraph slider to 0 pt.
|
| |
6. | Choose Format > Create New Paragraph Style From Selection. Name the style ADA Header and click OK.
|
7. | Select the next text line and change its font to Times New Roman Regular at 10 points.
|
8. | In the Text Inspector, click Text; then drag the Spacing: After Paragraph slider to 0 pt.
|
9. | Choose Format > Create New Paragraph Style From Selection. Name this style ADA Body and click OK.
|
10. | In the toolbar, click the View button and choose Show Styles Drawer.
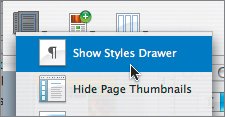 You can use the Styles Drawer to quickly access styles and change the font, size, and style of selected text. Just highlight the text; then double-click a style in the Styles Drawer.
|
11. | Format the text you just inserted. Use the following sample as a guide. Be certain to select all of the text only in the first column (the placeholder text will return to column 2).
 |
| |
12. | Switch back to the 09Brochure Text.pages file by selecting it in the Window menu.
|
13. | Select the back cover copy and add it to the clipboard by choosing Edit > Copy.
|
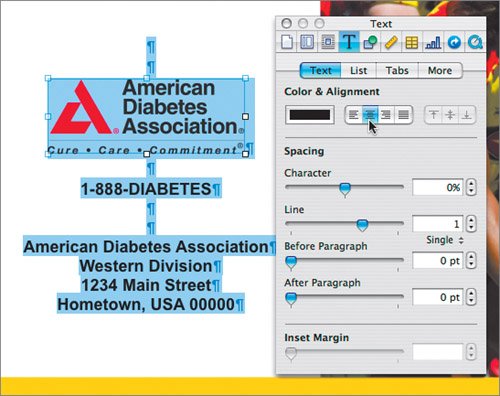
14. | Switch to your three-panel brochure and click in the middle column on page 1. Select both the headline and body text.
 |
15. | Choose Edit > Paste.
|
16. | Select the first line of text ("Know the Warning…") and apply the ADA Header style. Then select the next paragraph of text and apply the ADA Body style.
|
17. | Switch to the Text Inspector, click More, and select the "Remove hyphenation for paragraph" check box to make the text look better.
|
18. | Click in the space above the phone number and press Return five times.
|
19. | Choose Insert > Choose and choose Lesson 09 > Logos > tall_ada_logo_tall_4c.eps to insert the ADA logo.
|
20. | With the logo selected, switch to the Metrics Inspector and set the logo to a width of 2 in.
|
21. | Click to the right of the phone number and press Return to add a line space.
|
| |
22. | Select the logo and the rest of the text (including the phone number and address) by dragging. Apply the ADA Header style; then switch to the Text Inspector, click Text, and under Color & Alignment click the Center text button.
 |
23. | Choose Edit > Deselect All to make sure nothing is selected; then click in an empty area outside of any text block.
|
24. | Choose Insert > Choose and navigate to the Tour de Cure logo by choosing Lesson 09 > Logos > tour_logo_4c.eps.
|
25. | In the Metrics Inspector, set a width of 2 in for the logo; then switch to the Wrap Inspector and deselect the Object causes wrap check box.
|
| |
26. | Place the image near the bottom of the third column on page 1.
Your completed page 1 layout should closely match the following figure.
 |
27. | Save your work.
|
You should be getting quite comfortable working with columns, styles, and images. Completing the interior of the three-panel brochure is similar to completing page 1. It also requires a few new techniques, such as spreading text across multiple columns.
1. | Switch to page 2 of your brochure. Delete the large headline and the table from your layout.
The text from the third column automatically flows into the second column to fill in the area previously occupied by the headline and table. This is one benefit of using columns.
|
| |
2. | Switch to the document Brochure Text.pages and copy the text beneath the Inside Panels header to the clipboard.
You should be copying three headlines and three paragraphs.
|
3. | Select all of the text in columns 1 and 2 on page 2; then press Delete to remove the placeholder text. Choose Edit > Paste to add the text from the clipboard.
|
4. | Select the first headline ("Race And Family…"). Open the Font panel and set the font to Arial Bold at 16 pt.
|
5. | In the Text Inspector, click More, and select the Remove hyphenation for paragraph check box.
 |
6. | Select a word in the first headline and choose Format > Copy Character Style.
|
7. | Highlight the next headline and choose Format > Paste Character Style.
|
| |
8. | Repeat step 7 for the third headline.
 The text needs to be spread over three columns and it needs to be balanced so that the lengths are more even. The text needs to be spread over three columns and it needs to be balanced so that the lengths are more even.
|
9. | Click to place the insertion point to the left of the second headline ("Ride Solo Or…") and choose Insert > Column Break. Then click to the left of the third headline ("Fundraising To Cure…") and choose Insert > Column Break.
The document should now look like the following figure.
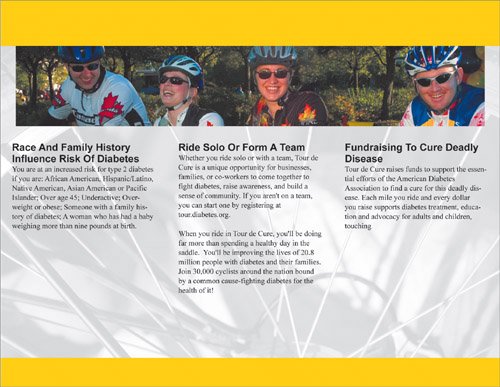 There is room to make the banner photo at the top larger to better fill up the layout. There is room to make the banner photo at the top larger to better fill up the layout.
|
10. | Double-click the photo to edit the mask. Click the dotted line that represents the mask, and drag down to reveal more of the photo. Reposition the photo to taste; then press Return to apply the mask.
|
11. | The hyphenation in the three columns is distracting. Use the Text Inspector to remove the hyphenation for each column.
The layout is almost complete. You have just two text boxes to add.
|
12. | Click outside the document pages to deselect all text elements.
|
| |
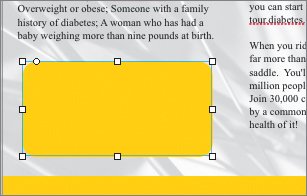
13. | In the toolbar, click the Objects button, choose Shapes, and choose the rounded rectangle.
A blue rounded rectangle is added in the middle of the page.
|
14. | In the Graphic Inspector, click the Fill color well to open the Colors window; then with the Magnifying glass sample yellow from the top bar.
 The fill of the rounded rectangle changes to match the top bar.
|
15. | In the Wrap Inspector, deselect the Object causes wrap check box.
|
16. | In the Metrics Inspector, set the width to 3 in and the height to 1.5 in.
|
17. | Position the box near the bottom of the first column on page 2.
 |
18. | Switch to the 09Brochure Text document and copy the text for the first inside panel callouts to the clipboard.
This text contains a Web address. By default, Pages attempts to automatically format Web addresses as hyperlinks. While this behavior is useful in Keynote, it's less useful in a printed document.
|
19. | Choose Pages > Preferences; then click the Auto-Correction button and deselect the Automatically detect email and web addresses check box. Close the Preferences dialog.
|
| |
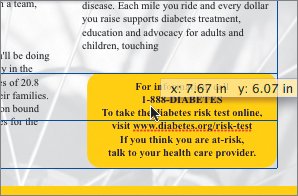
20. | Switch back to your brochure layout, double-click inside the rounded rectangle, and choose Edit > Paste.
|
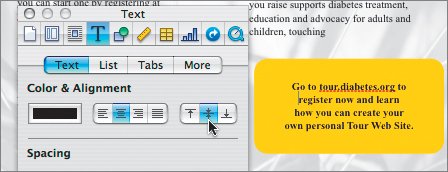
21. | Use the Font panel to change the text to bold. Then switch to the Text Inspector and click the Text button. Click the Center Text button to align the text to the center of the rounded rectangle. Use the Spacing: After Paragraph slider to choose a value of 0 pt.
|
22. | Click outside the active text to deselect it; then select the rounded rectangle and choose Edit > Duplicate to duplicate it.
|
23. | Drag the new duplicate rounded rectangle to the third column on page 2.
 Use alignment guides to help you position the box.
|
24. | Switch to your source text document and copy the text for the second inside panel callout to your clipboard.
|
25. | Select the text in the second rounded rectangle and choose Edit > Paste and Match Style. In the Text Inspector, click the Align Text to Middle button.
 |
| |
26. | Save your work.
You can open the file 09Tour Brochure Final.pages to compare your project.
|