Hack 90 Tips for Making Videos with Windows Movie Maker
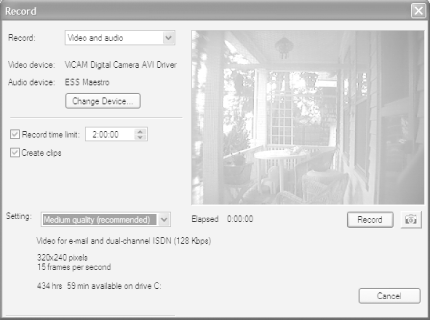
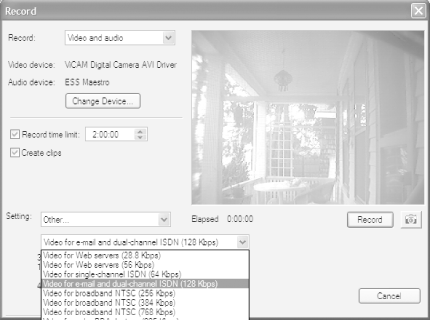
Hack 90 Tips for Making Videos with Windows Movie Maker Ways you can make better home movies and other videos with XP's built-in video maker . XP is Microsoft's most media-aware operating system, and it comes with built-in software for making and editing videos and home movies: Windows Movie Maker. (To run it, choose Start 10.6.1 Capture the Video ProperlyWindows Movie Maker lets you edit movies and add special effects and titles, but it all starts with capturing the video properly. So, first make sure that you bring the video into your PC in the best way. If you have an analog video camera or videotape, you need some way of turning those analog signals into digital data. You can do this via a video capture board or by using a device you can attach to your FireWire or USB port. If you're going the route of a video capture board, make sure the board has XP-certified drivers; otherwise , you may run into trouble. To find out whether a board has XP-certified drivers, search the Windows Compatibility List at www.microsoft.com/windows/catalog. If you have a USB port, you can import analog video with USB Instant Video or USB InstantDVD, both available from http://www.adstech.com. They're hardware/software combinations; to get the video into your PC, connect the analog video device to the USB Instant Video or USB InstantDVD device, and then connect a USB cable from the device to the USB port on your PC. (A similar product, called the Dazzle Digital Video Creator 150, will do the same thing. For details, go to http://www. dazzle .com.) Check your system documentation to see what type of USB port you have. If you have a USB 1.1 port, you won't be able to import high-quality video, and you'd be better off installing a video capture card. USB 2.0 will work fine, though. If you have a FireWire-enabled PC, you're also in luck, because its high-speed capacity is also suitable for importing video. You'll have to buy extra hardware, called Hollywood DV-Bridge. Plug your RCA cable or S-Video cable into Hollywood DV-Bridge, and then plug a FireWire cable from Hollywood DV-Bridge into your FireWire port, and you'll be able to send video to your PC. For more information, go to http://www.dazzle.com/products/hw_bridge.html. Once you've set up the hardware and your camera, recording the video is easy. Open Windows Movie Maker, choose File 10.6.2 Capturing Video with a Digital Video CameraIf you have a digital video camera or WebCam, you shouldn't need any extra hardware in order to capture video from it, as long as you have a FireWire port on your PC. These devices generally include built-in FireWire ports (the cameras might call the port an IEEE 1394 or an i.Link port). If you don't have a FireWire port on your PC, you can install a FireWire port card. These generally cost well under $100. Make sure that the card is OHCI (Open Host Controller Interface)-compliant. When you plug your digital camera into a FireWire port and turn it on, Windows will ask you what you want to do with the camera. Tell it that you want to Record in Movie Maker, and it will launch Movie Maker to the Record dialog box, with a video showing in the preview window. 10.6.3 Best Settings for Recording VideoBefore you start recording, you'll see a preview of your movie in the Record dialog box, shown in Figure 10-7. This is your chance to change your video settings, and choosing the proper setting is perhaps the most important step in creating your video. Figure 10-7. Options for recording video in Windows Movie Maker Look at the Setting drop-down box in Figure 10-7. This box lets you choose the quality of the video you're creating, which is the most important setting. These setting will be dependent on the input source; digital video cameras, for example, let you record at a higher quality than analog video cameras, so they will give you a wider range of options. Movie Maker comes with a number of preset profiles, including three basic ones: High, Medium, and Low quality. When you make a choice of your profile, Movie Maker tells you how many hours and minutes of recording time you have, based on your disk space and the disk requirements of the profile. For example, you might have 193 hours of recording time based on the High setting, but 1,630 hours based on the Low setting. Those three profiles aren't your only choices, though. You can choose from a much wider variety of profiles (as a general rule, I suggest doing that), based on what you plan to do with the eventual video. Do you plan to post the video on the Web? Just play it back at home? Run it on a personal digital assistant? These other profiles are designed for specific purposes like those. To select the profile, choose Other in the Setting drop-down list. Underneath it, a new drop-down list appears, shown in Figure 10-8, with a range of profiles from which you can choose. They're prebuilt for specific usesfor example, recording video to post on the Web, for color PDA devices, and for broadband NTSC (National Television Standards Committee), which is standard TV. Figure 10-8. Choosing from additional preset profiles Whenever you choose a profile, you'll see underneath it the frame size of the video, the frames per second, and if you choose a profile from Other, you'll also see the video bit rate. Here's what the settings mean:
To help you make the best choice among profiles, Table 10-1 shows the settings for every one of the Movie Maker profiles. Table 10-1. Settings for Movie Maker profiles
10.6.4 Tips for Making Your Own DVDsIf you use Movie Maker to make or copy your own videos and burn them to DVDs, consider these tips:
10.6.5 See Also
|
EAN: 2147483647
Pages: 166
 All Programs