Considering Callback Functions

 < Day Day Up > 

A value list control is easy to create, but it has one limitation you should know about. When you set the control's Row Source Type property to Value List, the Row Source property the actual list of items is limited to 2,045 characters or less. Most of the time, this limit will probably be adequate, but when it isn't, you need another solution such as a callback function to populate the list.

For Access to display a list box, certain parameters about that list box must be known first. For instance, Access must know how many rows and columns of data are in the control. The callback function passes these values to Access. A callback function is similar to any other function, but the difference is that you reference the function in the control's Row Source Type property. In addition, the callback function uses DAO, so you must reference that library for this populating method to work. That library is already referenced in the sample database, TimeTrack.mdb.

Let's walk through an example that uses a callback function to populate a list box control with all the forms in the current database. To do so, follow these steps:

  1. Insert a list box in either of the example forms and name it lstCallback.

  2. Enter CallbackList as the control's Row Source Type property. Just write right over the default Table/Query setting. The CallbackList function doesn't exist yet; that's the next step.

  3. Click the Code button to launch the VBE and insert a standard module. (Or use the Chapter 12 module.)

  4. Enter the following function and then save the module:


     Function CallbackList(ctrl As Control, id As Variant, _  row As Variant, col As Variant, code As Variant) As Variant   Select Case code     Case acLBInitialize       CallbackList = 1     Case acLBOpen       CallbackList = 1     Case acLBGetRowCount       CallbackList = CurrentProject.AllForms.Count     Case acLBGetColumnCount       CallbackList = 1     Case acLBGetColumnWidth       CallbackList = -1     Case acLBGetValue       CallbackList = CurrentProject.AllForms(row).Name     Case acLBGetFormat       CallbackList = -1   End Select End Function 

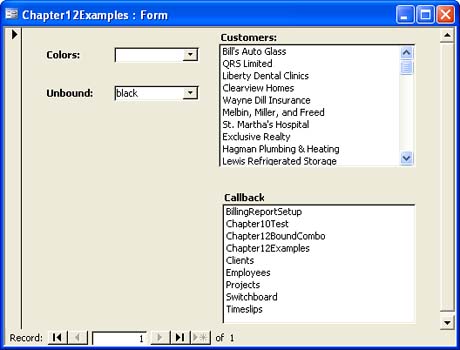
View the form in Form view. Figure 12.19 shows the form and the list control, which displays a list of all the forms.

Figure 12.19. This list box uses a callback function to populate it with a list of forms.

graphics/12fig19.jpg


Opening the form in Form view forces the list box to call the CallbackList function. There's a lot going on behind the scenes, and you'll want to use the same structure: the arguments passed and the intrinsic constants used in the Select Case statement.

The CurrentProject.AllForms.Count statement determines the number of rows in the control by counting the number of documents in the Forms collection. Then, the CurrentProject.AllForms(row).Name statement determines each item by retrieving the names of all the documents in the Forms collection.

Callback functions are an advanced but powerful technique. They let you take complete control of the data displayed by a list control. Access calls your code each time it wants to retrieve a row for the list, and you can decide dynamically what to supply for the row.

CASE STUDY: Using List Box Controls as Drill-Down Controls

You've seen a few common uses for list controls in this chapter. A combo box makes a good filtering control. In addition, a list box is a good place for listing database objects, such as reports and forms, so users can choose what they need. Now, let's look at an unconventional use for a list control.

Let's suppose you want to use the Employees form to view project information for individual employees. Now, you can use datasheet forms dropped in as subforms or opened with the click of a command button, but list controls make an interesting alternative. In this context, it's easy to apply what's known as the "drill-down" effect to a list control (not so easy with a datasheet form or subform). This term refers to clicking or double-clicking data to display additional data about the clicked or double-clicked item.

The first step is to create the query shown in Figure 12.20 and name it HoursWorkedByProject. Notice that the query is a Totals View so be sure to select the appropriate aggregate functions in each Total cell. In addition, enter the following reference in the EmployeeID column's Criteria cell:


 [Forms]![Employees]![EmployeeID]  

Figure 12.20. This query totals the hours per employee spent on each task.

graphics/12fig20.jpg


The list box shown on the left in the form shown in Figure 12.21 shows the results of the query, but those records are specific to the current employee. Refer to Table 12.3 to add the additional list box controls. Then, launch the form's module, enter the event procedures shown here, and save the form:


Private Sub Form_Current() lstProjects.Requery lstDetails.RowSource = "" End Sub Private Sub lstProjects_DblClick(Cancel As Integer) Dim strSQL As String strSQL = "SELECT Projects.ProjectID, Tasks.TaskName, " _ & "Tasks.HourlyRate, Timeslips.DateWorked " _ & "FROM (Projects INNER JOIN Tasks ON Projects.ProjectID=Tasks graphics/ccc.gif.ProjectID) " _ & "INNER JOIN Timeslips ON Tasks.TaskID=Timeslips.TaskID " _ & "WHERE EmployeeID = " & Forms!Employees!EmployeeID _ & " AND ProjectName = '" & lstProjects.Column(2) & "'" _ & "ORDER BY TaskName, ProjectName, DateWorked ASC" Debug.Print strSQL lstDetails.RowSource = strSQL End Sub

Figure 12.21. Use the list items to learn more about the item.

graphics/12fig21.jpg


Table 12.3. List Box Control Properties

Object

Property

Setting

list box

Name

Row Source

Column Count

Column Widths

lstProjects

HoursWorkedByProject

4

0";1.5";1.5";0.5"

list box

Name

Column Count

Column Widths

lstDetails

4

0";1.5";0.5";0.5"


You can use the form's navigation buttons or the filtering combo box control in the header to browse through the records. The form's Current event re-queries the projects control (on the left) to update it with only records for the current employee. This event also sets the detail displaying the control's Row Source property to "", so the list displays nothing.

To display more detailed information about an item in the left list box, double-click an item. The control's Dbl Click event sets the blank control's Row Source property to a SQL statement that reflects the current employee and the task you double-clicked in the first list box.

View the form in Form view. The first employee is Larry Schaff. Double-click the third item in the projects control Inventory Manager with a total of 68.75 hours. The double-click event updates the contents of the second list box, as shown in Figure 12.22.

Figure 12.22. Use the list items to learn more about the item.

graphics/12fig22.jpg


You can see that Larry has clocked hours in project management on the inventory manager project for Bill's Auto Glass on three different days. He has spent part of four days on the project in support, and three days in testing. Each task has its own hourly rate, and you can even see the dates on which Larry performed the specific tasks.

Although this approach for displaying data isn't as common as some others, you might find it an approachable and easy alternative after you're familiar with list controls, their properties, and their unique behaviors.


     < Day Day Up > 


    Automating Microsoft Access with VBA
    Automating Microsoft Access with VBA
    ISBN: 0789732440
    EAN: 2147483647
    Year: 2003
    Pages: 186

    flylib.com © 2008-2017.
    If you may any questions please contact us: flylib@qtcs.net