| Access actually comes with two built-in programming languages. Normally, professional Access developers work with a language called Visual Basic for Applications (VBA). Teaching you anything about VBA is far beyond the scope of this book. But the second language, called macros , is intended for beginning users. If you can select items from a combo box, you can write a macro. If you've never done any programming, don't worry. Programming with macros is just writing down a list of instructions for the computer to follow. In the next few pages, we'll show you how easily you can write simple macros in Access. Note  | One big difference between macros in Access and macros you might be familiar with in Word or Excel is that Access doesn't have a macro recorder. |
Building a Macro Your first macro will do something very simple: cause the computer to emit a beep from its speaker. To build your first macro, follow these steps: -
Click the Macros shortcut in the Database window. -
Click the New button on the Database window toolbar to open a design grid for the new macro. -
Click in the first row of the Action column for the macro. This reveals an arrow for a drop-down list. Click the arrow and select Beep from the list. -
Select File , Save . -
In the Save As dialog box, enter Beep as the macro name and click OK . -
Close the macro. -
In the Database window, double-click the Beep macro. Your computer will beep. A macro consists of one or more actions. In the case of the Beep macro, it consists of a single beep action, which instructs the computer to beep. That's pretty simple, isn't it? Now we'll show you a more complex (and possibly more useful) example. This macro opens a form and then moves to a specific record within the form. Follow these steps: -
Click the Macros shortcut in the Database window. -
Click the New button on the Database window toolbar, which opens a design grid for the new macro. -
Select the OpenForm action in the first row of the Action column. When you do this, the lower pane of the macro designer shows the action arguments for the OpenForm action (see Figure 15.10). This is similar to what the Table designer does when you add a new field to a table. Figure 15.10. Setting action arguments for a macro.  -
Select the Plants form in the Form Name action argument. -
Click in the second row of the Action column, and select the FindRecord action. -
Enter Chamomile in the Find What action argument. -
Select Any Part of Field in the Match action argument. -
Select File , Save . -
In the Save As dialog box, enter Chamomile as the macro name and click OK . -
Close the macro. -
In the Database window, select the Chamomile macro. Click the Run toolbar button, and the Plants form opens and displays the record for German Chamomile. When a macro contains more than one action, Access executes the actions in order from top to bottom. In this case, the first action opens a form and the second macro finds a record on the form (just as if you had opened the form yourself and then selected Edit, Find from the Access menus ). The macro programming language in Access consists of dozens of macro actions. Many of these perform advanced Access tasks beyond the scope of this book. Table 15.3 lists some of the macro actions you might want to experiment with. Table 15.3. Some Macro Actions | Action | Meaning | | ApplyFilter | Applies a filter to a form to limit the records shown | | Beep | Causes the computer to beep | | Close | Closes an open object, such as a form or report | | FindNext | Repeats the previous Find operation | | FindRecord | Finds a particular record on a form | | Hourglass | Turns the hourglass cursor on or off | | Maximize | Maximizes the current window within Access | | Minimize | Minimizes the current window within Access | | MsgBox | Displays a message in a separate dialog box | | OpenForm | Opens a form | | OpenQuery | Opens a query | | OpenReport | Opens a report | | OpenTable | Opens a table | | Quit | Quits Access | | SendObject | Sends the current object via email | For a third macro example, you'll use the ApplyFilter action. You learned about filtering in Chapter 8, "Creating and Using Data Entry Forms." In this macro, we'll show you how to apply a filter automatically and combine multiple filters into a single macro. This example is fairly complex, but as you work through it, you'll see that it mainly involves putting together pieces you've already worked with. Here's how to do it: -
Click the Macros shortcut in the Database window. -
Click the New button on the Database Window toolbar. This opens a design grid for the new macro. -
Select View , Macro Names to add another column to the macro design grid. With macro names, you can combine similar activities into a single macro for easier organization. -
Type Decorative as the macro name in the first row of the Macro Name column. -
Select the ApplyFilter action in the first row of the Action column. -
Enter [TypeID]=1 in the Where Condition action argument for this row. This tells Access that this particular filter will select only records in which the TypeID is equal to 1. -
Type Edible as the macro name in the second row of the Macro Name column. -
Select the ApplyFilter action in the second row of the Action column. -
Enter [TypeID]=2 in the Where Condition action argument for this row. -
Type Medicinal as the macro name in the third row of the Macro Name column. -
Select the ApplyFilter action in the third row of the Action column. -
Enter [TypeID]=3 in the Where Condition action argument for this row. Figure 15.11 shows the macro with all three rows entered. Figure 15.11. Creating a macro to perform multiple distinct activities. 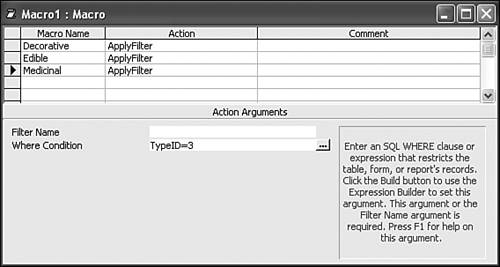 -
Select File , Save . -
In the Save As dialog box, enter PlantFilters as the macro name and click OK . -
Close the macro. -
In the Database window, click the Forms shortcut. -
Select the Plants form and click the Design toolbar button. -
Select View , Toolbox to show the Toolbox, if it is not already visible. -
Select the Command Button tool in the Toolbox, and then click the form in an empty area to create a new button. -
In the Command Button Wizard, select the Miscellaneous category. Then select the Run Macro action and click Next . -
Select PlantFilters.Decorative as the macro to run. Click Next . -
Select the Text choice and set the text of the button to Decorative . Click Finish . -
Select the Command Button tool in the Toolbox; then click the form in an empty area to create a second new button. -
In the Command Button Wizard, select the Miscellaneous category. Then select the Run Macro action and click Next . -
Select PlantFilters.Edible as the macro to run; then click Next . -
Select the Text choice and set the text of the button to Edible . Click Finish . -
Select the Command Button tool in the Toolbox. Click the form in an empty area to create a third new button. -
In the Command Button Wizard, select the Miscellaneous category. Then select the Run Macro action and click Next . -
Select PlantFilters.Medicinal as the macro to run and click Next . -
Select the Text choice and set the text of the button to Medicinal . Click Finish . -
Select File , Save . -
Select View , Form View . -
Click the new buttons one at a time. You'll see that the form changes to display only the selected records. For example, Figure 15.12 shows the form with the Medicinal filter applied; you can see from the status bar that only three medicinal plants are visible. Figure 15.12. The form filtered by applying a macro.  -
To view all the records in the table, click the Remove Filter button on the toolbar. Whew! By now, you should have some hint of the automation that a few well- chosen macros can bring to your application. Next, we'll look at some ways to make working with macros easier. Building Macros with Drag and Drop Access includes shortcuts for some macro actions. For example, you can create a macro to open a form or a report without selecting any actions or action arguments. Here's how: -
Click the Macros shortcut in the Database window. -
Click the New button on the Database window toolbar to open a design grid for the new macro. -
Arrange the windows in Access so that you can see both the macro window and the Database window at the same time. -
Click the Reports shortcut in the Database window. -
Drag the CatalogsBySpecialty report from the Database window and drop it on the first row of the macro. This creates an OpenReport action referring to the CatalogsBySpecialty report. -
Change the View action argument to Print Preview . -
Select File , Save . -
In the Save As dialog box, enter CatalogsReport as the macro name and click OK . -
Close the macro. -
Click the Macros shortcut in the Database window. -
In the Database window, double-click the CatalogsReport macro. The CatalogsBySpecialty report opens in print preview mode. You can drag any object from the Database windowa table, query, form, or reportto a macro to create a macro that opens that object. Creating Buttons from Macros By creating buttons that run the macros, you can also use macros to make your forms more convenient . In fact, you can do this without writing any more code! Here's how to add the CatalogsReport macro to a form: -
Click the Forms shortcut in the Database window. -
Select the Catalogs form. -
Click the Design toolbar button to open the form in design view. -
Click the Macros shortcut in the Database window. -
Drag the CatalogsReport macro from the Database window and drop it on the footer section of the form. This creates a new command button on the form. -
Press F4 to open the Properties window. -
Change the Caption property of the command button by typing Preview Report . -
Select File , Save . -
Close the Properties window. -
Select View , Form View ; the form displays with the new Preview Report button in the footer. -
Click the Preview Report button to open the CatalogsBySpecialty report in print preview mode, as shown in Figure 15.13. Figure 15.13. Opening a report from a button based on a macro.  Any time you drag a macro to a form that's open in design view, Access creates a command button that runs that macro. This provides you with a powerful alternative to the Button Wizard for creating custom command buttons. Pause for a moment and think about how all the pieces fit together in this example: -
The data is stored in the Catalogs table. -
The form is based on the Catalogs table. -
The CatalogsBySpecialty query is based on the Catalogs table as well. -
The CatalogsBySpecialty report is based on the CatalogsBySpecialty query. -
The macro was created by dragging the report to the macro designer. -
The button was created by dragging the macro to the form designer. You've learned quite a bit about how all the pieces of Access fit together by now!  |