The Design Process
|
|
There's a lot more to learn about relational theory, but right now we're going to walk through the process of actually designing and normalizing some tables for our sample book database. The most important thing to learn from this phase is never to skip it. Few developers can correctly normalize their data in action-most of us need to work through the process on paper first. Doing so gives
you a chance to work out flaws that could have serious repercussions in a working database. The development process is simple, although lengthy:
-
Gather information.
-
Define the database's purpose.
-
Create a list of all the data elements.
-
Divide the data elements into tables.
-
Normalize the tables.
-
Normalize new tables created during step 5.
-
Define datatypes, relationships and joins, foreign keys, and indexes.
-
Create the tables using the lists as reference.
-
Enter sample data.
-
Create prototype queries, forms, and reports.
-
Let the users evaluate the product.
-
Redesign based on user feedback.
-
Build actual forms and reports.
-
Repeat steps 11 through 13 as necessary.
-
Test beta.
-
Release product.
-
Maintain data and database.
Steps 1 through 7 are strictly design-you're creating your database on paper. Step 8 begins the development process. You'll implement and modify the original design throughout the development phase. Few developers are so intuitive that they know exactly what the database will look like when they begin step 8. (We'll only work through step 7 in this chapter. Steps 8 through 16 are often repeated and don't adhere to any strict order.)
Know Your Data
Perhaps one of the biggest mistakes a developer can make is to ignore the actual users. There's simply no way you can garner enough information to build a database by listening to the managers tell you what they want the database to do. Of course, you must give them your ear. But when they're done, speak to the users and pay close attention to their comments because they'll have the information you're really after-they'll tell you what the database needs to do. There's nothing worse than delivering a database spearheaded by managers that won't even use the product only to have the users tell you it doesn't get the job done.
We don't mean to put managers in a bad light, but managers seldom know how the work gets done; they just know how the finished product looks. On the other hand, the users have been getting the job done, despite inadequate processing support (why else would they have called you?), so they understand the mysterious process of gathering, manipulating, and reporting the data in a way the manager never will. There's no substitute for talking with the users and even watching them work if possible. Gather copies of the forms they use to gather data and the reports they generate.
Talk to the people actually doing the work, and talk to the people who know the future goals for the business and, most likely, the database. After your fact-finding mission is complete, compose a mission statement of sorts. It can be a paragraph or a page, but it needs to be as specific and realistic as possible in regards to the database's purpose. You don't need to list actual processing steps, but you must list the results of those steps.
After the users approve the mission statement, sit down with those forms and reports you gathered from users and managers, and start listing the actual data items that the database will store. If you're converting an existing database, start with those tables. Keep in mind that they may be improperly normalized or in flat-file format, but that's not important at this stage. Right now, you just need a comprehensive list of the data.
| Note | Some developers find a series of mock-up forms created at this point help them through the normalization process that follows. Doing so certainly isn't necessary, but feel free to take a bit of creative license with the design process, and add the tools you find most helpful. Just make sure every data item on the paper forms and reports is represented in at least one of your mock-up forms. Others don't bother creating mock-up forms because they simply can't visualize forms at this stage without getting ahead of themselves and leaving holes. |
Now, let's put what we know to use by actually designing the sample book database we've referred to a few times in earlier examples. Specifically, let's suppose we're tracking books for a group or organization that accepts donated books and then lends them to others in the group (similar to a library). The following is a list of known items for our sample book tracking database: Title, ISBN, Category, Page Count, Author, Publisher, Type (hardback or paperback), Contributor, Borrower, Borrower's Address, Borrower's Phone, Lent Date, Due Date, and Return Date. Keep in mind that the number of data items can change during the design process. But this is where we'll start.
On CD-ROM All the tables we'll create in this chapter are available for you to review in the Chapter05.mdb file on the accompanying CD.
Applying Normal Forms
Once you have a list of data items, you're ready to start normalizing that data. At this point, you're just using pen and paper-don't attempt to create and normalize your tables without first working through the normalization process on paper. The first step is to identify the entities. An entity is a collection of one type of data (see the list of database definitions earlier in this chapter). For instance, our sample database stores data about books and information regarding the lending of those books. At this point, two entities are coming to light-books and lending information. (The number of entities might increase as we normalize our data.)
| Tip | Forget the original paper forms and reports because most likely those forms aren't based on normalized data. They're helpful for identifying data items, but don't try to normalize your tables based on the how the data are arranged in those forms, or you'll bury yourself before you get started. Forget what you know about how the users have been getting the job done and stick to normalization rules. It can be difficult to take on the task without being influenced by what you've seen, but try. |
Once you identify the entities, start listing the data items under their appropriate categories. For instance, book title and page count describe the book, while borrower and lending data describe the lending process. After this step, our initial list has become two:
| Books | Lending |
|---|---|
| Title | Borrower Name |
| ISBN | Borrower Address |
| Category | Borrower Phone |
| Page Count | Lent Date |
| Author | Due Date |
| Publisher | Return Date |
| Type | |
| Contributor |
At the end of this task, you might have several lists or just a few-each representing a table in your database. You'll probably end up with more by the time you're done, so don't worry if you have only a few tables in the beginning. In fact, some databases require only two or three tables.
Meeting 1NF Requirements
At this point, you can begin breaking down the data items into the smallest possible units. For instance, author's name can be subdivided into author's first name and author's last name. The same is true of the contributor and the borrower. In addition, the borrower's address should comprise several fields: street address, city, state, and zip code. As you gain experience, you'll probably find that you do this automatically when creating the first list of items in step 3. The following lists have atomic fields-we've met the first condition of 1NF:
| Books | Lending |
|---|---|
| Title | Borrower Last Name |
| ISBN | Borrower First Name |
| Category | Borrower Street Address |
| Page Count | Borrower City |
| Author First Name | Borrower State |
| Author Last Name | Borrower ZIP Code |
| Publisher | Borrower Phone |
| Type | Lent Date |
| Contributor Last Name | Due Date |
| Contributor First Name | Return Date |
If you've ever worked with an improperly normalized table, you already understand the importance of reducing each data item to the smallest possible unit. If not, names are a good way to illustrate the need for this step. You could enter a person's full name in one field. Furthermore, let's suppose that you enter the names in first name, last name format. How would you search those records or sort by last names? You could, but doing so would involve some serious programming tricks. In contrast, storing the last name and the first name in different fields satisfies normalization rules and makes searching, sorting, and manipulating the data easier.
Data items that need further division aren't always as obvious as names. In fact, the decision to subdivide may depend more on the database's purpose (business rules) and less on the actual data. Street addresses are a good example. Most of the time, you'll enter the street number and the street name in the same field, but that's not always the case. For instance, a real estate database might need to sort or search by street name or otherwise group addresses by numbered lots. To satisfy this need easily, you'd want to store each street address component in separate fields.
| Tip | Tip As you're working through the design on paper, jot down notes and unique situations that explain decisions that might not be obvious or might be quickly forgotten. Then, keep these sketches and lists with your documentation. Later, those penned-in details can prove invaluable to understanding and explaining early decisions. |
Next, check each table for multivalued fields. Every entry should be just one instance of the item it represents. For instance, a book could have more than one category; a book could be both an adventure and a classic. So, we must move the category value to another table. Type is also a problem, since you could end up with both a hardback and a paperback version of the same book. Move the type value to another table. Now let's look at the lending list. There don't appear to be any multivalued fields, so we won't change that list during this step. The following books list meets the second condition of 1NF-there are no multivalued fields.
| Books | Categories | Types |
|---|---|---|
| Title | Category | Type ISBN |
| Page Count | ||
| Author First Name | ||
| Author Last Name | ||
| Publisher | ||
| Contributor Last Name | ||
| Contributor First Name |
The third 1NF condition is that you move repeating groups to another table. There will be a limited number of publishers, and eventually some or even all those publishers might be repeated, so let's move publishers in the books list to a new list. No repeating groups in the lending lists jump right out at us, so we'll not make any changes to that list. The following shows the books list and its resulting lists with no repeating group fields (we hope).
| Books | Categories | Types | Publishers |
|---|---|---|---|
| Title | Category | Type | Publisher |
| ISBN | |||
| Page Count | |||
| Author First Name | |||
| Author Last Name | |||
| Contributor Last Name | |||
| Contributor First Name |
| Note | Don't be surprised if your 1NF-compliant lists include new fields. Certainly each will include at least one new field if you use surrogate keys. In addition, subdividing your data may result in new fields. |
The final condition of 1NF is that each table must have a primary key. At this point, review each table for candidate keys-the field or fields that uniquely identify the record. If you're going to use surrogate keys, simply add a new field to each table, and properly identify it as the primary key. We'll add a system-generated datatype to each field instead of depending on natural data.
Those insisting on natural key primary keys will have a bit more work because:
-
It's often difficult to find a set of fields that uniquely identify each record. In extreme cases, you may find the primary key requires every field in the table.
-
Businesses change, and ultimately data and the purposes that data serves change. Adding a field to or deleting a field from a primary key can spell havoc for your database, no matter how deftly you attack the change. Anticipating the potential for long-term change this early in the design process is difficult, if not impossible.
All the lists below are normalized to 1NF.
| Books | Categories | Types | Publishers | Lending |
|---|---|---|---|---|
| BookID (PK) | CategoryID (PK) | TypeID (PK) | PublisherID (PK) | LendingID (PK) |
| Title | Category | Type | Publisher | Borrower Last Name |
| ISBN | Borrower First Name | |||
| Page Count | Borrower Street Address | |||
| Author First Name | Borrower City | |||
| Author Last Name | Borrower State | |||
| Contributor Last Name | Borrower ZIP Code | |||
| Contributor Last Name | Borrower Phone | |||
| Lent Date Due Date Return Date |
| Note | You might want to take a stab at assigning foreign key fields and establishing relationships. It might be a bit too early in the process to get them all exactly right. However, some developers do like to get this phase underway. Others wait until all the tables are fully normalized, to avoid confusion. |
Meeting 2NF Requirements
Take your lists of 1NF tables and review each item carefully. Each field must provide information about (or describe) the primary key. Moving fields to other tables and even creating new tables are common occurrences during this stage.
Think back to your earlier categories from step 3, and make sure each value actually identifies, describes, or represents that entity. To do so, simply compare each field to your list of categories. If an item has characteristics that describe more than one category, you must move that field to another table. Which table you move the field to depends on the data. You might even have to create a new table.
Our original tables have a few problems. The books table list has two fields for the author and the contributor. Either one of the author fields could be said to describe the other more strongly than it describes the primary key value (the entity). The same is true with the contributor fields. So, move both to new tables. All the borrower information also fails this test, so move all the borrower data to a new table. Now the lists are normalized to 2NF.
| Books | Categories | Types | Publishers | Authors | Contributors |
|---|---|---|---|---|---|
| BookID (PK) | CategoryID (PK) | TypeID (PK) | PublisherID (PK) | AuthorID (PK) | ContributorID (PK) |
| Title | Category | Type | Publisher | Author Last Name | Contributor Last Name |
| ISBN | Author First | Name Contributor First Name | |||
| Page Count |
| Lending | Borrowers |
|---|---|
| LendingID (PK) | BorrowerID (PK) |
| Lent Date | Borrower Last Name |
| Due Date | Borrower First Name |
| Return Date | Borrower Street Address |
| Borrower City | |
| Borrower State | |
| Borrower ZIP Code | |
| Borrower Phone |
Some might see this as a 3NF issue, since we're dealing with non-key fields, but the two areas do seem to overlap sometimes. You can remove the first or last name for either the contributor or the author without adversely affecting the contents of the other name. In other words, deleting the author's first name field doesn't necessarily affect the contents of the author's last name field. That's why this particular problem seems to fall more into the 2NF arena. The two name fields aren't dependent on each other, but the names do describe each other more than they describe the entity (the book).
If you're using natural data and a primary key is based on more than one field, you have one more step. Each field must describe the primary key, as a whole. That means you can't have a field that describes only one field in the primary key. If you find such a field, move it to another table or create a new table.
Meeting 3NF Requirements
At this stage, you want to rid your tables of inappropriate dependencies. By that, we mean you must remove any field that describes or depends on a non-key field. Basically, it's the same step you took in normalizing to 2NF, but in 2NF you secured dependency on the primary key. Now, you want to apply this logic to non-key dependencies.
| Tip | An easy way to find non-key dependent fields is to imagine that you've deleted each field (one at a time) from the table and see if doing so affects any other field. This trick won't catch all non-key dependent fields, but it's an easy way to catch some of them. |
The only list with a non-key dependency is the borrower list, and some people would ignore this one. As you probably know, zip codes depend on the address. You can leave the street address in the borrower's list, but the city and state will be repeating groups that need to go to another table. Yes, we probably could have caught them when looking for repeating data earlier, but this situation wasn't quite as obvious as the others we caught. The borrowers list quickly becomes two, and now our lists are all normalized to 3NF.
| Borrowers | ZIP Codes |
|---|---|
| BorrowerID (PK) | ZIPCodeID (PK) |
| Borrower Last Name | City |
| Borrower First Name | State |
| Borrower Street Address | ZIP Code |
| Borrower ZIP | Code |
| Borrower Phone |
| Note | The zip codes structure is more complicated than we've shown here because codes aren't always unique. Two different cities in different states could use the same zip code. In addition, a zip code often depends on the street address, and we didn't include that dependency in our example. We'll not attempt to resolve this issue in this exercise because we're simply illustrating the normalization process in the early stages of your design phase. To take the zip code system's true structure into account would unnecessarily complicate the task at hand. However, in real-world situations you will often find that the system you're trying to include in your normalizing scheme is inconsistent. |
Meeting BCNF Requirements
BCNF is really a subrule of 3NF, but the two forms tend to merge in most discussions. In fact, if you really apply 3NF, there won't be anything left to change during this step. But, finding interdependencies among non-key fields can be difficult, and this is just one more chance to catch problems you missed.
This rule requires that there can be no chance of dependency, and it can be hard to define. Addresses are another good example because zip codes depend on city and state data. To fully normalize to BCNF, you must move these address dependencies to new tables, which we did in 3NF. However, you could take the whole matter a step further and move the city and state fields to yet another table, because there is still a possibility of dependency between the city and state fields.
| Zip Codes | Cities |
|---|---|
| ZipCodeID (PK) | CityID (PK) |
| City | City |
| Zip Code | State |
Such an arrangement can become complicated and actually slow down performance. You might have to choose between normalization and performance, and many developers often skip the BCNF step. However, as we mentioned earlier, with today's fast systems, performance isn't as persuasive an argument against BCNF as it used to be.
Do you recall how many lists we had in the beginning? Our two lists have been normalized into ten.
Don't consider your tables complete at this point. They're probably close, but we still have a few possible situations that could result in changes. First, the phone field in the borrowers list has the potential to be a problem if a borrower wants to leave more than one number. In such a simple database, one phone number is probably adequate, but this is one of those questions you might want to deal with now. Before entering any data, you could move the phone field to a new table and include a field to identify the type of phone each record represents: home, fax, cell, and so on, which means yet another table to list phone types.
At some time in the future, you might decide to add the contributor address information, especially if those contributors are interested in tax deductions for their donations. Doing so also might help resolve another problem that could arise-contributors with the same name. Although the primary key value solves this problem internally, there's no way for you to know that the existing contributor isn't the one you're currently dealing with unless you have more precise information. As with the phone situation, you might want to resolve this now before going any further.
If you decide to add address information, you don't need duplicate zip code and city tables; use the existing ones. The relationships can handle this arrangement.
Defining Datatypes, Relationships, Joins, Foreign Keys, and Indexes
Now you're ready to assign each field a datatype and to identify indexes and relationships between tables. You're still working with paper lists, so don't turn on your computer just yet.
Many developers still use field size to help limit data entry, but no longer worry about it in terms of resources because today's technology simply negates the problem. Most systems now have plenty of memory to go around, so limiting an entry's size to conserve on resources isn't the critical issue it once was. Old habits die hard though, and setting an appropriate field size is still an efficient development process.
In regards to datatypes, choose the type that most adequately accommodates the data. Doing so has two benefits: it's an easy form of validation, and you'll save on resources. For instance, a numeric field won't accept text, so assigning a numeric datatype is a field-level attempt at protecting the integrity of your data. In addition, if a two-character field is adequate, assign a two-character field size. Don't be stingy-allow enough room for the largest possible entry. Just don't waste your resources unnecessarily. Table 5.1 shows the tentative datatypes for all our fields:
| Table | Field | Datatype |
|---|---|---|
| Books | BookID Title SBN Page Count | Numeric[*] Text Text Text |
| Categories | CategoryID Category | Numeric[*] Text |
| Types | TypeID (PK) Type | Numeric[*] Text |
| Publishers | PublisherID (PK) Publisher' | Numeric[*] Text |
| Authors | AuthorID (PK) Author Last Name Author First Name | Numeric[*] Text Text |
| Contributors | ContributorID (PK) Contributor Last Name Contributor First Name | Numeric[*] Text Text |
| Lending | LendingID (PK) Lent Date Due Date Return Date | Numeric[*] Date/Time Date/Time Date/Time |
| Borrowers | BorrowerID (PK) Borrower Last Name Borrower First Name Borrower Street Address Borrower ZIP Code Borrower Phone | Numeric[*] Text Text Text Text Text |
| ZIP Codes | ZIPCodeID (PK) City ZIP Code | Numeric[*] Number Text |
| Cities | CityID (PK) City State | Numeric[*] Text Text |
|
[*] Refers to the system's self-generating auto number datatype. | ||
About Relationships
Establishing relationships between fully normalized tables is usually easy. At this point, you are so familiar with your data that the associations seem obvious. Keep in mind that these relationships are the tools you'll use to pull your data together into usable units. For instance, those books all have authors, but the author information is stored in the author table. That means you'll need to create a relationship between the two tables in order to view the author for each book or to view all the books written by a particular author. Indicate a relationship by drawing a line from table to table or by creating a legend that lists each relationship and identifies its type.
| Note | This section won't attempt to teach you how to create relationships in any particular RDBMS. Those features are unique to each system. Refer to your system's documentation for specifics on creating and enforcing relationships. |
Relationships are associations between tables. You'll use these relationships to pull together all that normalized data. In this section, we'll review three types of relationships:
One-to-one A one-to-one relationship is probably the least common of the three. That's because this relationship relates one record to another, but limits the results of that relationship to just one record in either table. In other words, each record relates to none or only one record
in the other table. You'll probably find that this relationship is most often forced by business rules and not the data itself. For instance, our example book database could force a lending rule that each lender can borrow only one book at a time, creating a one-to-one relationship between borrowers and available books. In this case, the relationship is forced by a business rule and doesn't flow naturally from the data-which will almost always be the case.
One-to-many Almost all relationships falls into this category, in which one record in the primary key table relates to none, one, or even many records in the foreign key table. Following our book example, a book will have only one publisher, but each publisher can have many books. In this case, the publisher table contains the primary key value, and the book table stores the appropriate publisher primary key value as a foreign key. Figure 5.1 illustrates the relationship between these two entities.
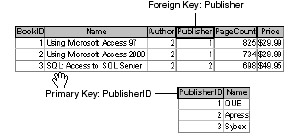
Figure 5.1: The publisher primary key becomes the foreign key in the books table.
Tip In discussions about relationships, you'll often see the tables in the relationship referred to as the one table or the many table. These terms really refer to primary and foreign key placement. The one table contains the relationship's primary key, and the many table contains the relationship's foreign key. However, the many table contains a primary key of its own; it just won't be relevant to that particular relationship.
Many-to-many This relationship is a bit unique and a pain to work with because you're forced to create a third table to accommodate this relationship (in most RDBMSs). It's similar to the first type, the one-to-one relationship, except there's no limit-any record can match any number of records, and vice versa.
You end up with three tables: the two many tables as well as a linking table that contains the primary keys from both many tables as foreign keys. The linking table has a one-to-many relationship with both many tables, so there's no direct relationship between the two many tables in the end. Each record in the linking table relates to only one record in either many table. But both many tables may have many records in the linking table.
Our sample book database has a good example. Initially, you might want to treat the author primary key as a foreign key in the book table, to relate each book to a specific author. But some books have more than one author, and some authors write lots of books. The answer is to create a linking table that contains its own primary key and the primary key from both the books and authors tables. The books table will no longer contain a foreign key to the authors table. Figure 5.2 illustrates the use of the linking table between two many tables.
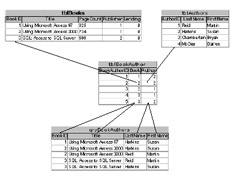
Figure 5.2: Create a linking table to relate two many tables.
Joins
No discussion of relationships is complete without including information on joins. A join is a rule that further defines a relationship by determining which records are selected or acted upon. That means, like relationships, joins really don't come into play until you start querying records. The three most common types of joins are inner, left outer, and right outer.
Inner joins Most relationships depend on an inner join to determine which records are acted upon. This simple join returns only those records from both tables in which there is a matching value in the related fields (primary and foreign key fields). Figure 5.3 is a graphic illustration of an inner join. Imagine that each circle represents a table on either side of a relationship. The intersection of the circles represents those records that contain a matching primary and foreign key value. The inner join returns only those records that intersect.
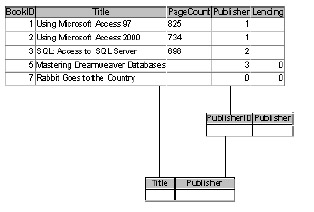
Figure 5.3: An inner join is well represented by two intersecting circles.Using our book database, let's suppose you have several books listed but you haven't entered any publisher information yet. Running a query based on the books and publishers tables will return an empty recordset, as shown in Figure 5.4. That's because there are no matching values to relate the two entities. Later, once you've entered some publisher information, the query will return a list-but will return only those books for which the publisher foreign key matches a publisher primary key. In other words, if you have books for which you've not yet listed a publisher, the query won't return those books.
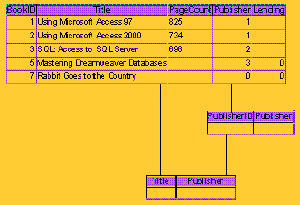
Figure 5.4: An inner join returns records only when there's a matching key value.Left outer join The left outer join returns records from both sides of a relationship. However, the left outer returns all the records from one side of a relationship-even when there's no matching record in the related table. Any matching values in the related table are also returned. But the important point to grasp is that the "one" side of the one-to-many relationship returns all its records.
Once again, we can illustrate this join using circles. The circle on the left in Figure 5.5 represents the one table; the circle on the right represents the many table. Notice that the entire left circle is shaded, and that means the query returns all the records in that table. However, the query returns only those records from the many table (the circle on the right) in which the primary and foreign key values match. The resulting recordset will most likely contain seemingly incomplete records.
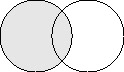
Figure 5.5: The shaded area represents the records returned by a left outer join.Now, let's suppose that the inner join we discussed isn't adequate for a particular need in the book database. We want to see a complete list of books and their publishers, even if the book doesn't have a listed publisher. In this case, we'd use a left outer join to return all the books in the books table (the one side of the relationship) and any matching values in the publishers table as shown in Figure 5.6 (the many side).
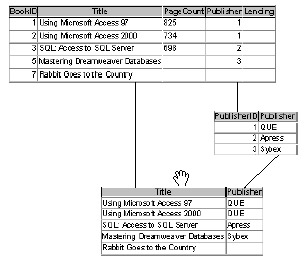
Figure 5.6: A left outer join returns all records from the one table.Right outer join The right outer join is similar to the left outer join. The difference is that the right outer join returns all the records from the right side of the relationship-or the many table. Records from the one side are included in the results only when the primary/foreign key values match.
Figure 5.7 uses the circles one last time to illustrate a join. The shaded circle on the right illustrates the many table, and a right outer join returns all the records in this table. The circle on the left represents the one table, and the shaded intersection represents those records in which the primary and foreign key values from both tables match.
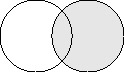
Figure 5.7: The right outer join returns all the records from the many table and only those records that match a key value from the one table.In our last example, we returned all the books regardless of whether they had a matching publisher. Let's suppose you want to return all the listed publishers and their books. The emphasis is on returning all the publishers, regardless of whether they have a book in the list. Figure 5.8 shows the results of this type of join.
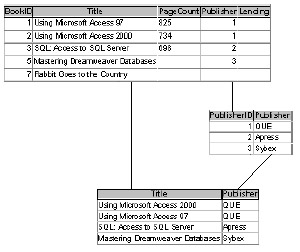
Figure 5.8: Use a right outer join to return all the publishers and any of their listed books.
Assigning Foreign Keys
Choosing foreign keys is much easier once you define the relationships between your tables. (If you assigned foreign keys earlier, you might want to re-evaluate your choices now that the relationships are clear.) Simply put, one table's primary key becomes another table's foreign key. Of course, this means you add a new field to many of your tables. It's possible for a table to contain both a primary key and a foreign key, but there's no requirement that every table contain both. In addition, a table can have more than one foreign key (as you saw earlier in the table that links two many tables), but a table will never have more than one primary key. Apply the following guidelines for adding foreign keys to related tables:
One-to-one Most of the time you can eliminate a one-to-one relationship by simply combining the data in one table.
One-to-many Add the primary key from the one table to the related many table as a foreign key.
Many-to-many Add the primary keys from both many tables to the third linking table as foreign keys.
Initially, most of the relationships between our sample tables are many-to-many:
| Books | Datatype | Relationship Type | Foreign Key Field |
|---|---|---|---|
| BookID (PK) | Numeric[*] | ||
| Title | Text | ||
| ISBN | Text | ||
| Page Count | Text | ||
| Category (FK) | Numeric | many-to-many | Categories.CategoryID |
| Type (FK) | Numeric | many-to-many | Types.TypeID |
| Publisher (FK) | Numeric | one-to-many | Publishers.PublisherID |
| Author (FK) | Numeric | many-to-many | Authors.AuthorID |
| Contributor (FK) | Numeric | many-to-many | Contributors.ContributorID |
| Lending (FK) | Numeric | one-to-many | Lending.LendingID |
|
[*]Refers to the system's self-generating auto number datatype. | |||
At this point, you'll realize that the existing tables won't get the job done. We have several many-to-many relationships, and these relationships require a linking table. We can best illustrate this need by looking at the books and authors lists. Each book can have more than one author, and each author can have more than one book. Imagine trying to enter books with more than one author. The current lists simply can't handle this situation. Consequently, we need a linking table between the books and authors lists.
| Note | Check your RDBMS documentation to see if it requires a linking table between many-to-many tables. |
A linking table will include a primary key of its own and the primary key from both the books and authors list as foreign keys. You won't need an author foreign key in your books list. When you need to review a list of books and authors, you query on three lists, not two: books, authors, and the linking lists between the two. Table 5.2 summarizes the tables in our database, including the linking tables added to handle the many-to-many relationships.
| Table | Field | Datatype | Relationship Type Foreign | Key Field |
|---|---|---|---|---|
| Books | BookID (PK) Title ISBN Page Count Publisher (FK) Lending (FK) | Numeric* Text Text Text Numeric Numeric | one-to-many one-to-many | Publishers.PublisherID Lending.LendingID |
| Categories | CategoryID (PK) Category | Numeric* | ||
| Books-Categoriesmmlink | BookCategoryID (PK) Book (FK) Category (FK) | Numeric* Numeric Numeric | | Books.BookID Categories.CategoryID |
| Types | TypeID (PK) Type | Numeric* Text | ||
| BooksTypesmmlink | BookTypeID (PK) Book (FK) Type (FK) | Numeric* Numeric Numeric | one-to-many one-to-many | Books.BookID Types.TypeID |
| Publishers | PublisherID (PK) Publisher | Numeric* Text | ||
| Authors | AuthorID (PK) Author Last Name Author First Name | Numeric* | ||
| Books-Authorsmmlink | BookAuthorID (PK) Book (FK) Author (FK) | Numeric* Numeric Numeric | | |
| Contributors | ContributorID (PK)Contributor Last Name Contributor First Name | Numeric* | ||
| Books-Contributorsmmlink | BookContributorID (PK) | Numeric* Numeric Numeric | | |
| Lending | LendingID (PK) Lent Date Due Date Return Date Borrower (PK) | Numeric* Date/Time Date/Time Date/Time Numeric | ||
| Borrowers | BorrowerID (PK) Borrower Last Name Borrower First Name Borrower Street Address Borrower ZIP Code (FK) Borrower Phone | Numeric* | | |
| ZIP Codes | ZIPCodeID (PK) | Numeric* Number Text | one-to-many | Cities.CityID |
| Cities | CityID (PK) | Numeric* |
Figure 5.9 shows all the relationships in graphic format; we used Access's Relationships window. You probably never imagined that those original 2 tables would grow to 14. In the end, we have only one-to-many relationships in our database. Most systems can't handle a direct many-to-many relationship.
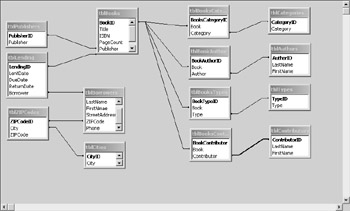
Figure 5.9: Join lines graphically define the relationships between our tables.
Once you think the tables are normalized and the relationships are all squared away, you're ready to tackle indexes. When you add your indexes is somewhat up to you-we think now is a good time, especially if you use surrogate keys. Keep in mind that a primary key automatically sets a unique index to avoid duplicate records. If you're using surrogate keys, your system will set that unique index to only one field-the field containing those meaningless values that constitute the primary key. That means you must remember to build any unique index, based on the data, yourself.
Indexes are unique to each database system, so it's difficult to define them specifically. The simplest explanation is that a nonclustered index is like a lookup table. The table stores key values that act as pointers to your data, making it easier for your system to search and sort data. When looking for data, the system refers to the lookup table for the pointer.
Some systems provide what's known as a clustered index, which stores data in a predefined order (such as alphabetical). All data are stored in this order. There's no pointer to the data as in the nonclustered data.
This chapter isn't the place for an intense discussion of indexes. We just want to make sure you attempt to include them in the design process. Refer to your RDBMS documentation for specific information on this subject.
At this point, you might consider adding three indexes, and those could change. First, add an index to the ISBN field in the books list because, theoretically, each book should have a unique ISBN. If there's any doubt, you could add the Title to create a complex index (an index based on more than one field).
This situation illustrates one of those real-world problems you'll have to deal with often. The truth is, publishers must maintain ISBNs, and that means duplicates do occur occasionally-by accident. If you include the title in the unique index, you negate the purpose of eliminating duplicate ISBNs- assuming the duplicate was in error. On the chance that the duplicate is in fact a mistake and does exist, you'd not be able to enter the second book in your database. In the end, regardless of which route you take, you'll have to take additional measures to guard against duplicate ISBNs that truly are in error.
| Note | Unless you're maintaining a huge library, the chances of encountering a duplicate ISBN are so slight that the issue might not be important. If you're working on a voluntary project for a small group, you might not want to spend your time planning for a situation that might never arise. On the other hand, if you're creating a professional database, it might be best to cover all the possible problems, even small ones. If you're in doubt as to a particular solution's worth, discuss your concerns with whoever's paying the bill. Running up the client's bill on something they think is unimportant might not be in your best interest. Just make sure the client realizes there is a potential for trouble; you might even include your concerns in the accompanying documentation and then note the client's decision for historical support. |
Also add a complex index to the ZIP Codes and Cities lists. Specifically, add an unique index to the City and ZIP Code fields in ZIP Codes and the City and State fields in Cities.
The three indexes that we've suggested are for eliminating duplicates and won't necessarily improve performance. We've not added any indexes for the sole purpose of improving sort and search functions-none seem appropriate at this time.
|
|
EAN: 2147483647
Pages: 214