Configuring Dreamweaver MX to Suit Your Needs
|
|
Naturally, you'll want to personalize your nifty, new Dreamweaver MX installation to suit the way you work. Macromedia built dozens of configuration options into this new version of Dreamweaver so you can certainly make it conform to your work style as opposed to the other way around. To start you on your merry way, let's take a look at the Preferences menu, which is where you control almost all of the customization options available to you.
To customize Dreamweaver MX, choose Edit ® Preferences to open the Preferences window, shown earlier in Figure 2.5. We've already covered how to change your Dreamweaver MX workspace style, so let's explore some of the other options.
Adding Icons to the Panels and Adding the Launcher
If you're a designer, you're probably going to like this next feature. If you're a coder at heart, you're also going to find this next feature helpful, since it gives you quick access to the coding features you most often use. Instead of just using text to describe all these panels and options and menus (oh my!), wouldn't it be nice if you could see a helpful icon to visually indicate what all these options do? Well, surprise! You can. Select the Panels category, and then click the Show Icons In Panels And Launcher check box as shown in Figure 2.6. Once you do, you should notice a welcome, unobtrusive transformation of your Dreamweaver MX desktop-icons appear on the feature panels, and an additional, graphical toolbar called the Launcher is added at the bottom of your document window (see Figure 2.7). You can use this toolbar to launch some of the more frequently used features in Dreamweaver MX. Table 2.2 lists and describes the buttons on the Launcher toolbar.
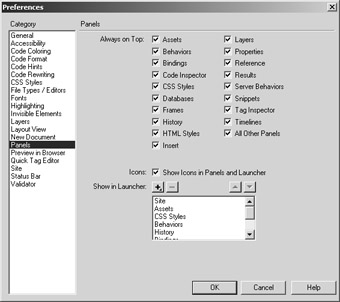
Figure 2.6: You can transform Dreamweaver MX's simple text descriptions to eye-catching icons by choosing this option.
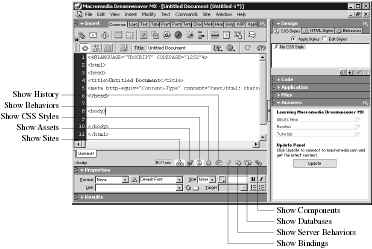
Figure 2.7: The Icon option also displays a toolbar, called the Launcher, at the bottom of your document window.
| Button | What It Does |
|---|---|
| Show Sites | Opens the Site tab under the Files panel, from which you control the sites in your work environment |
| Show Assets | Opens the Assets tab under the Files panel, from which you control the video, links, Flash, Shockwave, and so forth that are used in your sites |
| Show CSS Styles | Opens the CSS Styles tab under the Design panel, from which you control the CSS style sheets that are used in your site |
| Show Behaviors | Opens the Behaviors tab under the Design panel, from which you control the behaviors used in the pages you're creating |
| Show History | Opens the History panel, from which you can see the steps you've taken to modify the current document |
| Show Bindings | Opens the Bindings tab under the Application panel, from which you control the data bindings used in your pages |
| Show Server Behaviors | Opens the Server Behaviors tab under the Application panel, from which you modify the server-side behaviors used in your site |
| Show Databases | Opens the Databases tab under the Application panel, from which you control the databases used in your site |
| Show Components | Opens the Components tab under the Application panel, from which you control the non-Dreamweaver components you are using in your site |
You can customize the options that appear on the Launcher by, you guessed it, going back to the Preferences window, selecting the Panels category, and clicking the plus sign button.
You can select which items you want on your Launcher, and you can also change the order in which the selected options appear using the arrows at the right of the panel. Figure 2.8 shows that we still have the Code Inspector, Frames, HTML Styles, and other options available to add to our Launcher. A grayed-out option is already on the Launcher.

Figure 2.8: Choose your Launcher options from the Panels category of the Preferences window.
The designers among us will probably prefer a different set of Launcher preferences than the programmers. But since Dreamweaver MX is targeted to both audiences, you'll probably find a mixture of options helpful, regardless of your profession. Here are our recommendations and ordering for each of the professions:
| Designer | Programmer |
|---|---|
| Sites | Sites |
| Assets | Assets |
| CSS Styles | CSS Styles |
| Behaviors | Behaviors |
| Server Behaviors | Server Behaviors |
| Bindings | Bindings |
| Databases | Databases |
| Timelines | Components |
| Code Inspector | Snippets |
| Reference | Code Inspector |
| History | Reference |
Preview in Browser
Probably the second thing you'll want to configure is the Preview In Browser setting. Dreamweaver MX lets you preview your work in an actual, live browser window. That is, it loads the page you're currently working on in a browser window so that you can view exactly how the page is going to appear to the public. Dreamweaver MX should automatically discover which browsers you have on your system during the installation process. But if you need to, you can manually add a browser or change which you use as your primary and secondary browsers through this setting.
Figure 2.9 shows the Preview In Browser category window. You'll notice that we set iexplore, which corresponds to Microsoft's Internet Explorer, as our primary browser. The F12 next to the name indicates that F12 is the hotkey by which we invoke the Dreamweaver MX preview mode for Internet Explorer. Now if Internet Explorer were our secondary browser or we also had Netscape Navigator, Opera, or some other browser installed, we'd see secondary browser with a CTLF12 next to it, implying that we invoke the secondary browser by pressing the Control key in conjunction with the F12 key. To add a secondary browser, click the Edit button to open the Add Browser dialog box (shown in Figure 2.9), and select the appropriate executable (.exe) file on your hard disk. You enter a name by which you want to refer to this browser (Netscape, IE, The Other Browser, or whatever), point to the executable file via the Browse button, and select whether you want to set this new browser as the primary or secondary browser. Once you click OK, you'll be ready to use the new setting. You may add as many browsers to this list as you wish, but you may have one Primary and one Secondary browser choice.
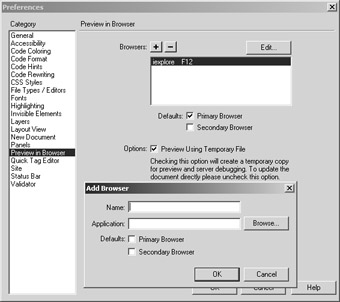
Figure 2.9: Use the AddBrowser dialog box to add a browser.
| Tip | Tip Generally, you want to test your site on many different browsers and versions of browsers. Because of the rivalries among the various browser makers, they do not all adhere strictly to the HTML standards set forth by the World Wide Web Consortium (W3C). Even though most features you create will work on all browsers, invariably you'll find a feature that doesn't behave quite like you expect it to in one browser or another. By testing your code on as many brands of browsers as possible, you can find and trap for the odd behavior your users might encounter. |
The Preview Using Temporary File check box tells Dreamweaver MX how to handle the preview step. If this option is checked, Dreamweaver writes your work to a temporary file and loads that file into the browser. You can change the default behavior by clearing the Preview Using Temporary File check box, which instructs Dreamweaver MX to automatically save your work and send the actual file itself to your browser. Keep in mind that if you select this option, you'll be working with the original version of your page; you won't have a copy to fall back on if you mess up your code or design. The temporary copy adds a small layer of protection for your original file. Plus, you can load the original file in one browser window for comparison and use the temporary version to review your most recent changes or additions.
Letting Dreamweaver MX Check Your Pages for Errors Before You Save Them
With all the updates to software, versions of programming languages, and versions of browsers, it's difficult to remember which HTML or other coding statement works in what combination. Does the Layer tag work with just version 4 browsers and later, or was that 4.5? Or maybe it was just Netscape 4.5? Or wait-was it the other way around? See what we mean? With Dreamweaver MX, you don't necessarily have to remember every nuance of every language and how it applies to every browser. You can have Dreamweaver MX check your work, or validate it, before you send it to the web server.
Using the Validator category in the Preferences window, you can tell Dreamweaver MX to validate your code against versions of HTML, XHTML (Extensible HyperText Markup Language), Internet Explorer, Netscape, ColdFusion, SMIL (Synchronized Multimedia Integration Language), WML (Website META Language), and JavaServer Pages. As you can see in Figure 2.10, telling Dreamweaver MX to validate against the different versions is as simple as clicking a check box. However, you might notice that you can't check all the versions of a particular language. Some newer code libraries- HTML, for example-incorporate the previous versions; so if you want to validate against HTML 4, it doesn't make sense to check HTML 1, 2, and 3. They're already in there.
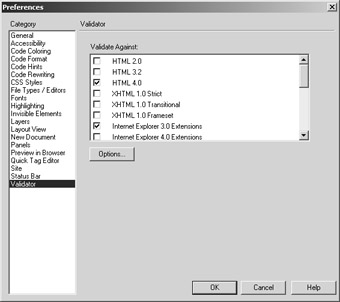
Figure 2.10: Dreamweaver MX can check your work to ensure it adheres to a certain language syntax.
Once you've set your preferences, you can start the validation process by choosing File â Check Page from the main Dreamweaver MX screen. As you can see in Figure 2.11, you then have several options, only three of which we'll mention here. If you want to validate your HTML code, which you will probably do frequently, choose Validate Markup, or press the hotkey combination Shift+F6. If you want to validate an XML page, choose Validate As XML. Dreamweaver MX checks your code against the preferences you chose and displays a list of errors it finds, if any, in the Results pane at the bottom of your screen.
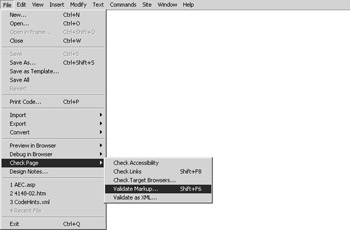
Figure 2.11: You can validate your work in several ways in Dreamweaver MX.
| Note | If your page contains programming code such as ASP (Active Server Pages) and you're validating against HTML, you'll probably see errors about ASP tags in the list as well, since ASP isn't part of the HTML language. |
To make sure that your page works with a specific version of a browser, choose Check Target Browsers option to display a list of the current browser versions of Internet Explorer, Netscape Navigator, and Opera. Again, if Dreamweaver MX finds any incompatibilities with your page, it displays a list of errors in the Results pane.
Letting Dreamweaver MX Rewrite (or "Fix") Your Code
Another category under Preferences is Code Rewriting. If you instruct it to, Dreamweaver MX tries to fix code so that it meets HTML standards when it opens a file. Depending on the user and the development task at hand, that can be either beneficial or counterproductive. The hardcore coder may find it annoying to have someone (or something) else rewrite their code, especially if the coder doesn't even know about it. More important, in ASP, ColdFusion, and other web server languages that tweak standard HTML to their own purposes, the "errors" Dreamweaver finds may not be incorrect and should not be "fixed." On the other hand, those new to HTML scripting may well appreciate having Dreamweaver MX do things such as remove extra closing tags. The settings under Code Rewriting give you considerable control over this behavior, so it's important to choose them carefully.
Figure 2.12 shows you the options available in the Code Rewriting category. The default behavior is to only rename forms when pasting into another page and to ensure that URLs and certain coding characters behave nicely. Naturally, you can change this default behavior. Click the Fix Invalidly Nested And Unclosed Tags check box, and several other options will activate as well. The Fix Invalidly Nested And Unclosed Tags option tells Dreamweaver MX to try to make sense of tags that aren't closed properly, such as nested tables that don't include closing </tr> tags and the like.
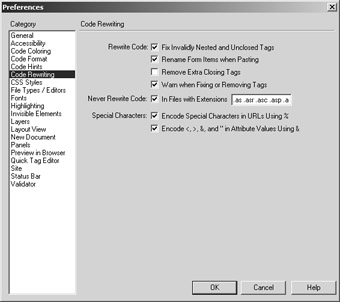
Figure 2.12: Dreamweaver MX lets you control how it will try to fix what it deems as erroneous HTML.
Early versions of programs such as FrontPage tried to fix these tags for you, which was fine, but they didn't warn you about it first! Plus, they rewrote and reconstructed meticulously created code that you may have spent hours on. Fortunately, Dreamweaver MX wants to play nice and gives us the option of warning us before it rewrites our code. It will even ignore files with certain extensions altogether so that there's no chance of it inadvertently creating bugs. If you have check the Warn When Fixing Or Removing tags option, Dreamweaver MX displays a window similar to Figure 2.13 when it encounters tag errors in a file that it's opening.
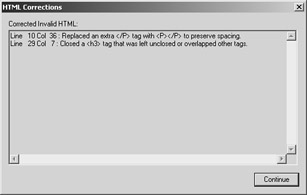
Figure 2.13: Dreamweaver MX will warn you when it changes your code.
| Tip | Even though Dreamweaver MX tries to fix tag errors it finds, it's not foolproof. It may still leave unclosed tags if it can't quite interpret what you intended. Relying on Dreamweaver MX to fix your web pages is not an excuse for sloppy programming! |
Making Your Code Pretty and Readable
You designers out there probably won't care about the final preference setting we're going to cover. But the coders will almost certainly want to tweak the Code Format category's options. This category lets you control how indention is configured-should indents be created using either tabs or spaces, for example-tab size, column wrapping, tag case, and more. Before you write your first line of code or create your first design, make sure these options conform to your coding style.
Exploring the Remaining Preferences Settings
We've explored many of the Preference settings in Dreamweaver MX, but by no means have we touched on them all. Those we've covered here will let you get Dreamweaver MX up and running in a manner that should aid your development process. Dozens more are available, so don't be afraid to explore the Preferences panel. And another thing-don't be afraid of the help (F1) key while you're exploring.
|
|
EAN: 2147483647
Pages: 214
- Chapter II Information Search on the Internet: A Causal Model
- Chapter VIII Personalization Systems and Their Deployment as Web Site Interface Design Decisions
- Chapter XII Web Design and E-Commerce
- Chapter XIII Shopping Agent Web Sites: A Comparative Shopping Environment
- Chapter XVII Internet Markets and E-Loyalty