Dreamweaver MX Extensions
|
|
Dreamweaver MX extensions are actually pieces of code written by either Macromedia or third parties that add new capabilities or extend the capabilities of Dreamweaver MX. By adding new features to Dreamweaver MX, you can customize it to behave in a manner more to your liking or add new functionality that helps you in your daily work. Extensions are typically created by Dreamweaver MX users who have a technical background in JavaScript and XML (Extensible Markup Language) usage and placed on Macromedia's Dreamweaver Macromedia Exchange, which you can find at: http://dynamic.macromedia.com/bin/MM/exchange/main.jsp?product=dreamweaver, or just go to www.macromedia.com/dreamweaver and click Dreamweaver Macromedia Exchange. We'll cover more about Dreamweaver Macromedia Exchange in a moment. First, let's look at what you'll need before you can use extensions.
| Tip | Even though we're going to cover quite a bit about extensions in this chapter, we highly recommend that you check out the Dreamweaver Macromedia Exchange on Macromedia's website. New extensions and new information are added frequently. |
Getting to Know Macromedia's Extension Manager
Before you can install new extensions in Dreamweaver MX, you need Macromedia's Extension Manager version 1.5 (or later) installed on your system. Dreamweaver MX should install this additional program by default, but you can quickly verify that you have it in a couple of ways: choose Start ®Programs ® Macromedia and check for Macromedia Extension Manager, or simply choose Commands ® Manage Extensions from the Dreamweaver MX main menu bar, as shown in Figure 24.1.

Figure 24.1: Launch the Macro- media Extension Manager from Dreamweaver MX's Commands menu.
You can check the version number of your copy of the Macromedia Extension Manager by choosing Help ® About from the Extension Manager main menu. Figure 24.2 shows the About screen in which we've highlighted the version number.

Figure 24.2: You must have version 1.5 or later of Macromedia's Extension Manager in order to use extensions with Dreamweaver MX.
If you don't have the Macromedia Extension Manager, you can download it from Macromedia's website at http://dynamic.macromedia.com/bin/MM/exchange/em_download.jsp.
| Tip | Before you can download anything from the Macromedia Exchange, you'll need to become a member by registering an e-mail address and a password. |
The Extension Manager, which also lets you manage Fireworks MX and Flash MX extensions, lets you quickly and easily install extensions into Dreamweaver MX. In fact, you won't be able to extend Dreamweaver MX without it. Once you launch the Extension Manager, you'll see a window similar to that in Figure 24.3 that lists the extensions you have installed along with information about each extension.
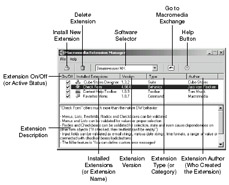
Figure 24.3: The Macromedia Extension Manager lets you install and control the extensions you add to Dreamweaver MX.
To install new extensions for Dreamweaver MX, click the Install Extension button to open the File Open dialog box through which you point to extensions you've downloaded and are ready to install. You'll probably have to stop Dreamweaver MX (if its running) and restart it before the change takes effect. We'll look at how to install a new extension later in this chapter.
To remove an extension from Dreamweaver MX, select the extension you wish to delete then click Delete Extension. The Extension Manager will ask you for confirmation before it actually deletes an extension. You'll probably have to stop Dreamweaver MX (if it's running) and restart it before the change takes effect.
Using the Software Selector drop-down list box, you can choose to manage extensions for Dream- weaver MX, Fireworks, or Flash. Extension Manager displays the extensions installed for these pieces of software once you select the title in the Software Selector.
Click Go To Macromedia Exchange to open the Macromedia Exchange website in your web browser.
Click Help to open the Macromedia Extension Manager help file. You can find here everything you ever wanted to know and were afraid to ask about Extension Manager.
The On/Off, or Extension Active Status, column lets you control whether the installed extension is on or off-that is, whether it's active in Dreamweaver MX. If an extension is set to inactive, or ADD-INSoff, it is removed from Dreamweaver MX, but not deleted from the Extension Manager. Again, you'll probably have to stop and restart Dreamweaver MX for the changes to take effect.
The Installed Extensions column, or Extension Name column, lists the extensions you have installed. You can sort the extensions by name by clicking the column header. Click once to sort the column in ascending order. Click again to sort the column in descending order.
The Version column lists the version number of the particular extension you have installed. This is useful for determining if you have the latest version of an extension. Exchange Manager will detect if you're trying to install the same version of an already-installed extension, but knowing the version number can save you from downloading the same version again.
The Type, or Extension Category, column shows you the category to which the extension belongs. Macromedia has created several categories into which an extension can fall:
Accessibility Provide features for making your web pages W3C Accessibility compliant. See Chapter 3 for more information on accessibility.
App Servers Help you connect to, query, format, and view dynamic content from the web application servers that Dreamweaver MX supports, such as ColdFusion, JSP, and ASP.
Browsers Assist with browser detection and redirection, handle types of browser issues, and so forth.
DHTML/Layers Add DHTML (Dynamic HTML) objects and behaviors to a web page.
E-Commerce Aid you in performing e-commerce functions such as building catalogs and transaction processing.
Extension Development Aid developers in creating and deploying extensions.
Fireworks Aid you in using Fireworks within Dreamweaver.
Flash Media Aid you in using Flash Media within Dreamweaver.
Learning Give you educational or instructional aids that you can either use in Dreamweaver or add to your site.
Navigation Help you provide various navigation features to your site.
Productivity Let you improve or add to Dreamweaver MX's tools, ease of use, or behavior.
Rich Media Provide third-party multimedia tools, effects, or controls to deliver a better experience to your users.
Scripting Tools Help developers create extensions and scripts for Dreamweaver MX, browsers, and media players.
Security Let you build security measures into your web pages.
Style and Format Give you greater flexibility to format and stylize your pages.
Tables Make creating HTML tables and formatting and manipulating them faster and easier.
Text Provide better and faster text editing and formatting.
The Author column indicates who created the extension. Creators can be anyone, of course- individuals, third-party companies, or even Macromedia.
The Description pane shows you information about the extension. This information is generally a description of the features of the extension but can contain any text the author chooses to enter.
Now that you've learned the basics of Extension Manager, let's look at how to actually use it. It's simple, effective, and elegant.
Using Extension Manager
In your day-to-day operation, you'll normally be primarily involved in installing extensions, removing extensions, and turning them on and off. Before you can use an extension, of course, you have to install it.
As we've mentioned, you can find extensions on Macromedia's Dreamweaver Macromedia Exchange. The next section will explain more about the Macromedia Exchange. For now, let's assume you have downloaded an extension called Downloads Counter.
Installing an Extension
To install an extension, you'll take the following steps:
-
Click the Install Extension button, to open the Select Extension To Install dialog box, as shown in Figure 24.4.
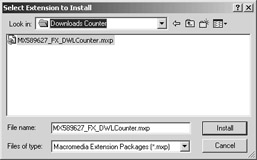
Figure 24.4: Extensions come in Macromedia Extension Packages, files with a .mxp extension. -
Point to the file, called a Macromedia Extension Package, you want to install and click the Install button. Macromedia Extension Manager displays a disclaimer (see Figure 24.5) that you must accept in order to continue.
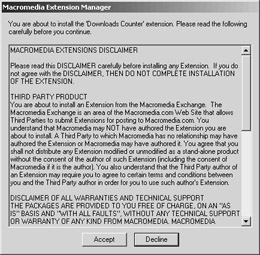
Figure 24.5: You must accept the disclaimer in order to install a new extension. -
Click Accept to open an "Installing…" window followed by a message that tells you the extension has been installed, as in Figure 24.6.
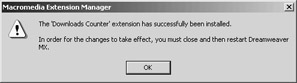
Figure 24.6: Our installation is a success.Notice the message that tells you to stop and restart Dreamweaver MX. Be sure to save your work.
Tip If you're working with a lot of open files and find restarting inconvenient because you'll have to remember all the files you have open, we'll show you an extension later-the Favorites extension-that will let you quickly add and open files from a Favorites menu, much like your browser's Favorites menu.
This particular extension is a Server Behavior that aids us in tracking the number of times a file has been downloaded (or a link clicked). It installs into a developer-named menu called FELIXONE, as you can see in Figure 24.7. (FELIXONE isn't a default Dreamweaver MX Server Behavior name.)
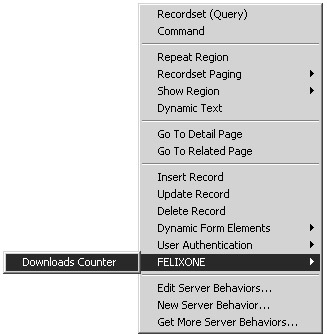
Figure 24.7: Extensions can show up anywhere in Dreamweaver MX, depending on their type and function. -
Click Downloads Counter to open the configuration dialog box associated with this extension.
Disabling an Extension
Let's assume that you want to disable the extension we just installed until you're sure you're going to need it. Perhaps your Dreamweaver MX menus have become too crowded due to all the extensions you've installed, and you want to temporarily remove those you don't use every day. Instead of removing the extension completely, you can simply disable it, which removes it from Dreamweaver MX, but keeps it in Extension Manager for later reinstallation and use.
To disable an extension, or turn it off, open Extension Manager and clear the check mark in the On/Off column next to the name of the extension you want to disable. Figure 24.8 shows that we've disabled the Downloads Counter extension, and, dutifully, Extension Manager is telling us that we'll have to stop and restart Dreamweaver MX in order for this change to take effect.
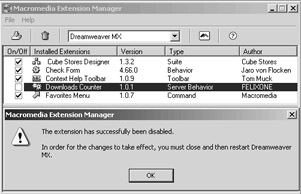
Figure 24.8: Extension Manager lets you temporarily disable an extension.
Removing an Extension
Now suppose that a couple of months later, you realize that you're not using that extension any longer and would like to clean up Extension Manager. You can remove the extension from Extension Manager, which also removes it from Dreamweaver MX if it happenes to be enabled. Removing an extension from Extension Manager does not remove the original installation file from your disk; so if you need to reinstall the extension later, you can, provided you have the file.
| Tip | Keep your extensions organized in a single directory or folder with a name such as Dreamweaver MX Extensions. Then, store each extension in its own folder by the extension name, such as Downloads Counter. That way, if you ever need to reinstall the extension, you have the exact version to which you became accustomed. |
To remove the file, you simply click the name of the extension you want to remove and click the Remove Extension button-the trash can button. After a verification pop-up makes sure you want to remove the extension, Extension Manager removes the extension and verifies success. And, as you can see in Figure 24.9, you'll have to stop and restart Dreamweaver MX for the removal to take effect.
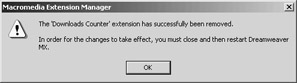
Figure 24.9: You can also permanently remove an extension in Extension Manager.
"Fine!" you say. "Where do I get these nifty extensions?" On the Macromedia Exchange, of course. Let's look at that next.
|
|
EAN: 2147483647
Pages: 214