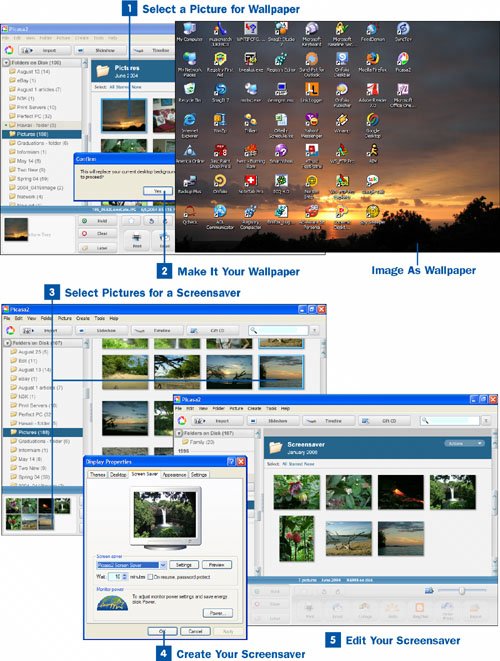
Select a Picture for Wallpaper
In the Picasa main screen, select the picture you want to be your Windows wallpaper. Note that Picasa refers to the Windows wallpaper as the desktop.
 Make It Your Wallpaper
From the Create menu, select Set as Desktop. A Confirm dialog box appears, asking whether you want to use the picture as your desktop background. Click Yes, and the picture appears as your wallpaper.
Note
Using Picasa isn't the only way to change your wallpaper. You can also do it yourself. In Windows XP, you change your desktop background in the Desktop Display Properties dialog box. Get there by right-clicking a blank area of the desktop, choosing Properties from the context menu to open the dialog box, and then selecting the Desktop tab. The background you've created using Picasa is listed at picasabackground, so if you choose a different desktop wallpaper and want to at some point go back to the background you've just created in Picasa, select picasabackground as your desktop. However, if you create a new background with Picasa, that new background appears when you choose picasabackground (Picasa overwrites the original image file with whatever you later select to be the wallpaper image).
 Select Pictures for a Screensaver
From Picasa's main screen, select the photos you want in your screensaver. To select multiple individual photos, press the Ctrl key while you click. To select contiguous photos, press the Shift key and click the starting and ending pictures; all the photos between (and including) the two photos you clicked are now selected. If you want to select pictures from different folders, create a label for those photos and then select them in the label as explained in  Organize Your Photos. The screensaver you create looks like an automatic slideshow.
 Create Your Screensaver
Select Create, Screensaver from the menu bar. The screensaver is created, and the Windows Display Properties dialog box opens to the Screen Saver tab. To preview your screensaver, click the Preview button. To change how long each photo should be displayed, click the Settings button and select the number of seconds. When you're done, click the OK button to finalize your screensaver.
After your computer remains idle for the amount of time specified in the Wait box in the Display Properties dialog box, the Picasa screensaver launches and begins showing the images you selected.
 Edit Your Screensaver
When Picasa creates a screensaver, it creates a Screensaver folder and places the pictures you selected in that folder. By deleting pictures from that folder or adding pictures to it, you can change the pictures the screensaver uses. In the Picasa main screen, look for the Screensaver folder in the Folders on Disk area on the left side of the screen. Drag pictures into this folder to add them to the screensaver; drag pictures from this folder to remove them from the screensaver. When you remove pictures from the Screensaver folder, they still appear in their original location in Picasa and on your hard disk.