11.1 Namespace Fundamentals
| only for RuBoard - do not distribute or recompile |
11.1 Namespace Fundamentals
The topic of namespaces is monumental, to say the least. This chapter is the longest in the book; even so, consider this a crash course. But before we dive in and start discussing how namespace extensions work, let's spend some more time discussing some of the fundamentals.
11.1.1 Rooted vs. Non-rooted
There are two types of namespace extensions: rooted and non-rooted. There is no difference code-wise between these two types. The difference is just how they are used.
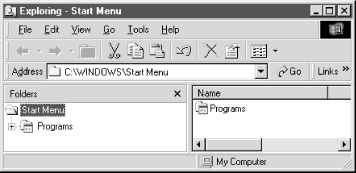
A rooted extension has its own root. In other words, you can't navigate to a level above it, and only its branches are available. For an example of this, right-click on the task bar and select Properties from the Context menu. Select the Start Menu Programs tab and then press Advanced. A rooted view of the Start menu will be displayed with the Start menu selected (see Figure 11.2). Notice that the level-up button on the tool bar is disabled.
Probably everything you can find discussing rooted extensions uses this same example. That's how rare they are. But to be fair, a rooted view might be good if you are creating a namespace extension that allows you to navigate into a file (such as a .zip file or an Access database), and "upward" navigation from it makes little sense. But then again, even this is arguable. A rooted namespace should only be used if your data really does need to stand alone.
Figure 11.2. Rooted view of Start menu

Non-rooted extensions , on the other hand, are aware of the entire namespace. Their root is the desktop. You can freely navigate to other parts of the namespace in a non-rooted view.
11.1.2 Junction Points
A namespace extension for all intents and purposes is a folder. Therefore, it needs to have a specific location in the shell. This location is called a junction point .
There are four ways to create a junction point:
-
Associate the namespace extension with a file type.
-
Use desktop.ini in a directory.
-
Use a directory with a CLSID.
-
Associate a folder with an existing namespace.
I'll now talk about each of these methods in detail.
11.1.2.1 Using a file type
Suppose you want to create a namespace extension that allows you to actually navigate into the contents of a file. Several file types that could take advantage of this come to mind .zip , .cab , .ini , and .mdb files, to name just a few. These files contain data that exists in a format that could easily be viewed hierarchically within the namespace.
Associating a namespace extension with a file involves making a few entries in the registry under the file's application identifier key. Let's pretend we are associating a namespace extension with the .rad file type. The registry entries involved would look like this:
HKEY_CLASSES_ROOT\ \radfile \shell \{verb} \command = "explorer /root, {CLSID}, %1" The value verb can be any thing we want. You might choose "Browse," "Navigate," or something similar. Whatever you choose, this value will be displayed in the context menu for the file object. But the system defines seven of these as canonical verbs: open , find , explore , print , printto , openas , and properties . Each of these verbs, except for printto , corresponds to a context menu item for the file. (The advantage of these canonical verbs is that they automatically appear in mixed case and in the default language used on the host system.) You can also define the verb that is automatically executed when the file is double-clicked. The default value of the shell key is where this done. If no default value has been defined, the command defined by the verb open will be executed.
The /root command line parameter tells Explorer to use a rooted view with the namespace extension as the root. { CLSID } , of course, is the CLSID of the namespace that the shell will use for the file object, and the %1 is merely a placeholder for the filename Explorer will pass to the namespace extension.
11.1.2.2 Using a directory desktop.ini
Namespace extensions can be associated with a physical directory in the filesystem. You probably have seen this before without realizing that it was being done by a namespace extension. Consider the following folders: Fonts , Downloaded Program Files , and History (each of these is a subdirectory under Windows). Each of the folders has a physical location in the filesystem. But instead of containing a standard file list like a normal directory, they contain a custom view that is handled by a namespace extension.
There are two ways to associate a namespace extension with a physical directory in the filesystemthat is, to have a designated namespace extension (rather than the default one) handle the display of filesystem information. The first technique involves creating the directory and placing a hidden file in the directory called desktop.ini . The basic format of the file is as follows :
[.ShellClassInfo] CLSID={ CLSID } The display name of this folder can be set by changing the default value of the following key:
HKEY_CLASSES_ROOT \CLSID \{ CLSID } = " Folder Nam e" Additionally, you can specify the default icon for this folder with the following key:
HKEY_CLASSES_ROOT \CLSID \{ CLSID } \DefaultIcon = " filename , icon index " where icon index is the zero-based position of the icon in the file named filename .
Consider the folder called My Documents ; it contains a desktop.ini file that looks like the following:
[.ShellClassInfo] CLSID={450d8fba-ad25-11d0-98a8-0800361b1103} InfoTip=Stores your documents, graphics, and other files. The [.ShellClassInfo] section can also contain the following additional entries:
- ConfirmFileOp
-
When this value is set to 0, the "You Are Deleting a System Folder" message will not be displayed when you attempt to delete or move the folder.
- NoSharing
-
Setting this value to 1 prevents the folder from being shared.
- IconFile
-
This is the name of the custom icon file for the folder. Files with the .ico and .bmp extensions are acceptable. It is also possible to specify an .exe or a .dll . For the latter option, it is necessary to use the IconIndex setting as well.
- IconIndex
-
The zero-based index of an icon if it is contained in a .dll or .exe (which is specified by IconFile ).
- InfoTip
-
Allows you to create an InfoTip for the folder.
11.1.2.3 Using a directory and the CLSID
The second method involving associating a directory with a namespace is very simple and requires no registry settings. You merely create a folder with the following naming convention:
FolderName.{ CLSID } The CLSID portion of this name will be invisible once the folder is created.
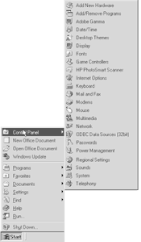
Here's a neat trick that demonstrates this idea. Right-click on the Start button in the task bar and select Explore. Create a folder with the following name:
Control Panel.{21EC2020-3AEA-1069-A2DD-08002B30309D} This will add the Control Panel to your Start menu, as Figure 11.3 demonstrates.
Figure 11.3. Control Panel namespace from Start menu

11.1.2.4 Using an existing namespace
The last method for creating a junction point involves inserting the extension into an existing namespaceinto Desktop, My Computer, Network Neighborhood, or Internet Explorer.
To insert a namespace extension in one of these locations, you need to find the following key:
HKEY_LOCAL_MACHINE\ \Software \Microsoft \Windows \CurrentVersion \Explorer \ Namespace \Namespace \{ CLSID } = "Folder Name" The value Namespace (the key that's a direct subkey of Explorer ) should be replaced with one of the following values: Desktop , MyComputer , NetworkNeighborhood , ControlPanel , RemoteComputer , or Internet . { CLSID }, of course, should be replaced with the CLSID of your component that is implementing the namespace extension.
| only for RuBoard - do not distribute or recompile |
EAN: N/A
Pages: 128