| This chapter presents a Java Swing implementation of a GUI for the virtual library. It demonstrates test driven development of a GUI application and serves as a more realistic example of a working library application than the previous chapters. However, it is still a demonstration program rather than a practically useful application. The functional goal of the library GUI is to allow a user to add new Book s to a Library and look up existing Book s. Nothing fancy, but like most GUI applications, there are many elements and behaviors to consider. The application will need a main window, dialogs for adding and finding Book s, and standard GUI functionality such as being able to open and close windows . Adhering to the TDD mantra, first identify a behavior and write a test for it. The initial target is the Add Book dialog described earlier, which provides a GUI interface for creating a new Book . Example 5-2 shows the unit test for the smart object AddBook . Example 5-2. Initial unit test for the smart object AddBook AddBookTest.java public class AddBookTest extends TestCase { public void testAddBook ( ) { Library library = new Library( ); AddBook addBook = new AddBook(library); addBook. add ("The Dragons of Eden", "Carl Sagan"); assertNotNull( library.getBooksByTitle("The Dragons of Eden") ); } }
This test creates an AddBook object, calls its method add( ) , and verifies that the Book has been added to the Library . AddBook 's constructor gives the test the Library to modify; this was an up-front design decision. The initial implementation of AddBook to pass AddBookTest is shown in Example 5-3. Example 5-3. Initial version of the smart object AddBook AddBook.java public class AddBook { private Library library; public AddBook (Library lib) { library = lib; } public void add (String title, String author) { Book book = new Book( title, author ); try { library. addBook ( book ); } catch (Exception e) {} } }
Since the method addBook() may throw an exception, add() must catch it. Informing the user about the error is something to add to the "to-do" list. Otherwise, the implementation is simple. The next step is to create the view class, AddBookView . It needs to provide a GUI window, text fields for the title and author, and Add and Cancel buttons . The window title should be "Add Book." The unit test AddBookViewTest verifies all of this, as shown in Example 5-4. Example 5-4. The unit test AddBookViewTest AddBookViewTest.java public class AddBookViewTest extends TestCase { public void testControlValues ( ) { AddBookView view = new AddBookView( ); assertEquals( "Add Book", view.getTitle( ) ); assertEquals( "", view. titleField .getText( ) ); assertEquals( "", view. authorField .getText( ) ); assertEquals( "Add", view. addButton .getText( ) ); assertEquals( "Cancel", view. cancelButton .getText( ) ); } }
Example 5-5 gives the initial implementation of AddBookView . It is a custom subclass of the Swing GUI class JFrame and contains only the minimum code necessary to pass the test. It completely ignores the layout of the controls. Example 5-5. The initial version of AddBookView AddBookView.java import java.awt.*; import javax.swing.*; public class AddBookView extends JFrame { protected JTextField titleField; protected JTextField authorField; protected JButton cancelButton; protected JButton addButton; public AddBookView ( ) { super("Add Book"); Container contentPane = this.getContentPane( ); // Add labels and text fields JLabel label1 = new JLabel("Title", Label.RIGHT); contentPane.add(label1); titleField = new JTextField("", 60); contentPane.add(titleField); JLabel label2 = new JLabel("Author", Label.RIGHT); contentPane.add(label2); authorField = new JTextField("", 60); contentPane.add(authorField); // Add buttons cancelButton = new JButton("Cancel"); contentPane.add(cancelButton); addButton = new JButton("Add"); contentPane.add(addButton); } }
When Java creates a JFrame -derived dialog window, it does not display it until its show( ) method is called. So, the test AddBookViewTest creates, verifies, and destroys the AddBookView dialog without actually showing it. Now AddBook can be made to use AddBookView . Some thought must be given to how the smart object and the humble dialog will interact. They will communicate via an implicit internal protocol. The ideal architecture will place all the important behavior in the smart object, and will place all the GUI- related code, such as event handling, in the view. Having both the smart object and the view know about each other is unnecessary. The only necessary interaction between the two is that the view needs to be able to call the methods on the smart object representing its behaviors, so we will follow that model. When the view is constructed , it will get a reference to its smart object. The most important functionality of this construct is to add a Book when the user clicks on the Add button in the view. This is a GUI-driven behavior, so the unit test belongs in AddBookViewTest . It also implicitly tests that the view invokes the smart object's add() method. Example 5-6 shows this test. Example 5-6. AddBookViewTest with test of the Add button AddBookViewTest.java public class AddBookViewTest extends TestCase { private Library library; private AddBook addBook; private AddBookView view; public void setUp( ) { library = new Library( ); addBook = new AddBook(library); view = new AddBookView(addBook); } public void testAddButton ( ) { view.titleField.setText("The Dragons of Eden"); view.authorField.setText("Carl Sagan"); view.addButton.doClick( ); assertEquals(1, library.getBooksByTitle("The Dragons of Eden").size( )); } }
AddBookViewTest is refactored as a test fixture that creates instances of Library , AddBook , and AddBookView in its setUp( ) method. The new test method, testAddButton( ) , sets the title and author text field values, simulates a user click on the Add button using the method JButton.doClick() , and verifies that the Book is added to the Library . To pass this test, AddBookView requires a number of additions, including a reference to an AddBook and the ability to handle the button click event. Example 5-7 shows the new version of AddBookView . The code to create and add the controls is moved to a new method, addControls( ) (which is not shown, for brevity). Example 5-7. AddBookView with "Add" button functionality AddBookView.java public class AddBookView extends JFrame implements ActionListener { protected JTextField titleField; protected JTextField authorField; protected JButton cancelButton; protected JButton addButton; private AddBook addBook; public AddBookView(AddBook ab) { super("Add Book"); addBook = ab; addControls( ); addButton.addActionListener( this ); cancelButton.addActionListener( this ); } public void actionPerformed (ActionEvent e) { String cmd = e.getActionCommand( ); System.out.println(cmd); if ( cmd.equals("Add") ) { addBook.add(titleField.getText( ), authorField.getText( )); } else System.out.println("cmd not handled: "+cmd); } }
The result of the changes to AddBookView is that it receives notification of user events via the actionPerformed() method. If the event indicates that the Add button was clicked, it calls the method AddBook.add() with the title and author values. Now the Add Book dialog can be tried out manually. Example 5-8 shows a simple executable class called CreateAddBook that creates the dialog. Example 5-8. Simple executable class to create AddBook dialog CreateAddBook.java public class CreateAddBook { public static void main (String[] args) { CreateAddBook create = new CreateAddBook( ); } public CreateAddBook ( ) { Library library = new Library( ); AddBook addBook = new AddBook(library); AddBookView view = new AddBookView(addBook); view.show( ); while (view.isVisible( )) {} System.exit(0); } }
Assuming that the directory containing the library classes is in the Java CLASSPATH , CreateAddBook is run as follows : $ java CreateAddBook
The Add Book dialog appears as just a titlebar. It can be resized to show that the Add button fills the entire frame, as shown in Figure 5-3. Figure 5-3. The AddBook dialog as it initially appears 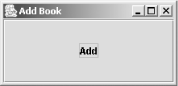
The dialog is effectively useless because nothing is being done in AddBookView to arrange and size the controls. Once a better layout is implemented, the dialog looks much better, as shown in Figure 5-4. Figure 5-4. The AddBook dialog with improved layout 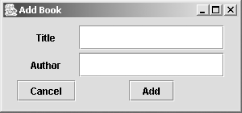
Example 5-9 shows the method addControls() with the new layout code. Aside from arranging the controls with a GridBagLayout , the method sets the dialog to a usable default size with the setSize( ) method. Example 5-9. addControls( ) with improved layout code AddBookView.java protected void addControls( ) { Container contentPane = this.getContentPane( ); contentPane.setLayout(new GridBagLayout ( )); GridBagConstraints c = new GridBagConstraints( ); // Add labels and text fields JLabel label1 = new JLabel("Title", Label.RIGHT); c.insets = new Insets(2, 2, 2, 2); c.gridx = 0; c.gridy = 0; contentPane.add(label1, c); titleField = new JTextField("", 60); titleField.setMinimumSize(new Dimension(180, 30)); c.gridx = 1; contentPane.add(titleField, c); JLabel label2 = new JLabel("Author", Label.RIGHT); c.gridx = 0; c.gridy = 1; contentPane.add(label2, c); authorField = new JTextField("", 60); authorField.setMinimumSize(new Dimension(180, 30)); c.gridx = 1; contentPane.add(authorField, c); // Add buttons cancelButton = new JButton("Cancel"); c.gridx = 0; c.gridy = 2; contentPane.add(cancelButton, c); addButton = new JButton("Add"); c.gridx = 1; contentPane.add(addButton, c); setSize (300, 140); }
Why isn't there a unit test for the new layout code? It is overkill to write unit tests for purely visual attributes such as layout positions and control sizes. Not only are such tests tedious to write, but their value is limited. If someone adjusts the position of a control, the code's functional behavior does not change, so why should the unit test fail? Now a working Add Book dialog is in place, along with unit tests of its functionality. The library GUI needs a lot more to be usable, including a main window, a Find Book dialog, and a lot of related GUI functionality and application logic. Rather than walking through all the steps to build this application, this description skips ahead to the finished result. The final version of the library GUI application contains a number of GUI elements implemented as smart objects with thin view classes, including: The class LibraryFrame is the main application window with an attached menu bar. It acts as the parent for the other windows. Closing it causes the application to exit. It is shown in Figure 5-3Figure 5-3. Figure 5-5. The LibraryFrame window 
Since the view classes have duplicate code and the same interface, it makes sense to create a common base class. The abstract parent class BaseView is a simple subclass of JFrame . Example 5-10 shows the code for BaseView . Example 5-10. The abstract base class BaseView BaseView.java public abstract class BaseView extends JFrame implements ActionListener { BaseView (String title, int width, int height) { super(title); addControls( ); setSize(width, height); } public abstract void actionPerformed (ActionEvent e); protected abstract void addControls( ) ; }
BaseView gives the view classes a consistent interface and eliminates code duplication between them. As an abstract class, BaseView should be tested with an AbstractTest. BaseViewTestCase is shown in Example 5-11. Example 5-11. The AbstractTest BaseViewTestCase BaseViewTestCase.java public abstract class BaseViewTestCase extends TestCase { public abstract BaseView getBaseView( ) ; public void testNotVisible( ) { BaseView view = getBaseView( ); assertFalse( view.isVisible( ) ); } public void testShow( ) { BaseView view = getBaseView( ); view.show( ); assertTrue( view.isVisible( ) ); } public void testClose( ) { BaseView view = getBaseView( ); view.show( ); WindowEvent e = new WindowEvent(view, WindowEvent.WINDOW_CLOSING); Toolkit.getDefaultToolkit( ).getSystemEventQueue( ).postEvent(e); try { Thread.currentThread( ).sleep(100); } catch(Exception x) {} assertFalse( view.isVisible( ) ); } }
The AbstractTest tests three behaviors that all classes derived from BaseView should exhibit: they are hidden upon creation, become visible after the show( ) method is called, and are hidden again after a WINDOW_CLOSING event is sent. The unit tests for the view classes derived from BaseView should be subclasses of BaseViewTestCase . Example 5-12 shows AddBookViewTest implemented this way. Example 5-12. AddBookViewTest implemented as a subclass of BaseViewTestCase AddBookViewTest.java public class AddBookViewTest extends BaseViewTestCase { private Library library; private AddBook addBook; private AddBookView view; public BaseView getBaseView( ) { return new AddBookView( addBook ); } public void setUp( ) { library = new Library( ); addBook = new AddBook( library ); view = (AddBookView) getBaseView( ) ; view.show( ); } public void tearDown( ) { addBook = null; library = null; } public void testAddButton( ) { view.titleField.setText("The Dragons of Eden"); view.authorField.setText("Carl Sagan"); view.addButton.doClick( ); assertEquals(1, library.getBooksByTitle("The Dragons of Eden"). size( )); assertEquals( "", view.titleField.getText( ) ); assertEquals( "", view.authorField.getText( ) ); assertFalse( view.isVisible( ) ); } }
Note how the test implements and uses the factory method getBaseView( ) to create an instance of AddBookView for the tests. In conclusion, although unit tests for a GUI-driven application use different strategies than tests for ordinary classes, the same basic patterns of unit test development are followed. Each class has a corresponding test class, and each behavior is tested with a separate test method. |