Applying Styles
You'll now learn how to manually apply styles to the text in your document. You might use the techniques given here to modify the formatting applied by the AutoFormat command, by a theme, or by using the Style Gallery. Or, you might use them to format a document yourself from scratch. (In this case, you might apply styles as you're entering the document text). Word provides two types of styles: paragraph styles (such as those applied by AutoFormat), and character styles (for emphasizing individual blocks of characters).
Applying styles has several advantages over directly assigning character and paragraph formatting (which you'll learn later in the chapter). Applying a style can save you time because it allows you to assign an entire group of formatting features with a single command. Also, using styles promotes consistent formatting—all text that is assigned a given style will look the same. As you'll learn in Chapter 8, you can easily change the format of all text throughout a document that has a given style by merely adjusting the style itself. For example, you could make all top-level headings bold by assigning the bold format to the Heading 1 style, which would be a lot easier than individually reformatting all these headings in the document.
When you create a new document, it obtains a private copy of the styles that are stored in the template that was used to create it. The document's styles are saved within the document file along with the other document content. You saw previously how to use the Style Gallery to replace these styles with the styles stored in a different template. In the following sections, you'll learn how to apply the document's styles to paragraphs or blocks of characters within the document. You can use these techniques to apply both predefined styles (that is, those supplied with the Word program) and styles that you define yourself. In the next chapter, you'll learn how to modify the predefined styles and how to define new styles.
Applying Paragraph Styles
SEE ALSO
For information on finding and replacing styles, see "Finding and Replacing Text".
A paragraph style stores a complete set of paragraph and character formatting features. When you apply the style to a paragraph, all these features are assigned to the paragraph text. Table 7-4 summarizes all the formatting features that are stored in a paragraph style, dividing them into six categories. (These categories correspond to the commands that you use to choose the formatting attributes, as described later in this chapter, and in chapters 9 and 10.)
If you haven't used AutoFormat or applied styles to your document, paragraphs will usually have the Normal style. (Paragraphs in documents based on certain templates, however, might be initially assigned a different style, such as Body Text). The Normal style has a set of formats suitable for the bulk of the text in a typical document. In the Normal template supplied with Word, the formatting attributes of the Normal style include the Times New Roman font, a font size of 12 points, single line spacing, and flush-left paragraph alignment. (Any of these attributes can be changed.)
To apply a different style to one or more paragraphs, perform the following two steps:
- To apply a style to a single paragraph, place the insertion point anywhere within the paragraph. To apply a style to several paragraphs, select at least a portion of all the paragraphs. If you have not yet started entering text for a new paragraph, place the insertion point before the paragraph mark for the new paragraph. You can do this whether the paragraph mark is visible or not.
- Choose Style from the Format menu, and then select the style you want in the Style dialog box, as shown in Figure 7-8.
Table 7-4. Formatting Attributes Stored in a Paragraph Style
| Category | Chief Formatting Attributes |
|---|---|
| Font, Spacing, and Animation | The font name (for example, Times New Roman), as well as the character size, style (bold or italic), underlining, effects (such as strikethrough or superscript), color, intercharacter spacing, and animation effects. |
| Language | Controls which dictionary (English, French, or German, for example) the Word proofing tools (such as the spelling and grammar checkers) will use to correct the text. Can also be used to exclude the text from proofing. The proofing tools are discussed in Chapter 10, "Using Word's Proofing Tools" |
| Indents, Spacing, and Breaks | Paragraph indentation. Space before or after a paragraph, paragraph line spacing, alignment (left, right, centered, or justified), outline level, and page break control. |
| Tabs | Position and type of tab stops in effect within a paragraph. |
| Borders and Shading | Borders around the text and background shading. |
| Bullets and Numbering | Automatic display of a bullet character or number for a paragraph in a list. |
NOTE
Some of the predefined styles are used for standard Word elements. For example, Word automatically assigns the Comment Text style to comment text (discussed in Chapter 12), and the Header style to page headers. You can, however, assign these styles to any paragraphs in your document.
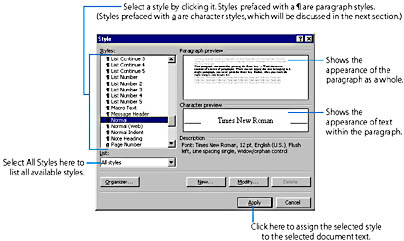
Figure 7-8. Choosing a style in the Style dialog box. The name of each style suggests its purpose. The descriptions and previews help you find an appropriate style.
If you know the name of the style you want, you don't need to use the Style dialog box. Instead, you can apply the style by selecting it from the Style list on the Formatting toolbar or by typing the style name into the box at the top of the list:
SEE ALSO
For details on defining your own shortcut keys for quickly applying styles, see the section "Modifying Styles".
Note that the label for each style on this list is formatted using the style's character formatting attributes and possibly some of its paragraph formatting attributes (such as an indent). The list displays only those styles that are currently used in the document or were previously selected, plus several other common styles (such as Heading 1). To list all available styles, press Shift while you click the down arrow. Also, Word provides the shortcut keys shown in Table 7-5 for applying several of the paragraph styles:
Table 7-5. Shortcut Keys for Styles
| Style | Shortcut Key |
|---|---|
| Normal | Ctrl+Shift+N |
| List Bullet | Ctrl+Shift+L |
| Heading 1 | Alt+Ctrl+1 |
| Heading 2 | Alt+Ctrl+2 |
| Heading 3 | Alt+Ctrl+3 |
TIP
Take Advantage of the Predefined Heading StylesUse the predefined styles Heading 1 through Heading 9 for the headings in your document. Not only do these styles provide appropriate and consistent formatting for various levels of headings, but using them will also allow you to view the organization of your document in Outline view, to quickly navigate through your document with the Document Map, and to easily generate tables of contents.
Additionally, when you drag the scroll box on the vertical scroll bar, Word will display the text of each heading to make it simpler to find the desired location in your document. (Headings, outlines, the Document Map, and tables of contents will be fully discussed in "Chapter 13.")
When you press Enter at the end of a paragraph, the new paragraph that is inserted generally has the same style as the previous paragraph. Some styles, however, are defined so that the new paragraph has a different style. For example, if you press Enter while in a paragraph with the Heading 1 style, the new paragraph will typically have the Normal style.
TIP
Use the Body Text Style for More Formatting ControlIf you use the Body Text style—rather than Normal—for the body text in your document, you'll be able to easily modify the formatting of the body text without altering other text in your document. (Changing Normal alters most other paragraph styles as well, because these styles are based on Normal. In contrast, other styles aren't commonly based on Body Text. This topic will be fully discussed in Chapter 8.
Applying Character Styles
You can use a character style to apply a set of character formatting attributes to emphasize one or more characters within a paragraph. Character styles differ from paragraph styles in the following ways:
- A character style can store only formatting attributes that belong to the Font, Spacing, and Animation, the Language, or the Borders and Shading categories, described in Table 7-4. Notice that these are only three of the six categories of formatting that can be assigned to a paragraph style.
- You assign a character style to one or more individual characters, while you assign a paragraph style to one or more entire paragraphs.
- Unlike a paragraph style, a character style doesn't need to fully specify the character format. For example, a particular character style might specify only bold and italic formats. If you assigned this style to a block of text, Word would remove any directly applied character formatting, apply the bold and italic formats to the text, and preserve all the other character formatting that is specified by the paragraph style, such as the character font, size, and effects.
NOTE
If a character style includes formatting that's also part of the paragraph's style, applying the character style can result in turning off the formatting. This will happen with formatting that can be selected or deselected, such as bold, italic, all caps, and strikethrough. For example, if a character style includes italic, applying the character style to text within a paragraph whose style also includes italic will remove the italics. This is in accord with common writing practices; for example, a typical way to emphasize a word within an all-italic heading is to remove the italics from that word.
Word provides few predefined character styles. Therefore, the techniques given here will not be truly useful until you learn how to define your own character styles in Chapter 8.
To apply a character style to a group of characters:
- Select the text, or to apply the style to the text you're about to type, place the insertion point at the position where you want to insert the text. To apply a character style to a single word, place the insertion point anywhere within the word without selecting it.
- Choose Style from the Format menu, and in the Style dialog box (see Figure 7-8), select a character style from the list. The names of character styles are prefaced with a. Notice that Word displays sample text formatted with the selected style. Click the Apply button when you have selected the style you want.
- If you didn't select characters in step 1, begin typing. The character style will be applied to all characters you type until you move the insertion point or press Ctrl+Spacebar or Ctrl+Shift+Z.
SEE ALSO
For instructions on defining your own character styles, see "Creating New Styles".
Alternatively, if you know the name of the desired character style, you can simply select it in the Style list on the Formatting toolbar or type the style name into the box at the top of the list. Recall that to list all available styles, you must press Shift while you click the down arrow.
EAN: 2147483647
Pages: 228