Touring the Word Workplace
To run Word and take a short tour of its most basic features, click the Start button on the Windows taskbar, point to the Programs folder, and then choose the Microsoft Word command.
![]()
SEE ALSO
The section"Running Office Applications", describes several other ways to start an Office application.
When Word first begins running, it automatically opens a new empty document. Figure 5-1 shows the Word program window displaying a typical set of components.
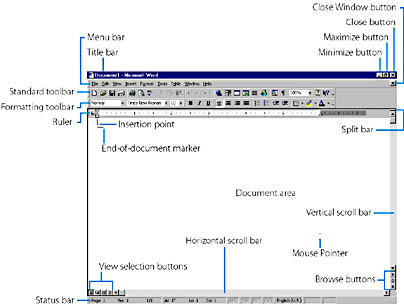
Figure 5-1. The Word window.
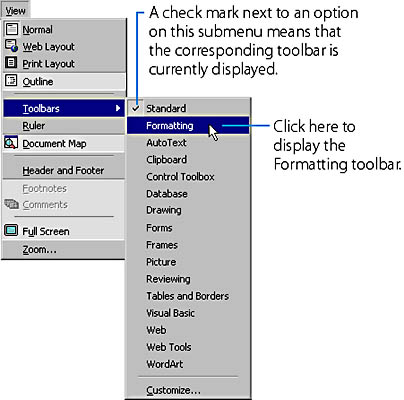
Because Word is so highly customizable, your window could be quite different. If you are missing any of the components shown in Figure 5-1, you can display them as follows: To display the ruler, choose Ruler from the View menu. (You can also display the ruler temporarily by simply placing the mouse pointer over the horizontal gray bar at the top of the document area of the window.) To show either the Standard or the Formatting toolbar, point to Toolbars on the View menu—or place the mouse pointer over the menu bar or over a toolbar and click with the right mouse button (right-click)—and then choose the Standard or Formatting option from the submenu that appears:
TIP
Shortcuts Are a Click AwayMany times you can find the next action you want to perform on the pop-up menu (also known as a shortcut menu) that appears when you click the right (or secondary) mouse button. The commands on a pop-up menu change according to the location of the mouse pointer when you click. (Word provides commands that are appropriate to the context of your actions.) So check the pop-up menu often for possible shortcuts to accomplish your tasks more quickly.
To show the horizontal or vertical scroll bar or the status bar, choose Options from the Tools menu, open the View tab in the Options dialog box, and turn on the corresponding option. (See Figure 5-2.)
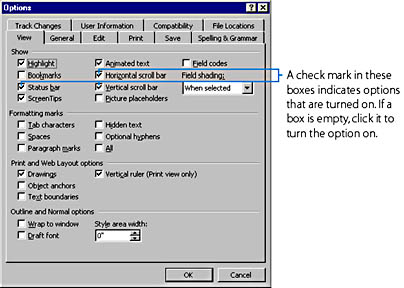
Figure 5-2. Displaying the horizontal or vertical scroll bar or the status bar using the Options dialog box.
The Word window shown in Figure 5-1 is in Normal view. (Refer to Figure 5-1, throughout the remainder of this section.) A view is a way of displaying and working with a document; the different Word views will be explained near the end of the chapter. If the interior of your Word window doesn't appear as shown in the figure, a different view might be active. To switch to Normal view, choose Normal from the View menu.
The Standard toolbar in Word lets you perform a variety of tasks, such as opening and saving documents, printing, copying text or formats, and obtaining help. The Formatting toolbar is typical of a special-purpose Word toolbar; it is used for modifying the format (that is, the appearance) of characters and paragraphs. In the following chapters, you'll learn how to use the buttons on these toolbars as well as how to display, use, and even customize or create other specialized Word toolbars to suit your style of working.
SEE ALSO
For general information about working with toolbars, see"Using Toolbars".
The ruler at the top of the document area allows you to use the mouse to change the document margins and also to set the indents and tab stops for individual paragraphs. The vertical and horizontal scroll bars permit you to use the mouse to scroll through a document that is too large to fit within the window. You can drag the split bar down from the top of the vertical scroll bar to divide the Word window into two panes; you can then view a different portion of the same document within each pane. The view selection buttons (the four buttons at the left end of the horizontal scroll bar) permit you to change the document view, as explained later in this chapter in the section"Changing the Way Documents Are Displayed". The browse buttons (the three buttons at the bottom of the vertical scroll bar) let you browse through the document; they are discussed in"Using the Browse Buttons".
To learn the purpose of any of these buttons, simply move the mouse pointer over the button without clicking a mouse button. Word will display a brief description of the button's action, known as a ScreenTip, next to the button.

If ScreenTips don't appear, you can enable them by choosing Customize from the Tools menu, clicking the Options tab in the Customize dialog box, and selecting the Show ScreenTips On Toolbars option. (If you want the ScreenTips to display the key combination for executing each command, also select the Show Shortcut Keys In ScreenTips option.)
The Word status bar provides information about the operation of the program. The first six items indicate the current position of the insertion point within the document; the insertion point is the flashing vertical line that is displayed at the position where the characters you type appear in the document. The next four items indicate the status of various program modes; if any of these items is displayed in dark print, the corresponding mode is active (for example, Word is recording a macro or typing replaces existing text). Word uses the area to the right of the mode indicators to display appropriate icons when the program is engaged in various operations, such as saving a document, printing a document, or as-you-type spelling or grammar checking. The status bar items are labeled in Figure 5-3; the significance of each item will become clear when the related Word feature is discussed later in the book.
SEE ALSO
For more information about working with Office application windows, see"Working with Application Windows", Chapter 2.
TIP
Use the Status Bar to Issue CommandsYou can double-click various parts of the status bar to quickly issue certain Word commands. For example, double-clicking the left half of the status bar activates the Go To command (discussed in Chapter 6), and double-clicking one of the program mode indicators toggles (switches on and off) the selected mode. If you have enabled ScreenTips, placing the mouse pointer over one of these parts of the status bar will display a ScreenTip indicating the effect of double-clicking that part.
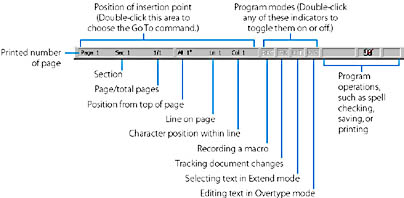
Figure 5-3. The Word status bar.
![]()
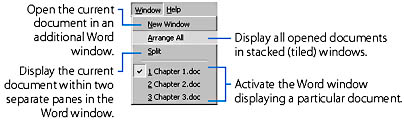
Although Figure 5-1, shows only a single open document, you can simultaneously open several documents in Word, each one appearing in a separate Word window. You can switch to the document you want to work on by clicking the document's button on the Windows taskbar, by pressing Ctrl+F6 (repeatedly, if necessary), or by choosing the document's name from the Window menu in Word:
TIP
If Word terminates abnormally or begins to behave erratically, you might try the new detect and repair feature, which attempts to find problems in the Word program files and to fix the errors. To use this feature, choose Detect And Repair from the Help menu.
EAN: 2147483647
Pages: 228