Using the TextBox Control to Process Paragraphs
The Label control is useful if you want to display a short sentence on a UserForm, but if you want to exhibit or solicit large amounts of text, you'll want to use the TextBox control. A TextBox is a rectangular storage container for words, sentences, and paragraphs— the basic stuff of Office documents. You can receive text via a TextBox control, and provide your macro with raw material for text processing, comparing, or printing. Or you can display text using the TextBox control, either material from an existing document, or information from the operating system or the macro itself. Best of all, the TextBox control is designed with ease of use in mind— you can display it with or without scroll bars, and you can select, copy, and paste information to and from a TextBox just like an Office document.
You can configure a text box object to handle multiple lines by setting three properties in the Properties window. Before you set these properties, be sure the text box object is selected.
- Set Multiline to True (to display more than one line)
- Set ScrollBars to 2-fmScrollBarsVertical or 3-fmScrollBarsBoth (to provide scroll bar access to lines that are not visible in the TextBox)
- Set WordWrap to True (to force text wraps at the right margin and disable horizontal scroll bars)
Processing Text in a Word Document Word Document
On the Running Office 2000 Reader's Corner page is a document named Chap61.doc, which contains the two macros developed in this chapter: MusicTrivia (a trivia macro) and ParaScan (a Word paragraph formatting utility). If you haven't already downloaded this file, do it now so that you can run the ParaScan macro, which (because of its length) we don't provide detailed construction steps for. The Chap61 document also contains sample text for the ParaScan macro.
SEE ALSO
To learn how to access the sample files on the Running Office 2000 Reader's Corner page, see "Using the Book's Sample Files," in the Introduction.
Follow these steps to run the ParaScan macro, which uses a text box object to display each paragraph in a Word document, one by one. The macro contains Next, Format, and Delete buttons so that you can quickly scan the document and make formatting adjustments or delete unwanted material quickly. As you practice using the utility, you'll learn more about using program code to manipulate the contents of an Office document.
ON THE WEB
The ParaScan macro is located in the Chap61 document on the Running Office 2000 Reader's Corner page.
- Start Word (if it isn't already running), and open the Chap61.doc sample file, located on the Running Office 2000 Reader's Corner page.
- Press Alt+F8 to open the Macros dialog box, and then double-click the ParaScan macro.
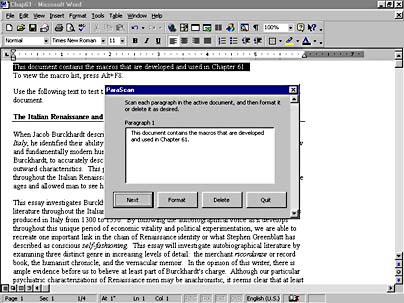
Word runs the macro and displays the ParaScan UserForm.
- Start the macro by clicking the Next button on the UserForm.
The macro selects the first paragraph in the Chap61 document and copies it to the text box object on the UserForm. The four buttons at the bottom of the UserForm describe your options in this macro: you can scan the next paragraph by clicking the Next button, you can format the current paragraph by clicking the Format button, you can delete the current paragraph by clicking the Delete button, or you can close the macro by clicking the Quit button.
- Click the Next button seven times to select the eighth paragraph in the document.
This paragraph is too long to fit entirely in the text box, but if you click the text box, a vertical scroll bar will appear to let you view the hidden text.
- Now click the Format button to change the font formatting in the paragraph.
The macro opens the Font dialog box so that you can quickly make the formatting changes you want to.
- Change the font to 9 point, change the color to Blue, and then click OK.
The macro formats the selected paragraph as you requested.
- Click the Next button again, and then click the Delete button.
The macro highlights a new paragraph and then deletes it when you click Delete.
- Click the Next button a few more times to see how the ParaScan macro works, and then click the Quit button to close the macro.
TIP
We wrote the ParaScan macro primarily for demonstration purposes, but if you'd like to use it to manage your own documents, copy it to the Normal template now using the Organizer tool so that you can use it with all your documents. (Right now, it's available only in the Chap61 document.)
Reviewing the ParaScan Macro Code
ParaScan is a two-part macro. The first part is a simple two-line procedure named ParaScan that uses the Load statement and the Show method to open and display the UserForm2 dialog box on the screen. The real work of the macro happens in the second part, a custom UserForm containing an event procedure for each command button object in the user interface: Next, Format, Delete, and Quit.
Something new you'll see in this macro is a global, or public, variable named Num, which keeps track of the current paragraph in the document. A public variable is declared at the top of a module using the Public keyword, in a special section called Declarations. When you declare a public variable in a macro, the variable holds its value in all event procedures in the macro. By way of contrast, variables declared within an event procedure are local to the event procedure, meaning they are reset each time an event procedure is finished.
Loading Text in a Text Box Object
When the user clicks the Next button, the CommandButton1 Click event procedure is executed. This event procedure increments the Num variable, which tracks the current paragraph number in the document. Using the paragraph number, the routine then selects the current paragraph and copies it to the Text property of the TextBox1 object. The current paragraph is also displayed in the Label1 caption, and if the paragraph is the last one in the document, the Next button is disabled. (Clicking the Next button with no paragraphs left would cause a run-time error.)
Private Sub CommandButton1_Click() Num = Num + 1 ActiveDocument.Paragraphs(Num).Range.Select TextBox1.Text = ActiveDocument.Paragraphs(Num).Range Label1.Caption = "Paragraph "& Num If Num = ActiveDocument.Paragraphs.Count Then CommandButton1.Enabled = False End If End Sub |
Opening the Font Dialog Box
The second command button object (Format) opens Word's built-in Font dialog box so that the user can format the selected paragraph. A built-in dialog box is displayed when you use one of Word's dialog box constants with the Dialogs collection and the Show method.
Private Sub CommandButton2_Click() Dialogs(wdDialogFormatFont).Show End Sub |
TIP
The Dialogs collection contains a constant name for each dialog box that Word can display. To learn more about these constants, search for "built-in Word dialog boxes, displaying" in the Word Visual Basic online Help.
Deleting a Paragraph
The third command button (Delete) deletes the paragraph that is currently selected in the Word document and is visible in the TextBox1 object. Deleting the text is the easy part— a simple matter of using the Delete method and the active range, as the first line of the event procedure demonstrates.
Private Sub CommandButton3_Click() ActiveDocument.Paragraphs(Num).Range.Delete If Num >= 2 Then Num = Num - 1 ActiveDocument.Paragraphs(Num).Range.Select TextBox1.Text = ActiveDocument.Paragraphs(Num).Range Label1.Caption = "Paragraph "& Num If Num = ActiveDocument.Paragraphs.Count Then CommandButton1.Enabled = False End If End Sub |
The rest of the event procedure clarifies what happens next. If the document contains two or more paragraphs, the new selected paragraph simply becomes the paragraph directly above. However, if the document contains only one paragraph, the paragraph count remains the same— in Word there can never be zero paragraphs. Finally, if the new active paragraph is the last paragraph in the document, the Next button is disabled so that the user cannot specify a paragraph outside the valid range. (Such an action would produce a run-time error.)
Unloading the UserForm
Finally, the last command button on the UserForm (Quit) terminates the macro by unloading the UserForm. This technique is always the best way to close a UserForm.
Private Sub CommandButton4_Click() Unload UserForm2 End Sub |
The ParaScan macro demonstrates the unique interplay between UserForms, event procedures, and document elements in an Office macro. You have learned several of the skills necessary to write your own professional-looking macros.