Writing If...Then Decision Structures
Conditional expressions can control the order in which statements are executed when they are used in a special block of statements known as a decision structure. An If...Then decision structure lets you evaluate a condition in the program and control the flow of execution based on the result. In its simplest form, an If...Then decision structure is written on a single line, in the form
If condition Then statement |
where the condition placeholder represents a conditional expression, and statement represents a valid Visual Basic macro statement. For example,
If Application.UserName = "Hugh Victor" Then MsgBox "Welcome, Hugh!" |
is an If...Then decision structure that uses the conditional expression
Application.UserName = "Hugh Victor" |
to determine whether the macro should display the message "Welcome, Hugh!" in a message box on the screen. If the UserName property of the Application object contains a name that matches "Hugh Victor," Office displays the message box; otherwise, it skips the MsgBox statement and executes the next line in the macro. Conditional expressions always result in a True or False value, never in a maybe.
Testing Several Conditionsin an If...Then Decision Structure
Visual Basic also supports an If...Then decision structure that allows you to include several conditional expressions. This block of statements can be several lines long and contains the important keywords ElseIf, Else, and End If.
If condition1 Then statements executed if condition1 is True ElseIf condition2 Then statements executed if condition2 is True [Additional ElseIf clauses and statements can be placed here] Else statements executed if none of the conditions is True End If |
In this structure, condition1 is evaluated first. If this conditional expression is True, the block of statements below it is executed, one statement at a time. (You can include one or more program statements.) If the first condition is not True, the second conditional expression (condition2) is evaluated. If the second condition is True, the second block of statements is executed. (You can add additional ElseIf conditions and statements if you have more conditions to evaluate.) Finally, if none of the conditional expressions is True, the statements below the Else keyword are executed. The whole structure is closed at the bottom by the End If keywords.
In the next section, you'll use an If...Then decision structure to convert a selected heading style in Microsoft Word to formatted text in the Normal style. This macro is useful if you want to reduce the amount of space a Word document takes up, or if you routinely convert one heading style to another.
ON THE WEB
The ConvertStyles macro is located in the Chap60 document on the Running Office 2000 Reader's Corner page.
Using an If...Then Decision Structure to Convert Styles
Word's Normal template includes three default formatting styles for headings: Heading 1, Heading 2, and Heading 3. The following steps show you how to convert these styles to all caps, underline, and italic formatting:
- Start Word and open a new, blank document.
- Choose Macros from the Macro submenu of the Tools menu. Word opens the Macros dialog box, the place where you create and run Visual Basic macros.
- Type ConvertStyles in the Name text box, and then click the Macros In drop-down list box and select your new, blank document in the list. (In this example, the new document is named Document1.)
- Click the Create button.
Word starts the Visual Basic Editor and opens a new macro procedure named ConvertStyles in the Code window.
- Type the following program statements:
If Selection.Type = wdSelectionIP Then MsgBox "No text selected." ElseIf Selection.FormattedText.Style = "Heading 1" Then Selection.FormattedText.Style = wdStyleNormal Selection.Font.AllCaps = True ElseIf Selection.FormattedText.Style = "Heading 2" Then Selection.FormattedText.Style = wdStyleNormal Selection.Font.Underline = True ElseIf Selection.FormattedText.Style = "Heading 3" Then Selection.FormattedText.Style = wdStyleNormal Selection.Font.Italic = True End If
- Click the Save button on the Visual Basic toolbar, and then specify a filename for your document.
This macro consists entirely of an If...Then decision structure that contains one If statement and three ElseIf clauses. The first If statement uses the Selection object's Type property to see whether text is selected in the document that can be evaluated by the macro. If there is a text selection, the structure determines which heading style is active, converts the head back to the Normal style, and applies some simple text formatting to preserve the meaning of the heads. (Heading 1 becomes all caps, Heading 2 is underlined, and Heading 3 is formatted as italic.)
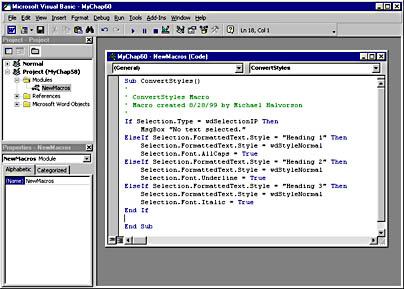
By modifying the style and formatting constants used in this example, you could easily modify the Word macro to convert other styles or formatting options. Your screen should look like Figure 39-1.

Figure 39-1. The ConvertStyles macro in the Visual Basic development environment.
Running the ConvertStyles Macro
To run the ConvertStyles macro to convert Word styles, follow these steps:
- Click the View Microsoft Word button on the Visual Basic Editor toolbar.
- At the top of the document, type First Head, Second Head, and Third Head on three lines.
Place the heads on separate lines so you can test each level of formatting.
- Select the first head, and apply the Heading 1 style by using the Style drop-down list box on Word's Formatting toolbar.

- Format the second head using the Heading 2 style and the third head using the Heading 3 style.
- Now select First Head in your document, and run the ConvertStyles macro.
Be sure to select one head only and not multiple lines. When you run the macro, Word converts the selected head to all caps.
NOTE
At this point, we'll assume you know how to start a macro. To review the five techniques you can use to run a macro in Office, see "Running a Macro."
Word converts the second style to underlined type.
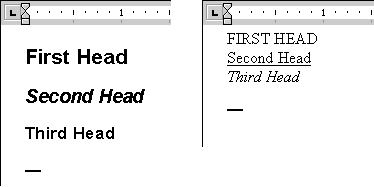
Word converts the third style to italic type. Figure 39-2 shows the three heads before and after the macro conversion.

Figure 39-2. The ConvertStyles macro converts Word headings from their default size to more compact styles.
Using Logical Operators in Conditional Expressions
Visual Basic lets you test more than one conditional expression in your If...Then and ElseIf clauses if you want to include more than one selection criterion in your decision structure. The extra conditions are linked together by using one or more of the following logical operators:
Logical Operator Meaning And If and only if both conditional expressions are True, then the result is True. Or If either conditional expression is True, then the result is True. Not If the conditional expression is False, then the result is True. If the conditional expression is True, then the result is False. Xor If one and only one of the conditional expressions is True, then the result is True. If both are True or both are False, then the result is False. For example, the following decision structure uses the And logical operator to test an Office object:
You'll see an example of this operator later in the chapter.
EAN: 2147483647
Pages: 228