The Inbox, Drafts, Sent Items, and Outbox default Outlook folders are used to store and manage mail items. This category of items includes e-mail messages that are sent over your network or across the Internet, faxes you receive using a fax modem installed on your system, discussion postings, and even files such as Microsoft Office documents. (The final two item types are used primarily with public folders, which are discussed in the sidebar "Exchange Server Only: Sharing Outlook Information.") Throughout this chapter, the term message refers to either an e-mail message or a fax.
All incoming messages are delivered to your Inbox, messages that you have written and saved but haven't yet sent are normally stored in Drafts, copies of all messages that you have sent are usually stored in Sent Items, and the Outbox temporarily stores e-mail messages that you have sent if they can't be delivered immediately.
NOTE The instructions in the following sections for managing your messages assume that you have opened the Inbox folder or other mail folder, such as Drafts, Outbox, or Sent Items.
Reading Messages
If you send and receive e-mail via a network (that is, you're using Outlook as a client for Exchange Server or another e-mail server on your network), your e-mail messages will normally be delivered to your Inbox automatically, and you won't have to issue any commands to retrieve them. Also, if you have set up a fax service, faxes will automatically appear in your Inbox as soon as your fax modem receives them.
Setting Up E-Mail and Faxes in Outlook
As you learned in the section "Setting Up Outlook," when you install Outlook, you might be able to upgrade from an existing e-mail program. You might also be able to use an existing user profile (perhaps one you defined for a previous Outlook version), together with the e-mail settings it contains. In either case, you can probably just start using Outlook to access your stored messages, and to send and receive messages using your current e-mail provider, without further fuss.
If, however, you weren't able to upgrade an e-mail program and you don't have a user profile already set up for e-mail (or if you want to change your e-mail service), you'll need to add and set up an appropriate e-mail information service in your user profile. The section "Information Services and User Profiles," discusses information services, explains how to add them to a user profile, and briefly describes the standard information services that Outlook provides. This sidebar offers some additional details on the e-mail information services to help you choose one that's appropriate for your e-mail provider.
If you send and receive e-mail via an Internet service provider that uses the standard SMTP and POP3 e-mail protocols, you can probably use the Internet E-Mail information service. For example, if you subscribe to the Microsoft Network (MSN), you can use Internet E-Mail provided that you have version 2.5 or later of the MSN software. If you want to exchange e-mail with users of the Microsoft Mail e-mail program for PC networks, you can use the Microsoft Mail information service. And if you send and receive e-mail via Microsoft Exchange Server on your network, the Microsoft Exchange Server information service will provide all necessary support. And if you need to exchange mail with users of Lotus cc:Mail, you can use the MS Outlook Support For Lotus cc:Mail information service.
All the information services mentioned so far are included with Outlook, and you can add any of them to your profile by simply choosing it from a list. In addition, some Internet service providers furnish proprietary information services that allow you to exchange e-mail with their systems using Outlook as your e-mail program. For example, if you use CompuServe, you can download a free product called CompuServe Mail for Microsoft Exchange. When you install it, it automatically adds to your user profile an information service called CompuServe Mail, which lets you use Outlook—rather than the CompuServe software—to send and receive e-mail via CompuServe.
The Information services that some service providers furnish must be manually installed from a disk. To do this, choose Services from the Tools menu, click the Add button on the Services tab, and click the Have Disk button in the Add Service To Profile dialog box.
If you're unsure which information service is appropriate for your e-mail system, contact your network administrator (if you send and receive e-mail over a network), or contact your e-mail service provider (if you exchange e-mail using a dial-up service). Note that if you have more than one e-mail provider, you can add an information service for each one; you can specify which service or services Outlook uses when you send and receive e-mail.
Likewise, if you have a fax modem attached to your computer and you want to send and receive faxes using Outlook, you'll need to include a fax information service in your user profile. Outlook provides a fax information service called Microsoft Fax, which lets you use the Microsoft Fax component of Windows. Note that you should install the Microsoft Fax component before you install Outlook because the Outlook installation program needs to update it.
To install Microsoft Fax in Windows 95, open Add/Remove Programs in your Windows Control Panel, click the Windows Setup tab, and select Microsoft Fax in the Components list. To install it in Windows 98, on the Windows 98 CD, double-click the file \tools\oldwin95\message\us\awfax.exe (for the United States version) or \tools\oldwin95\message\intl\awfax.exe (for the international version).
Recall from Chapter 25 that the Services dialog box in Outlook—opened by choosing Services from the Tools menu—lets you modify the delivery and addressing of messages. (See Figure 25-2.) The Delivery tab of this dialog box lets you change the folder where your messages are delivered. For example, if you have both an Exchange Server information service and a Personal Folders information service, you can choose whether to have your e-mail delivered to the Inbox in your Exchange Server mailbox or to the Inbox in your Personal Folders. And the Addressing tab lets you modify the way Outlook uses your address books when you send messages.
NOTE When you choose the Internet Only installation of Outlook, the Send/Receive button or F5 retrieves e-mail from all accounts for which you have enabled the Include This Account When Doing A Full Send And Receive option. You set this option by choosing Accounts from the Tools menu, selecting an account on the Mail tab of the Internet Accounts dialog box, and then clicking the Properties button. You'll find the option on the General tab of the Properties dialog box.
Setting Up E-Mail and Faxes in the Internet Only Installation
When you select the Internet Only installation, Outlook doesn t use information services and user profiles. Rather, you exchange e-mail and faxes by means of mail accounts.
If you weren t able to upgrade an existing e-mail program when you installed Outlook, you ll have to set up a mail account to be able to send and receive messages using your e-mail service. The first time you start Outlook, the Internet Connection Wizard (which runs after the Office 2000 Startup Wizard) will normally prompt you for information and set up a mail account for your e-mail provider. You can also add, remove, or modify mail accounts at any time by choosing Accounts from Outlook s Tools menu and clicking the Mail tab, or by opening the Mail item in the Windows Control Panel.
To send and receive faxes using the Internet Only installation, you use an integrated fax feature named Symantec WinFax Starter Edition. The first time you start Outlook, a wizard will obtain the necessary information and set up a mail account for sending and receiving faxes.
You can modify the way Outlook uses your mail accounts by choosing Options from the Tools menu and clicking the Mail Delivery tab in the Options dialog box. For example, you can specify when Outlook sends and receives e-mail. (Clicking the Accounts button on the Mail Delivery tab provides yet another way to add, remove, or modify accounts.) And you can change fax options by clicking the Fax tab in the Options dialog box. For example, you can control whether your fax line is answered automatically.
Finally, using the Internet Only installation, you can set up directory service accounts. A directory service is a database of people s names and e-mail addresses that s maintained by an Internet service provider. It s accessed by means of a protocol know as LDAP (lightweight directory access protocol). A directory service account lets you have Outlook automatically check addresses in your outgoing e-mail messages against that directory service. A directory service account also lets you look up information in that service by pointing to Find on the Windows Start menu and then choosing People from the submenu. When you install Outlook, it sets up a collection of default directory service accounts (such as Bigfoot, InfoSpace, and Yahoo! People Search). You can modify or remove any of these accounts or add new ones by choosing Accounts from the Tools menu and clicking the Directory Service tab.
For more information on managing e-mail and faxes in an Internet Only installation, see the online Help book, "Using Internet Only Features."
If, however, you send and receive e-mail by means of a dial-up modem connection (for example, from an Internet service provider or an online service), you normally have to explicitly issue a command to connect to your provider and have your e-mail messages downloaded into your Inbox. Outlook provides many ways to do this. The easiest is to click the Send/Receive button on the Standard toolbar or press F5. Outlook will then retrieve all e-mail messages that are waiting for you (and will also send any outgoing e-mail messages stored in your Outbox folder, as described later). It will download your e-mail from all services that are currently enabled for this feature. To enable e-mail services, choose Options from the Tools menu, click the Mail Services tab in the Options dialog box, and in the Check For New Mail On list, select all e-mail services that you want to use.
TIPUse a Specific E-Mail Service
If you have more than one e-mail service in your user profile, you can send and receive e-mail from a particular service (ignoring what's selected on the Mail Services tab) by pointing to Send/Receive on the Tools menu and choosing that service's name from the submenu. (Note that choosing the All Accounts command on this submenu is equivalent to clicking the Send/Receive button or pressing F5.)
NOTE The Internet Only installation of Outlook differs in several ways from the Corporate Or Workgroup installation in its handling of e-mail messages:
It gives you more control over when it sends messages or checks for incoming messages. For example, if your e-mail is exchanged over a network, you can choose Options from the Tools menu, click the Mail Delivery tab, and select the Send Messages Immediately option to have Outlook automatically send outgoing e-mail messages immediately, or you can select the Check For New Messages Every option to have Outlook automatically download incoming messages and send outgoing messages from your Outbox at a specified regular interval. If both options are deselected (or if you exchange e-mail via a dial-up connection), e-mail won't be exchanged until you explicitly click the Send/Receive button or choose another appropriate command.
It doesn't provide a Remote Connection Wizard.
It includes a set of commands for accessing IMAP folders if you have an IMAP e-mail service.
An alternative way to retrieve your e-mail messages from a dial-up connection is to use the Remote Connection Wizard. This wizard lets you choose specific mail information services if you have more than one. Also, it lets you first download only the headers for your messages, then select specific messages, and finally download the complete message text for only the selected messages. You run the Remote Connection Wizard by pointing to Remote Mail on the Tools menu and choosing Connect from the submenu. For complete information on using the Remote Connection Wizard and other remote mail tools, see the book "Using Remote Mail to Manage Your Messages," within the "Using Corporate or Workgroup Features" book in the Outlook online Help.
TIPAutomatically Download E-Mail
When you use some dial-up e-mail information services you can have your messages retrieved automatically at regular intervals. For example, with the Internet E-Mail information service you can set this up by choosing Options from the Tools menu and clicking the Internet E-Mail tab. And with the CompuServe Mail for Microsoft Exchange information service, you can set this up by choosing Services from the Tools menu, and on the Services tab selecting the service and clicking the Properties button. (See Figure 25-2.)
When one or more new e-mail messages or faxes arrive in your Inbox, Outlook displays an envelope icon at the right end of the Windows taskbar:
You can also have Outlook notify you of the receipt of a new message by displaying a message box, by playing a sound, or by temporarily changing the mouse pointer. To enable the message box, choose Options from the Tools menu, click the E-Mail Options button on the Preferences tab, and then select Display A Notification Message When New Mail Arrives in the E-Mail Options dialog box. To access the options for enabling the sound or pointer change, click the Advanced E-Mail Options button, also in the E-Mail Options dialog box.
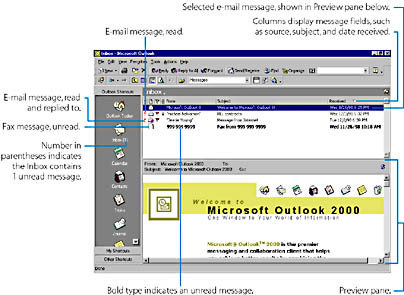
To read your new message or messages, open the Inbox folder in Outlook (you can quickly open it by double-clicking the envelope icon on the Windows taskbar), and you'll see a list of your new messages plus any messages you have already read that are still stored in the Inbox. See Figure 27-1.
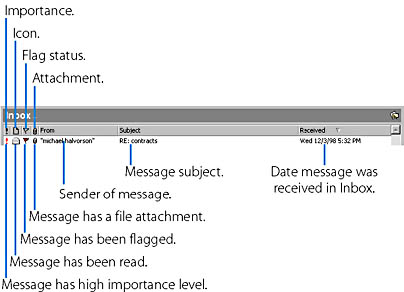
Figure 27-1 shows the Inbox in Messages view, which arranges the messages in a table so that each column displays a different field of information about the messages. These fields are labeled in Figure 27-2.
To read an e-mail message, simply click it to select it, and the message contents will be displayed in the Preview pane. If the Preview pane isn't shown, choose the Preview Pane option from the View menu.
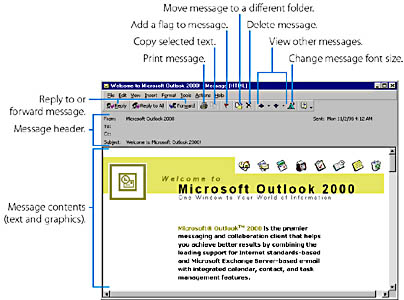
You can also read an e-mail message by double-clicking it to open it in the Message form. In addition to displaying the content of the message, the Message form provides commands for replying to or forwarding the message, printing it, moving it to a different Outlook folder, deleting it, or adding a message flag (a comment such as Call or Follow up attached to the message). In the Message form, you can also open other messages, create new messages, and perform additional operations, as shown in Figure 27-3. Note that the look and features of the Message form can vary depending on the message format and the format options you have chosen. (See the sidebar "Choosing the Format for New E-Mail Messages.")
Figure 27-1.The Inbox displaying both unread and read messages.
Figure 27-2.The default message fields displayed in the Messages view of the Inbox folder.
Figure 27-3.Reading a message in the Message form—this message is in HTML format.
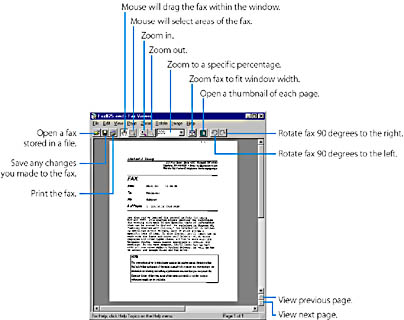
To read a fax, double-click it in the Inbox. The fax will be opened in the fax viewer provided by the fax information service. Figure 27-4 shows a fax displayed in the fax viewer supplied by the Microsoft Fax software; this viewer lets you view the fax at various levels of magnification, print it, and manipulate its image in several different ways.
Figure 27-4.Viewing a fax in the Fax Viewer window displayed by the Microsoft Fax software.
Sending Messages
You can reply to or forward a message you have received, or you can send a new message. To reply to or forward a message, first select the message in the Inbox (or another mail folder where you've stored it), and then click one of the following three buttons on the Standard toolbar (or choose one of the commands that have the same labels from the Actions menu):
If you click Reply, a new message will be sent back to the sender of the selected message. If you click Reply To All, a message will be sent to the sender and to all other recipients of the selected message. (As you'll see, a message can be sent to more than one person.) If you click Forward, a copy of the selected message will be sent to the recipient or recipients that you specify.
Receiving and Sending Faxes with the Internet Only Installation When you use Outlook's Internet Only installation, faxes are received and sent using the integrated fax feature (Symantec WinFax Starter Edition), which works somewhat differently from the Microsoft Fax information service used in the Corporate Or Workgroup installation:
To read a fax, first view it in the Preview pane or open it in the Message form, which will display information about the fax. The actual fax is contained in an attachment to the message. Double-click this attachment to read the fax in the Quick Fax Viewer.
To send a fax, choose New Fax Message from the Actions menu (not New Mail Message). The New Fax Message command will open a Fax form, rather than running the Compose New Fax Wizard as it does in the Corporate Or Workgroup installation. (The Fax form has the same design as the Message form.)
The Fax form's Tools menu doesn't have a Fax Addressing Wizard command. However, you can type a fax number directly into the To box by entering it in the format fax@111-1111, or fax@9w111-1111 (which dials 9 to reach an outside line and then waits for a dial tone). And of course you can select a fax number by clicking the To button and selecting an address book entry or Contact folder item that has a fax number.
To send a new e-mail message or fax, choose New Mail Message from the Actions menu, or just press Ctrl+N. An alternative way to send a fax is to choose New Fax Message from the Actions menu. (This command is provided by the Microsoft Fax information service.) The New Fax Message command runs the Compose New Fax Wizard, which helps you compose a fax consisting of one or more of the following elements: a cover sheet, a typed note, and the contents of one or more files. The wizard also lets you schedule the fax for later delivery, rather than sending it immediately.
Note that you can also reply to or forward a received e-mail message that you have opened in the Message form— or create a new message— using commands provided by the form. (See Figure 27-3.)
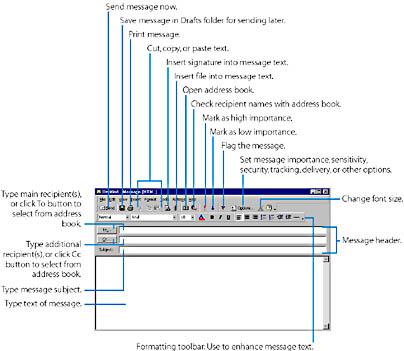
When you reply to or forward a message or create a new one, Outlook opens a Message form, which you can use to compose and send your message, as shown in Figure 27-5. (An exception is that choosing New Fax Message from the Actions menu runs the Compose New Fax Wizard rather than opening a form.) Notice that the Message form shown in Figure 27-5 is quite similar to the Message form displayed when you view a message you have received (shown in Figure 27-3). The primary difference is that the Message form for sending a message contains text boxes that allow you to enter or modify the header information (that is, the message recipients and subject). Keep in mind that the look of the Message form and the options it provides can vary depending upon the message format that's being used.
Choosing the Format and Editor for New E-Mail Messages
Outlook lets you read and write e-mail messages in one of three different formats: HTML (hypertext markup language, the format used for Web pages), Microsoft Outlook Rich Text (which preserves character formatting), and plain text. When you reply to or forward an e-mail message, Outlook matches the format of the received message. When you create a new e-mail message, however, you can select the format.
To select the default format for all new e-mail messages you send, choose Options from the Tools menu, click the Mail Format tab, and select the format from the Send In This Message Format list box.
If you've installed Microsoft Word, you can select the Use Microsoft Word To Edit E-Mail Messages option on the Mail Format tab to use Word as your editor for all new e-mail messages you create, rather than using the built-in Outlook message editor. Word will create the messages in the format you have selected in the Send In This Message Format list box. All received messages will also be opened in Word, unless the message is in HTML format. (HTML messages are always opened in the Outlook editor.)
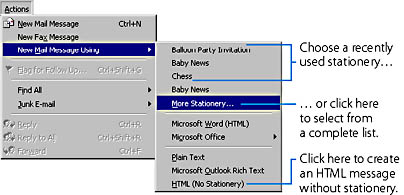
When you create a new e-mail message, you can select a different format for that specific message, overriding the current selection on the Mail Format tab. To do this, point to New Mail Message Using on the Actions menu, and choose a command from the submenu. If you choose Plain Text, Microsoft Outlook Rich Text, or HTML (No Stationery), the message will be created in the corresponding format using Word (if Word is selected as your default e-mail editor on the Mail Format tab), or using the built-in Outlook message editor (if Word isn't selected as your default editor). If you choose Microsoft Word (format)—where format is the name of the e-mail format currently selected on the Mail Format tab (Plain Text, Rich Text, or HTML)—the message will be created in Word, whether or not Word is your default e-mail editor, and the message will have the indicated format.
You can also create and e-mail an Office document by pointing to New Mail Message Using on the Actions menu, pointing to Microsoft Office on the submenu, and then choosing the type of document you want from the Microsoft Office submenu. You can choose Microsoft Access Data Page, Microsoft Excel Worksheet, Microsoft PowerPoint Slide, or Microsoft Word Document. The corresponding Office application will start, a new document will be opened, and a message header will be displayed above the document. (The header contains fields for the message recipient and subject, and is similar to the one shown in Figure 27-5.) After you have created the document and filled in the header, click the Send button on the header to convert the document to HTML format and send it using Outlook, which will process the document just like an e-mail message created within Outlook.
Figure 27-5.The Message form as it appears when you choose New Mail Message from the Actions menu to send a new message (this message is in HTML format).
While you're working on your message, Outlook will save a copy of the message every three minutes in the Drafts folder. You can change the folder where unsent messages are saved, as well as the frequency of automatic saves, by choosing Options from the Tools menu, clicking the E-Mail Options button on the Preferences tab, and then clicking the Advanced E-Mail Options button.
NOTE To send a message that you have created in the Message form as a fax, you can't merely type the fax number into the To text box. Rather, you have to click the To button to select the fax number from an address book in the Select Names dialog box. (When the Select Names dialog box is opened, you can create a new permanent or temporary address-book entry for the fax number if one doesn't already exist.) Alternatively, you can choose Fax Addressing Wizard from the Message form's Tools menu, enter the fax number as prompted, and then click the To button in the message header to add this fax number to the To text box.
Usually, if you create a message by choosing the Reply, Reply To All, or Forward command, the large text box in the Message form initially contains the text of the original message. This provides the recipient with a copy of the message that you're replying to or forwarding. You can then type your reply into the text box (or add your own comments if you're forwarding a message). Note, however, that you can choose whether to include the original message text in a reply or forwarded message, and you can adjust the format of this text, by choosing Options from the Tools menu, clicking the E-Mail Options button on the Preferences tab, and choosing options in the On Replies And Forwards area of the E-Mail Options dialog box.
Figure 27-5 shows the Message form as it appears when the message is being created in the HTML format. (See the sidebar "Choosing the Format and Editor for New E-Mail Messages" above) When you create a message in HTML, the Outlook Message form provides several formatting commands that aren't available with other formats. For example, you can choose Horizontal Line from the Insert menu, or you can click the Insert Horizontal Line button on the Formatting toolbar to insert a horizontal dividing line into the message text. You can choose Picture from the Insert menu to insert a graphic image that's displayed within the message text. You can format various elements of your message text by choosing standard styles (such as Heading 1 or Bulleted List) from the Style submenu of the Format menu or from the Style list box on the Formatting toolbar. And you can choose Picture or Color from the Background submenu of the Format menu to assign a graphic image or solid color to the background of the message text.
Using HTML Stationery When you use the HTML e-mail format (see the previous sidebar), you can get a head start in producing attractive e-mail messages by basing them on HTML stationery rather than creating them from scratch. HTML stationery adds initial content to a new message, which might include a background color, background graphics, or boilerplate text. After you create a message using stationery, you can customize these elements if you want, and you can add your own text.
Keep in mind, however, that some e-mail recipients can't read messages formatted in HTML. (The recipient's e-mail server and e-mail reading program must support the HTML format, and some of them don't.) Normally, a recipient whose mail system doesn't support HTML will receive a plain-text version of the message. So before expending a lot of creative effort designing beautiful HTML messages, you might send a few text messages to determine whether your recipients can read HTML e-mail.
You can select default stationery that'll be used for all new messages you create. To do this, choose Options from the Tools menu, click the Mail Format tab, and make sure that HTML is selected in the Send In This Message Format list box and that the Use Microsoft Word To Edit E-Mail Messages option is deselected. (You can't use Outlook stationery with Word.) Then, on this same tab, select the name of the stationery you want to use in the Use This Stationery By Default list box. (Choose the None option if you want to design your HTML messages from scratch without using stationery.) If you click the Stationery Picker button, you can see a preview image of each type of stationery, edit stationery, remove it, create new custom stationery, or download more stationery from Microsoft's Web site (by clicking the Get More Stationery button).
If you want to use different stationery for a particular message, overriding the default, create the new message by pointing to New Mail Message Using on the Actions menu, and then choosing the stationery you want from the submenu:
Note that selecting stationery—or the HTML (No Stationery) command—from this submenu lets you create a message in HTML format even if HTML isn't your current default e-mail format; the Outlook message editor or Word will appear, depending on which you've chosen as your default e-mail editor.
E-Mail file Attachments
Attaching a file to an e-mail message is a convenient way to send an Office document, another type of data file, or a program to a colleague or friend. To attach a file to an e-mail message, choose File from the Message form's Insert menu, or click the Insert File button on the form's Standard toolbar. Then, in the Insert File dialog box, select the file and select the Attachment option near the bottom of the dialog box. Alternatively, you can simply drag a file from the Windows Explorer or other file-viewing window to the large text box in the Message form. The attached file will be represented by an icon within the text of your message or in a separate pane at the bottom of the form.
When you receive an e-mail message that contains a file attachment, you can immediately open the file by opening the message and double-clicking the icon for the attachment. Or, if the Preview pane is displayed, you can just select the document in the Information Viewer, click the paperclip icon in the upper right corner of the Preview pane, and choose the name of the attached file from the drop-down menu. Using either method, you must have a program installed that can open the specific type of file.
Alternatively, you can save the attached file in a separate disk file by choosing Save Attachments from the File menu of the Message form, or by just dragging the icon for the attachment to the desired folder in Windows Explorer. Or, you can select the message in the Information Viewer, point to Save Attachments on the File menu, choose the name of the attached file from the submenu, and select a folder to place it in.
When you send an e-mail message across the Internet and attach a binary file—that is, an Office document, program, or other file that doesn't consist of plain text—the file data must be encoded using a standard Internet format. (The Internet e-mail protocol wasn't designed to transfer binary data. Encoding translates binary data into a sequence of standard characters that can be sent by e-mail.) The most common formats are MIME (Multi-part Internet Mail Extension) and UUE (Unix to Unix Encode).
Normally, your Internet e-mail server will encode outgoing binary file attachments and decode incoming binary attachments, so you don't even have to think about it. However, some servers don't encode outgoing attachments, and some servers don't decode incoming attachments in particular formats. (For example, at the time of this writing, the CompuServe Internet e-mail server doesn't decode incoming binary attachments that are in UUE format, and an attachment appears as a seemingly random sequence of characters.) In these cases, you have to encode or decode your file attachments manually. To do this, you can use a shareware utility such as Transfer Pro (which you can download from many locations on the Internet).
If you send and receive e-mail over a network, clicking the Send button in the Message form usually sends an e-mail message immediately. Fax messages are also sent immediately, unless you have configured your fax information service to delay sending faxes until a specified time.
However, if you send and receive e-mail by means of a dial-up connection, clicking Send normally just copies an e-mail message to your Outbox folder. The message isn't sent until you choose Send from the Tools menu, which connects to your e-mail service and uploads all outgoing e-mail messages stored in the Outbox. The messages in your Outbox will also be sent if you choose one of the commands for sending and receiving messages— namely, clicking the Send/Receive button on the Standard toolbar, pressing F5, choosing a command from the Send/Receive submenu of the Tools menu, or running the Remote Connection Wizard. (These commands are described in the section "Reading Messages") Finally, the Outbox messages might be sent automatically if you have configured an e-mail information service to exchange your e-mail at scheduled times.
Organizing Messages
As you begin to accumulate messages in your Inbox, you might want to do some housekeeping. First, you might want to remove or archive some of your older messages. For instructions on removing and archiving Outlook items, see "Removing Items"
You might also want to store some of your messages in a different mail folder. For example, you could create a folder named Saved E-Mail, and then move to this folder all the e-mail messages that you want to save. To create a new folder, follow the instructions given in "Working with Outlook Folders" In the Create New Folder dialog box, be sure to specify that the new folder is to contain Mail Items. If you want to create a shortcut on the Outlook Bar for a newly created folder, follow the directions given in "Modifying the Outlook Bar"
The following is a way to move one or more messages from the Inbox to another folder. Note that you can use this same general method to move other types of Outlook items stored in any Outlook folder.
In the Inbox (or other folder), select the message or messages (or other type of items) that you want to move. To select multiple items, click the first one, and then press Ctrl while clicking each additional one.
Click the Move To Folder button on the Standard toolbar, and choose Move To Folder from the drop-down menu that appears:
Alternatively, you can choose Move To Folder from the Edit menu or press Ctrl+Shift+V. Outlook will open the Move Items dialog box, shown here:
TIP The Move To Folder drop-down menu on the Standard toolbar also lists folders that you have recently moved items to. As a shortcut, you can simply choose one of these folders rather than completing the remaining steps in this procedure.
If you haven't yet created the destination folder, you can create one now by clicking the New button.
In the list in the Move Items dialog box, select the folder where you want to store the items you're moving, and click OK.
NOTE You can copy an item to a different folder by choosing Copy To Folder from the Edit menu, rather than issuing the Move To Folder command in step 2 of the above procedure.
TIPStreamline Your Copy and Move Operations
You can more quickly move or copy an item by selecting the item in the Outlook window and then doing one of the following:
Choose Cut from the Edit menu to move it or Copy to copy it, open the destination folder, and choose Paste from the Edit menu.
Press Ctrl+X to move the item or Ctrl+C to copy the item, open the destination folder, and press Ctrl+V to paste the item.
To move the item drag it to a shortcut for the destination folder on the Outlook Bar. You can copy the item by pressing Ctrl while you drag. If the destination folder's shortcut isn't currently visible, you can hold the mouse pointer over a group button to open another group, or you can hold it over the bottom or top area of a group to scroll to the shortcut you want.
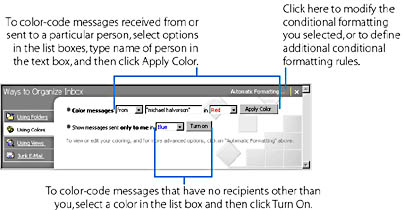
You can also use the Organize tool to help you do some of your housekeeping. General instructions for displaying and using the Organize tool are given in "Using the Organize Tool" This tool provides two useful pages of features that are available only for mail folders:
On the Using Colors page, you can have Outlook color-code certain messages in the current view. See Figure 27-6.
On the Junk E-Mail page, you can have Outlook automatically color-code, move, or delete junk e-mail messages, or messages that have adult content, that arrive in your Inbox. (To delete junk or adult-content e-mail, just have it moved to the Deleted Items folder.) See Figure 27-7.
TIPImprove Junk E-Mail Filtering by Compiling Lists
Outlook identifies junk e-mail and adult-content e-mail by searching incoming messages for key phrases (such as ordertoday or mustbe18). You can also add e-mail addresses to a junk e-mail list or to an adult-content e-mail list. Any message from an address in one of your lists will be identified as junk e-mail or adult-content e-mail, regardless of its content. These lists are initially empty, until you begin adding addresses. To quickly add the address of a message you have received to one of the lists, right-click the message in a mail folder, point to Junk E-Mail on the pop-up menu, and then choose either Add To Junk Senders List or Add To Adult Content Senders List from the submenu.
Figure 27-6.The Using Colors page of the Organize tool for mail folders.
Figure 27-7.The Junk E-Mail page of the Organize tool for mail folders.