Adjust Views
In Chapter 17, you learned how to increase the point size in worksheet cells to make numbers and headings more readable. You can also change the magnification of the worksheet to zoom in on information you want to see, or back up to view it from a distance. In this section, you'll learn how to use the Zoom command to vary the magnification in your workbook, and you'll discover how to save different views using the Custom Views command.
Using the Zoom Command
The Zoom command on the View menu changes the magnification of the selected worksheets. This command allows you to enlarge the worksheet temporarily to examine a group of cells, or to shrink the worksheet so that you can judge its overall appearance. (It doesn't change any of your data or formatting.) When you choose the Zoom command, the Zoom dialog box appears, as shown in Figure 19-1.
The default worksheet magnification is 100%, or Normal view. To enlarge the worksheet to twice its normal size, select the 200% option button. To shrink the worksheet, select the 75%, 50%, or 25% option button. Perhaps the most useful option button is Fit Selection, which adjusts the magnification to display only the cells you select before choosing the Zoom command. Finally, the Custom option button lets you specify an exact magnification percentage, from 10% reduction to 400% enlargement.
Figure 19-1. The Zoom dialog box lets you enlarge or shrink the selected worksheets without changing cell formatting.
After you select a magnification percentage and click OK, your worksheet is resized and displayed in the workplace window. Figure 19-2 shows an example of the Fit Selection option button at work. Before we chose the Zoom command, we selected cells A1 through C8 in the Summary worksheet— the only cells that should appear in the workplace window. The enlarged worksheet can be edited just like a normal-sized worksheet (but the enlargement gives your eyes a break), and if you save it to disk, the zoomed view will appear when you reopen the workbook.
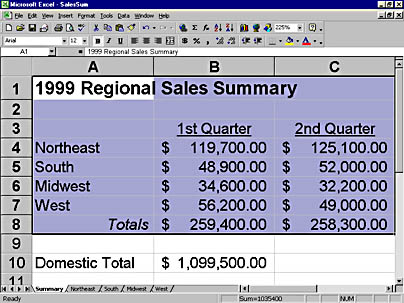
Figure 19-2. The Fit Selection option button zooms the worksheet to show only the selected cells.
The Zoom control on Excel's Standard toolbar also gives you access to many of the magnification options in the Zoom dialog box. To use the Zoom control, follow these steps:
- If you plan to magnify your worksheet based on a selection, highlight a range of cells in the worksheet. If you want to magnify several worksheets in the workbook, hold down Shift and click the worksheet tabs you want resized.
- Click the Zoom control. Your toolbar will look similar to the one shown here.
- Select the magnification option you want. Excel responds by resizing the selected worksheets.

TIP
Not all the worksheets in a workbook need to be viewed at the same magnification. Occasionally, you might want to vary how your worksheets appear within the workbook.
Saving Views Using the Custom Views Command
If you find you like rotating between two or three different views when you work in your workbook, you can save your views to disk and switch between them freely by using the Custom Views command on the View menu. Custom Views is a replacement for the View Manager add-in available in previous versions of Excel. When you save a view, you give it a name, and Excel records the display options, window settings, printing options, and current selection in your worksheet. You can quickly switch back and forth between these views.
To save a view using the Custom Views command, follow these steps:
- Set the view and display settings you want to save as a custom view. For example, set the magnification of the worksheet, click a cell to make it the current selection each time you use the view, or resize the workplace window.
- Choose Custom Views from the View menu. The Custom Views dialog box opens, and any custom views you have previously defined appear in the list box.
- Click the Add button. You'll get the Add View dialog box:
- Type a descriptive name for your worksheet view, such as Top Sales Rep, and then click OK. Excel saves your custom view and stores it in the current worksheet. To display this named view later, click the worksheet tab containing the custom view, and choose Custom Views from the View menu. The Custom Views dialog box appears:
- Double-click the view you want to show. The dialog box closes and the worksheet adjusts to your custom settings.
NOTE
Each worksheet in a workbook contains different named views, including the default or personal view associated with each registered user of the product. Before you use the Custom Views command to display a particular view, be sure to select the worksheet the view is stored in. (Clicking a single worksheet is important— if more than one worksheet is selected, the Custom Views command will not be available.) To delete a custom view, highlight the view in the Custom Views dialog box, and click Delete.
EAN: 2147483647
Pages: 228