Adding Menus by Using the MenuStrip Control
Adding Menus by Using the MenuStrip Control
The MenuStrip control is a tool that adds menus to your programs, which you can customize with property settings in the Properties window. (MenuStrip is an enhanced version of the MainMenu control that was distributed with Microsoft Visual Basic .NET 2002 and 2003.) With MenuStrip, you can add new menus, modify and reorder existing menus, and delete old menus. You can also create a standard menu configuration automatically, and you can enhance your menus with special effects, such as access keys, check marks, and keyboard shortcuts. The menus look perfect—just like a professional Microsoft Windows application—but MenuStrip only creates the visible part of your menus and commands. You still need to write event procedures that process the menu selections and make the commands perform useful work. In the following exercise, you'll take your first steps with this process by using the MenuStrip control to create a Clock menu containing commands that display the current date and time.
Create a menu
Start Visual Studio.
On the File menu, click New Project.
The New Project dialog box appears.
Create a new Windows Application project named MyMenu.
Click the MenuStrip control on the Menus & Toolbars tab of the Toolbox, and then draw a menu control on your form.
Don't worry about the location—Visual Studio will move the control and resize it automatically. Your form looks like the one shown here:
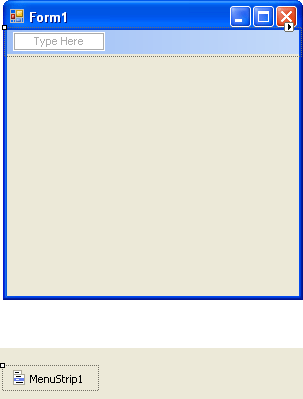
The menu strip object doesn't appear on your form, but below it. That's different from Visual Basic 6, which in one way or another displays all objects on the form itself—even those that don't have a visual representation when the program ran, such as the Timer control. But in Visual Studio, non-visible objects, such as menus and timers, are displayed in the IDE in a separate pane named the component tray, and you can select them, set their properties, or delete them right from this pane.
In addition to the menu strip object in the component tray, Visual Studio displays a visual representation of the menu you created at the top of the form. The Type Here tag encourages you to click the tag and enter the title of your menu. After you enter the first menu title, you can enter submenu titles and other menu names by pressing the arrow keys and typing additional names. Best of all, you can come back to this in-line Menu Designer later and edit what you've done or add additional menu items—the menu strip object is fully customizable and with it you can create an exciting menu-driven user interface like the ones you've seen in the best Windows applications.
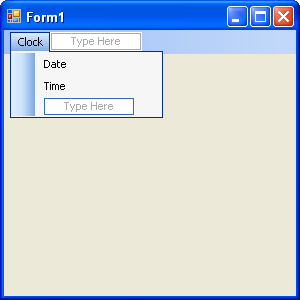
Click the Type Here tag, type Clock, and then press Enter.
The word “Clock” is entered as the name of your first menu, and two additional Type Here tags appear with which you can create submenu items below the new Clock menu or additional menu titles. The submenu item is currently selected.
Type Date to create a Date command for the Clock menu, and then press Enter.
Visual Studio adds the Date command to the menu and selects the next submenu item.
Type Time to create a Time command for the menu, and then press Enter.
You now have a Clock menu with two menu commands, Date and Time. You could continue to create additional menus or commands, but what you've done is sufficient for this example program. Your form looks like the one shown here:
Click the form to close the Menu Designer.
The Menu Designer closes, and your form appears in the IDE with a new Clock menu. You're ready to start customizing the menu now.
EAN: N/A
Pages: 168
- Business Continuity Planning and Disaster Recovery Planning
- Initiation of the System Authorization Process
- The Accreditation Phase
- Appendix C The Information System Security Architecture Professional (ISSAP) Certification
- Appendix E The Information System Security Management Professional (ISSMP) Certification