Customizing IDE Settings to Match Step-by-Step Exercises
Customizing IDE Settings to Match Step-by-Step Exercises
Like the tool windows and the Help system, the compiler settings within the Visual Studio development environment are highly customizable. It is important to review a few of these settings now so that your version of Visual Studio is configured in a way that is compatible with the step-by-step programming exercises that follow. You will also learn how to customize Visual Studio generally so that as you gain programming experience, you can set up Visual Studio in the way that is most productive for you.
Setting the IDE for Visual Basic Development
The first setting that you need to check was established when Visual Studio was first installed on your machine. During setup, you were asked how you wanted Visual Studio to configure your general development environment. Since Visual Studio is a multi-purpose programming tool, you had many options—Visual Basic development, Visual C++ development, Visual C# development, Visual J++ development, Web development, and even a general-purpose programming environment that closely matches Visual Studio .NET 2003. The selection you made configured not only the Code Editor and the development tools available to you, but also the menu and toolbar commands, and the contents of several tool windows. For this reason, if you plan to use this book to learn Visual Basic programming but originally configured your software for a different language, a few of the menu commands and procedures described in this book will not exactly match your current software configuration. (The location of the Open Browser command, discussed above, is one example.)
Fortunately, you can fix this inconsistency and practice changing your environment settings by using the Import and Export Settings command on the Tools menu. The following steps show you how to change your environment setting to Visual Basic development, the recommended setting for this book.
Set the IDE for Visual Basic development
On the Tools menu, click Import and Export Settings.
You can use the wizard that appears to save your environment settings for use on another computer, load settings from another computer, or reset your settings—the option that you want to select now.
Click Reset All Options, and then click Next.
Visual Studio asks you if you want to save your current settings in a file before you configure the IDE for a different type of programming. It is always a good idea to save your current settings as a backup, so that you can return to them if the new ones don't work out.
Verify that the Yes, Save My Settings button is selected, and note the file name and folder location in which Visual Studio plans to save the settings.
If you want to go back to these settings, you'll use this same wizard and the Import Selected Environmental Settings button to restore them.
Click Next to view the default list of settings that you can use for Visual Studio.
You see the following list of options:
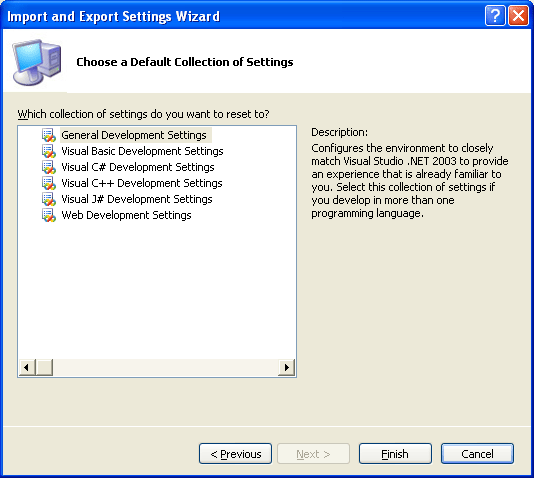
Click Visual Basic Development Settings, and click Finish.
The wizard switches your IDE settings, including menu commands, toolbars, and settings within a few dialog boxes, tool windows, and the Code Editor. If a Help window is still open from an earlier exercise, you see a warning reminding you that the Help system cannot be updated fully until you close and restart Help.
Feel free to repeat this customization process any time that you need to reset your settings (for example, if you make a customization mistake that you regret), or if you want to customize Visual Studio for another programming tool.
Click Close to close the wizard.
Checking Project and Compiler Settings
If you just reset your environment settings for Visual Basic development, you are now ready to begin the programming exercises. But if you didn't reset your settings—for example, if you were already configured for Visual Basic development and have been using Visual Studio 2005 for a while, or if your computer is a shared resource used by other programmers who might have modified the default settings (perhaps in a college computer lab)—complete the following steps to verify that your settings related to projects, solutions, and the Visual Basic compiler match those that I use in the book.
Check project and compiler settings
Click the Options command on the Tools menu to display the Options dialog box.
The Options dialog box is your window to many of the customizable settings within Visual Studio. To see all the settings that you can adjust, click to select the Show All Settings check box in the lower-left corner of the dialog box.
Click the Projects And Solutions category and the General item in the Options dialog box.
This group of check boxes and options configures the Visual Studio project and solution settings. So that your software matches the settings used in this book, adjust your settings to match those shown in the following dialog box:
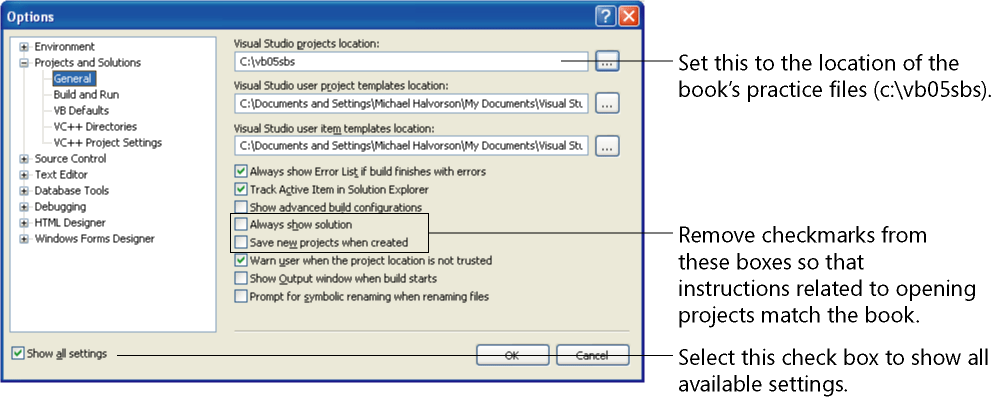
In particular, I recommend that you clear the check marks from the Always Show Solution and Save New Projects When Created check boxes. The first option creates a second folder for your program's solution file, which is not necessary for solutions that contain only one project (the situation for most programs in this book). The second option (in contrast with Visual Studio .NET 2003 and Visual Basic 6) causes Visual Studio to postpone saving your project until you click the Save All command on the File menu and provide a location for saving the file. This “delayed save” feature allows you to create a test program, compile and debug the program, and even run it without actually saving the project on disk—a useful feature when you want to create a quick test program that you might want to discard instead of saving. (An equivalent situation in word-processing terms is when you open a new Word document, enter an address for a mailing label, print the address, and then exit Word without saving the file.) With this default setting, the exercises in this book prompt you to save your projects after you create them, although you can also save your projects in advance by selecting the Save New Projects When Created check box.
You'll also notice that I have highlighted the c:\vb05sbs folder as the location for Visual Studio projects, the default location for this book's sample files. Most of the projects that you create will be stored in this folder, and they will have a “My” prefix to distinguish them from the completed project I provide for you to examine.
After you have adjusted these settings, you're ready to check three Visual Basic compiler settings.
Click the VB Defaults item in the Options dialog box.
Visual Studio displays a list of three compiler settings: Option Explicit, Option Strict, and Option Compare. Your screen looks like this:
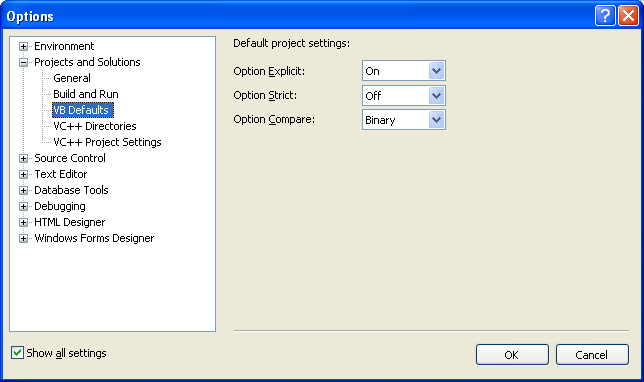
Although a detailed description of these settings is beyond the scope of Chapter 1, you'll want to verify that Option Explicit is set to On and Option Strict is set to Off—the default settings for Visual Basic programming within Visual Studio. Option Explicit On is a setting that requires you to declare a variable before using it in a program—a very good programming practice that I want to encourage. Option Strict Off allows variables and objects of different types to be combined under certain circumstances without generating a compiler error. (For example, a number can be assigned to a text box object without error.) Although this is a potentially worrisome programming practice, Option Strict Off is a useful setting for certain types of demonstration programs. If you don't keep this setting, a few projects will display error messages when you run them.
Feel free to examine additional settings in the Options dialog box related to your programming environment and Visual Studio. When you're finished, click OK to close the Options dialog box.
You're ready to exit Visual Studio and start programming.
EAN: N/A
Pages: 168