The Visual Studio Tools
The Visual Studio Tools
At this point, you should take a few moments to study the Visual Studio IDE and identify some of the programming tools and windows that you'll be using as you complete this course. If you've written Visual Basic programs before, you'll recognize many (but probably not all) of the programming tools. Collectively, these features are the components that you use to construct, organize, and test your Visual Basic programs. A few of the programming tools also help you learn more about the resources on your system, including the larger world of databases and Web site connections available to you. There are also several powerful Help tools.
The menu bar provides access to most of the commands that control the development environment. Menus and commands work as they do in all Windows-based programs, and you can access them by using the keyboard or the mouse. Located below the menu bar is the Standard toolbar, a collection of buttons that serve as shortcuts for executing commands and controlling the Visual Studio IDE. If you've used Excel or Word, the toolbar should be a familiar concept. To activate a button on the toolbar, use your mouse to click the button. You can see the full list of available toolbars by right-clicking the toolbar in the IDE.
Along the bottom of the screen is the Windows taskbar. You can use the taskbar to switch between various Visual Studio components and to activate other Windows-based programs. You might also see taskbar icons for Microsoft Internet Explorer, antivirus utilities, and other programs installed on your system.
The following illustration shows some of the tools and windows in the Visual Studio IDE. Don't worry that this illustration looks different from your current development environment view. You'll learn more about these elements (and how you adjust your views) as you work through the chapter.
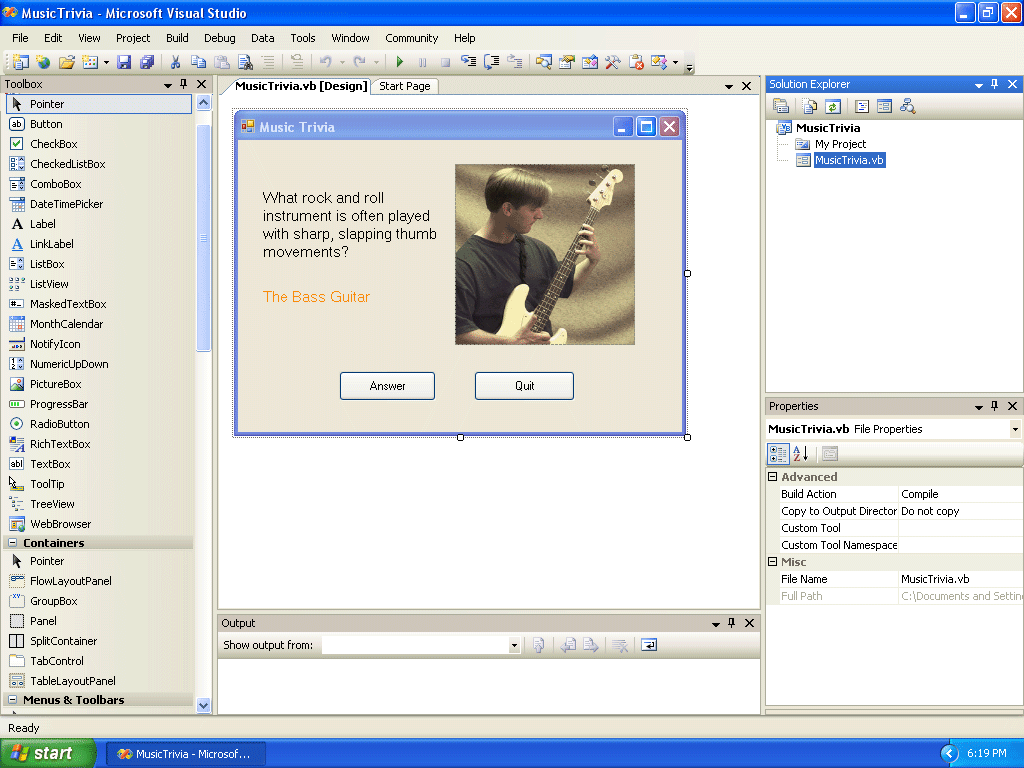
The main tools visible in this Visual Studio IDE are the Designer, Solution Explorer, the Properties window, the Toolbox, and the Output window. You might also see more specialized tools such as Server Explorer and Object Browser, or they may appear as tabs within the IDE. Because no two developers' preferences are exactly alike, it is difficult to predict what you'll see if your Visual Studio software has already been used. (What I show is essentially the “out of the box” view.)
If a tool isn't visible and you want to see it, click the View menu and select the tool. Because the View menu has expanded steadily over the years, Microsoft has moved some of the less frequently used View tools to a submenu called Other Windows. Check there if you don't see what you need.
The exact size and shape of the tools and windows depend on how your development environment has been configured. With Visual Studio, you can align and attach, or dock, windows to make visible only the elements that you want see. You can also partially conceal tools as tabbed documents along the edge of the development environment and then switch back and forth between documents quickly. Trying to sort out which tools are important to you now and which you can learn about later is a difficult early challenge when you're learning the busy Visual Studio interface. Your development environment will probably look best if you set your monitor and Windows desktop settings so that they maximize your screen space, but even then things can get a little crowded. (For example, I'm using a screen resolution of 1024 × 768 for some of the full-size screen shots in this book. You can change the screen resolution by right-clicking the Windows desktop and clicking Properties.)
The purpose of all this tool complexity is to add many new and useful features to the IDE while providing clever mechanisms for managing the clutter. These mechanisms include features such as docking, auto hiding, floating, and a few other window states that I'll describe later. If you're just starting out with Visual Basic, the best way to deal with this feature tension is to hide the tools that you don't plan to use often to make room for the important ones. The crucial tools for beginning Visual Basic programming—the ones you'll start using right away in this book—are Solution Explorer, the Properties window, the Designer, and the Toolbox. You won't use the Server Explorer, Class View, Resource View, Object Browser, or Debug windows until later in the book.
In the following exercises, you'll start experimenting with the crucial tools in the Visual Studio IDE. You'll also learn how to display a Web browser within Visual Studio and how to hide the tools that you won't use for a while.
The Designer
If you completed the last exercise, the MusicTrivia project is loaded in the Visual Studio development environment. However, the user interface, or form, for the project might not yet be visible in Visual Studio. (More sophisticated projects might contain several forms, but this simple trivia program needs only one.) To make the form of the MusicTrivia project visible in the IDE, you display it by using Solution Explorer.
Display the Designer
Locate the Solution Explorer window near the upper-right corner of the Visual Studio development environment. If you don't see Solution Explorer (if it is hidden as a tab in a location that you cannot see or isn't currently visible), click Solution Explorer on the View menu to display it.
When the MusicTrivia project is loaded, Solution Explorer looks like this:
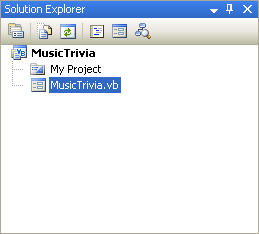
Click the MusicTrivia.vb form in the Solution Explorer window.
All form files, including this one, have a tiny form icon next to them so that you can easily identify them. When you click the form file, Visual Studio highlights it in Solution Explorer, and some information about the file appears in the Properties window (if it is visible).
Click the View Designer button in Solution Explorer to display the program's user interface.
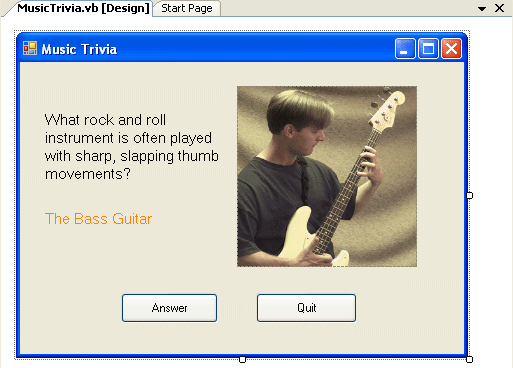
The MusicTrivia form is displayed in the Designer, as shown here:
Notice that a tab for the Start Page is still visible near the top of the Designer. You can click this tab to display the Start Page, where you can view articles and Web links, or open additional project files. To return to Designer view, click the MusicTrivia.vb [Design] tab near the top of the MusicTrivia form.
Now try running a Visual Basic program with Visual Studio.
TIP
If you don't see the Start Page and MusicTrivia.vb [Design] tabs, your development environment might be in Multiple Documents view instead of Tabbed Documents view. To change this option, click Options on the Tools menu. On the left side of the Options dialog box, click the Environment folder, and then click General. On the right, under Window Layout, click the Tabbed Documents option, and then click OK. The next time you start Visual Studio, the various windows that you open have tabs, and you can switch between them with a simple button click.
Running a Visual Basic Program
Music Trivia is a simple Visual Basic program designed to familiarize you with the programming tools in Visual Studio. The form you see now has been customized with five objects (two labels, a picture, and two buttons), and I've added three lines of program code to make the trivia program ask a simple question and display the appropriate answer. (The program “gives away” the answer now because it is currently in design mode, but the answer is hidden when you run the program.) You'll learn more about creating objects and adding program code in the next chapter. For now, try running the program in the Visual Studio IDE.
Run the Music Trivia program
Click the Start Debugging button (the green right-pointing arrow) on the Standard toolbar to run the Music Trivia program in Visual Studio.
TIP
You can also press F5 or click the Start Debugging command on the Debug menu to run a program in the Visual Studio development environment. Note that the placement of the Start command is different than it is in the Visual Basic 6 IDE, and that it has a different name.Visual Studio loads and compiles the project into an assembly (a structured collection of modules, data, and manifest information for a program), prepares the program for testing or debugging, and then (if the compilation is successful) runs the program in the development environment. While the program is running, an icon for the program appears on the Windows taskbar. After a moment, you see the MusicTrivia form again, this time with the photograph and answer label hidden from view, as shown here:
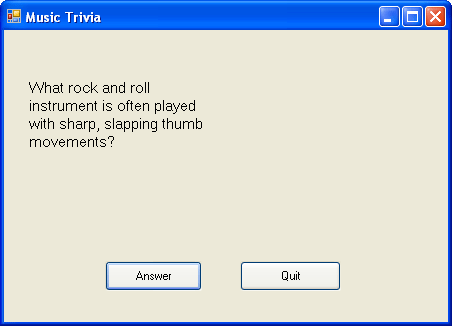
Music Trivia now asks its important question: What rock and roll instrument is often played with sharp, slapping thumb movements?
Click the Answer button to reveal the solution to the question.
The program displays the answer (The Bass Guitar) below the question and then displays a photograph of an obscure Seattle bass player demonstrating the technique. The test program works.
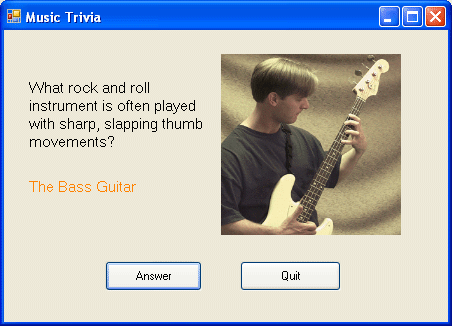
Click Quit to close the program.
The form closes, and the Visual Studio IDE becomes active again.
EAN: N/A
Pages: 168
- Article 240 Overcurrent Protection
- Article 354 Nonmetallic Underground Conduit with Conductors Type NUCC
- Article 409: Industrial Control Panels
- Example No. D2(b) Optional Calculation for One-Family Dwelling, Air Conditioning Larger than Heating [See 220.82(A) and 220.82(C)]
- Example No. D4(a) Multifamily Dwelling