Creating Your Own Base Classes
Creating Your Own Base Classes
The Inheritance Picker managed the inheritance process in the previous exercise by creating a new class in your project named Form2. To build the Form2 class, the Inheritance Picker established a link between the Form1 class in the My Form Inheritance project and the new form. Here's what the new Form2 class looks like in the Code Editor:
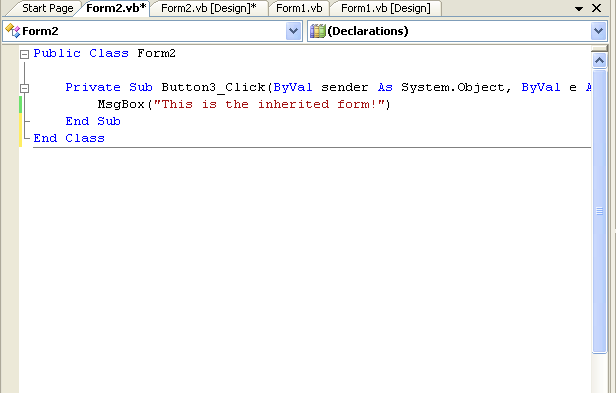
The Button3_Click event procedure that you added is also a member of the new class. But recall for a moment that the Form1 class itself relied on the System.Windows.Forms.Form class for its fundamental behavior and characteristics. So the last exercise demonstrates that one derived class (Form2) can inherit its functionality from another derived class (Form1), which in turn inherited its core functionality from an original base class (Form), which is a member of the System.Windows.Forms namespace in the Microsoft .NET Framework library.
TIP
In addition to the Inheritance Picker, Visual Studio offers the Inherits statement, which causes the current class to inherit the properties, procedures, and variables of another class. To use the Inherits statement to inherit a form, you must place the Inherits statement at the top of the form as the first statement in the class. Although you might choose to use the Inheritance Picker for this sort of work with forms, it is useful to know about Inherits because it can be used for classes and interfaces other than forms, and you will probably run into it now and then in your colleagues' program code. You'll see an example of the Inherits statement near the end of this chapter.
Recognizing that classes are such a fundamental building block in Visual Basic programs, you might very well ask how new classes are created and how these new classes might be inherited down the road by subsequently derived classes. To ponder these possibilities, I'll devote the remainder of this chapter to discussing the syntax for creating classes in Visual Basic 2005 and introducing how these user-defined classes might be inherited later by still more classes. Along the way, you'll learn how very useful creating your own classes can be.
Nerd Alert
There's a potential danger for terminology overload when discussing class creation and inheritance. A number of very smart computer scientists have been thinking about these object-oriented programming concepts for several years, and there are numerous terms and definitions in use for the concepts that I plan to cover. However, if you stick with me, you'll find that creating classes and inheriting them is quite simple in Visual Basic 2005 and that you can accomplish a lot of useful work by adding just a few lines of program code to your projects.
Adding a New Class to Your Project
Simply stated, a class in Visual Basic is a representation or blueprint that defines the structure of one or more objects. Creating a class allows you to define your own objects in a program—objects that have properties, methods, fields, and events, just like the objects that the Toolbox controls create on Windows forms. To add a new class to your project, you click the Add Class command on the Project menu, and then you define the class by using program code and a few Visual Basic keywords.
In the following exercise, you'll create a program that prompts a new employee for his or her first name, last name, and date of birth. You'll store this information in the properties of a new class named Person, and you'll create a method in the class to compute the current age of the new employee. This project will teach you how to create your own classes and also how to use the classes in the event procedures of your program.
Build the Person Class project
Click the Close Project command on the File menu, and then create a new project named My Person Class.
Use the Label control to add a label object to the top of Form1.
Use the TextBox control to draw two wide text box objects below the label object.
Use the DateTimePicker control to draw a date time picker object below the text box objects.
You last used the DateTimePicker control to enter dates in Chapter 3, “Working with Toolbox Controls.” Go to that chapter if you want to review this control's basic methods and properties.
Use the Button control to draw a button object below the date time picker object.
Set the following properties for the objects on the form:
Object
Property
Setting
Label1
Text
“Enter employee first name, last name, and date of birth.”
TextBox1
Text
“First name”
TextBox2
Text
“Last name”
Button1
Text
“Display Record”
Form1
Text
“Person Class”
Your form looks something like this:
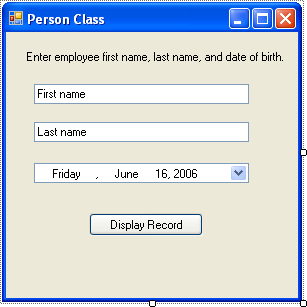
This is the basic user interface for a form that defines a new employee record for a business. (The form isn't connected to a database, so only one record can be stored at a time.) Now you'll add a class to the project to store the information in the record.
Click the Add Class command on the Project menu.
Visual Studio displays the Add New Item dialog box, with the Class template selected, as shown here:
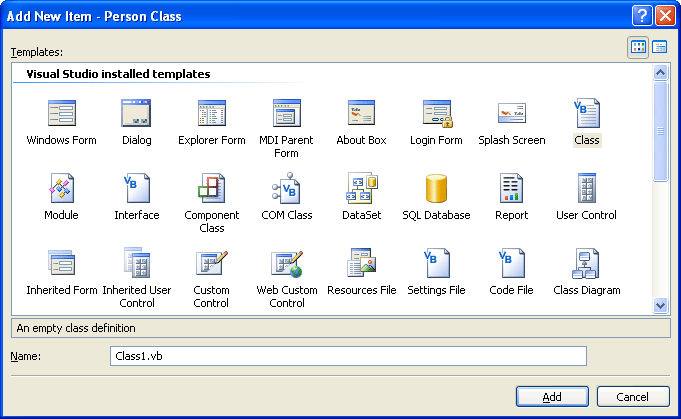
The Add New Item dialog box gives you the opportunity to name your class. Because you can store more than one class in a new class module, you might want to specify a name that is somewhat general.
Type Person.vb in the Name box, and then click Add.
Visual Studio opens a blank class module in the Code Editor and lists a file named Person.vb in Solution Explorer for your project, as shown here:

Now you'll type the definition of your class in the class module and learn a few new Visual Basic keywords. You'll follow four steps: declare class variables, create properties, create a method, and finally, create an object based on the new class.
Step 1: Declare class variables
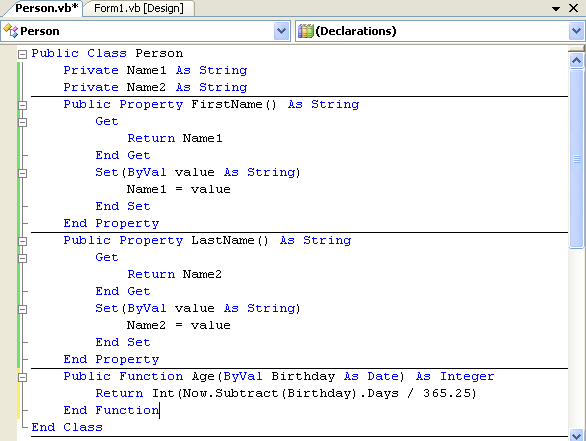
Below the Public Class Person program statement, type the following variable declarations:
Private Name1 As String Private Name2 As String
Here you declare two variables that will be used exclusively within the class module to store the values for two string property settings. I've declared the variables by using the Private keyword because, by convention, Visual Basic programmers keep their internal class variables private—in other words, not available for inspection outside the class module itself.
Step 2: Create properties
Below the variable declarations, type the following program statement, and press Enter:
Public Property FirstName() As String
This statement creates a property named FirstName, which is of type String, in your class. When you press Enter, Visual Studio immediately supplies a code structure for the remaining elements in the property declaration. The required elements are a Get block, which determines what other programmers see when they check the FirstName property; a Set block, which determines what happens when the FirstName property is set or changed; and an End Property statement, which marks the end of the property procedure.
Fill out the property procedure structure so that it looks like the code that follows. (The elements you type are in bold italic.)
Public Property FirstName() As String Get Return Name1 End Get Set(ByVal value As String) Name1 = value End Set End Property
The Return keyword specifies that the Name1 string variable will be returned when the FirstName property is referenced. The Set block assigns a string value to the Name1 variable when the property is set. Notice here especially the value variable, which is used in property procedures to stand for the value that's assigned to the class when a property is set. Although this syntax might look strange, trust me for now—this is how you create property settings in controls, although more sophisticated properties would add additional program logic here to test values or make computations.
Below the End Property statement, type a second property procedure for the LastName property in your class. It should look like the code that follows. (The bold italic lines are the ones you type.)
Public Property LastName() As String Get Return Name2 End Get Set(ByVal value As String) Name2 = value End Set End Property
This property procedure is similar to the first one, except that it uses the second string variable (Name2) that you declared at the top of the class.
You're finished defining the two properties in your class. Now let's move on to a method named Age that will determine the new employee's current age based on his or her birth date.
Step 3: Create a method
Below the LastName property procedure, type the following function definition:
Public Function Age(ByVal Birthday As Date) As Integer Return Int(Now.Subtract(Birthday).Days / 365.25) End Function
To create a method in the class that performs a specific action, you add a function or a Sub procedure to your class. Although many methods don't require arguments to accomplish their work, the Age method I'm defining requires a Birthday argument of type Date to complete its calculation. The method uses the Subtract method to subtract the new employee's birth date from the current system time, and it returns the value expressed in days divided by 365.25—the approximate length in days of a single year. The Int function converts this value to an integer, and this number is returned to the calling procedure via the Return statement—just like a typical function. (For more information about function definitions, see Chapter 10, “Creating Modules and Procedures.”)
Your class definition is finished, and in the Code Editor, the Person Class now looks like the following:
Now you'll return to Form1 and use the new class in an event procedure.
TIP
Although you didn't do it for this example, it's usually wise to add some type-checking logic to class modules in actual projects so that properties or methods that are improperly used don't trigger run-time errors that halt the program.
Step 4: Create an object based on the new class
Click the Form1.vb icon in Solution Explorer, and then click the View Designer button.
The Form1 user interface appears.
Double-click the Display Record button to open the Button1_Click event procedure in the Code Editor.
Type the following program statements:
Dim Employee As New Person Dim DOB As Date Employee.FirstName = TextBox1.Text Employee.LastName = TextBox2.Text DOB = DateTimePicker1.Value.Date MsgBox(Employee.FirstName & " " & Employee.LastName _ & " is " & Employee.Age(DOB) & " years old.")
This routine stores the values entered by the user in an object named Employee that's declared as type Person. The New keyword indicates that you want to immediately create a new instance of the Employee object. You've declared variables often in this book—now you get to declare one based on a class you created yourself! The routine then declares a Date variable named DOB to store the date entered by the user, and the FirstName and LastName properties of the Employee object are set to the first and last names returned by the two text box objects on the form. The value returned by the date and time picker object is stored in the DOB variable, and the final program statement displays a message box containing the FirstName and LastName properties plus the age of the new employee as determined by the Age method, which returns an integer value when the DOB variable is passed to it. After you define a class in a class module, it's a simple matter to use it in an event procedure, as this routine demonstrates.
Click the Save All button to save your changes, and specify the c:\vb05sbs\chap16 folder as the location.
Click the Start Debugging button to run the program.
The user interface appears in the IDE, ready for your input.
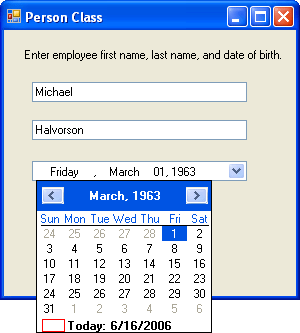
Type your first name in the First Name text box and your last name in the Last Name text box.
Click the date time picker object's arrow, and scroll in the list box to your birth date (mine is March 1, 1963).
TIP
You can scroll faster into the past by clicking the year field when the date time picker dialog box is open. Tiny scroll arrows appear, and you can move one year at a time backward or forward. You can also move quickly to the month you want by clicking the month field and then clicking the month in a pop-up menu.Your form looks similar to this:
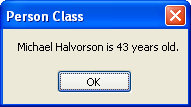
Click the Display Record button.
Your program stores the first name and last name values in property settings and uses the Age method to calculate the new employee's current age. A message box displays the result, as shown here:
Click OK to close the message box, and then experiment with a few different date values, clicking Display Record each time you change the birth date field.
When you're finished experimenting with your new class, click the Close button on the form.
The development environment returns.
EAN: N/A
Pages: 168