Working with Multiple Forms
Working with Multiple Forms
The following exercises demonstrate how you can use a second form to display Help information for the Lucky Seven program that you worked with in Chapter 2, “Writing Your First Program,” and Chapter 10, “Creating Modules and Procedures.” You'll add a second form by using the Add Windows Form command on the Project menu, and you'll display the form in your program code by using the My object and the ShowDialog method. The second form will display a short Readme.txt file that I created to display help and copyright information for the program (the type of information you typically see in an About or a Help dialog box).
Add a second form
Start Visual Studio, and then open the Lucky Seven Help project in the c:\vb05sbs\chap14\lucky seven help folder.
The Lucky Seven Help project is the same slot machine game that you worked with in Chapter 10. The program uses a module and a function to calculate the win rate as you try to spin one or more 7s.
Display the primary form (LuckySeven.vb) in the Designer, if it isn't already visible.
Click the Add Windows Form command on the Project menu to add a second form to the project.
You'll see this dialog box:
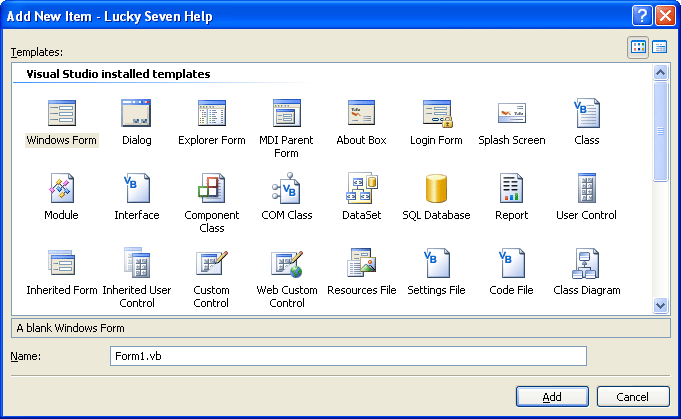
You use the Add New Item dialog box to add forms, classes, modules, and other components to your Visual Basic project. Although you selected the Add Windows Form command, forms aren't the only components listed here. (The Windows Form template is selected by default, however.) The Add New Item dialog box is flexible enough that you can pick other project components if you change your mind.
TIP
I especially recommend that you experiment with the Explorer Form template, which allows you to add a Windows Explorer–style browser to your application, complete with menus, toolbar, and a folder hierarchy pane.Type HelpInfo.vb in the Name text box, and then click Add.
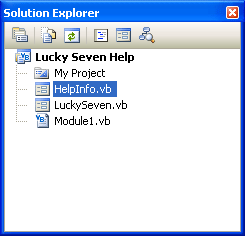
A second form named HelpInfo.vb is added to the Lucky Seven Help project, and the form appears in Solution Explorer, as shown here:
TIP
You can rename or delete form files by using Solution Explorer. To rename a file, right-click the file, and then click the Rename command. To remove a file from your project, right-click the file, and then click the Exclude From Project command. To remove a file from your project and permanently delete it from your computer, select the file, and then press Delete.Now you'll add some controls to the HelpInfo.vb form.
Use the Label control to create a label at the top of the HelpInfo.vb form. Place the label near the left edge of the form, but leave a small indent so that there is room for a descriptive label.
Use the TextBox control to create a text box object.
Set the Multiline property for the text box object to True so that you can resize the object easily.
Resize the text box object so that it covers most of the form.
Use the Button control to create a button at the bottom of the form.
Set the following properties for the objects on the HelpInfo.vb form:
Object
Property
Setting
Label1
Text
“Operating Instructions for Lucky Seven Slot Machine”
TextBox1
Scrollbars
Vertical
Button1
Text
“OK”
HelpInfo.vb
Text
“Help”
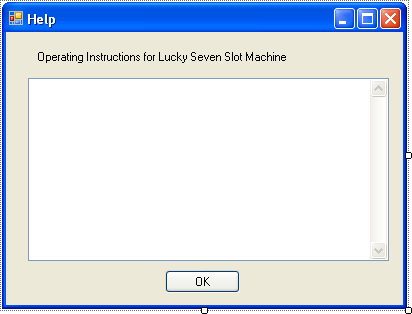
The HelpInfo.vb form looks similar to this:
Now you'll enter a line of program code for the HelpInfo.vb form's Button1_Click event procedure.
Double-click the OK button to display the Button1_Click event procedure in the Code Editor.
Type the following program statement:
Me.DialogResult = DialogResult.OK
The HelpInfo.vb form acts as a dialog box in this project because the Lucky Seven form opens it using the ShowDialog method. After the user has read the Help information displayed by the dialog box, he or she will click the OK button, which sets the DialogResult property of the current form to DialogResult.OK. (The Me keyword is used here to refer to the HelpInfo form, and you'll see this shorthand syntax from time to time when a reference is being made to the current instance of a class or structure in which the code is executing.)
DialogResult.OK is a Visual Basic constant that indicates the dialog box has been closed and should return a value of “OK” to the calling procedure. A more sophisticated dialog box might allow for other values to be returned by parallel button event procedures, such as DialogResult.Cancel, DialogResult.No, and DialogResult.Yes. When the Dialog-Result property is set, however, the form is automatically closed.
At the top of the Code Editor, type the following Imports statement above the Public Class declaration:
Imports System.IO
This statement incorporates the class library containing the StreamReader class into the project. The StreamReader class isn't specifically related to defining or using additional forms—I'm just using it as a quick way to add textual information to the new form I'm creating.
Display the HelpInfo.vb form again, and then double-click the form background.
The HelpInfo_Load event procedure appears in the Code Editor. This is the event procedure that runs when the form is first loaded into memory and displayed on the screen.
Type the following program statements:
Dim StreamToDisplay As StreamReader StreamToDisplay = _ New StreamReader("c:\vb05sbs\chap14\lucky seven help\readme.txt") TextBox1.Text = StreamToDisplay.ReadToEnd StreamToDisplay.Close() TextBox1.Select(0, 0)Rather than type the contents of the Help file into the Text property of the text box object (which would take a long time), I've used the StreamReader class to open, read, and display an appropriate Readme.txt file in the text box object. This file contains operating instructions and general contact information.
The StreamReader class was introduced in the Chapter 13, “Exploring Text Files and String Processing,” but you might not have experimented with it yet. As you learned, StreamReader is a Microsoft .NET Framework alternative to opening a text file with the My.Computer.FileSystem object or the Visual Basic FileOpen function. To use StreamReader, you include the System.IO class library at the top of the code for your form. Next you declare a StreamToDisplay variable of the type StreamReader to hold the contents of the text file, and open the text file by using a specific path. Finally you read the contents of the text file into the StreamToDisplay variable by using the ReadToEnd method, which reads all the text in the file from the current location (the beginning of the text file) to the end of the text file and assigns it to the Text property of the text box object. The StreamReader.Close statement closes the text file, and the Select method removes the selection from the text in the text box object.
You're finished with the HelpInfo.vb form. Now you'll add a button object and some code to the first form.
Display the second form by using an event procedure
Click LuckySeven.vb in Solution Explorer, and then click the View Designer button.
The Lucky Seven form appears in the IDE. Now you'll add a Help button to the user interface.
Use the Button control to draw a small button object in the lower-right corner of the form.
Use the Properties window to set the button object's Text property to Help.
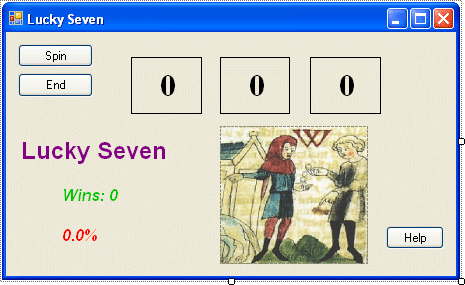
Your form looks something like this:
Double-click the Help button to display the Button3_Click event procedure in the Code Editor.
Type the following program statement:
My.Forms.HelpInfo.ShowDialog()
This statement uses the My object (introduced in Chapter 13) to access the forms active within the current project. As you typed the statement, the Visual Studio IntelliSense feature listed the forms available in the Forms collection, as shown in the following illustration:

Unlike Visual Basic .NET 2003, which required that you specifically declare a variable of the form's type before you used a second form, the My object makes all the forms in your project available without specific declaration.
Note that you can also open and manipulate forms directly (as you can in Visual Basic 6) by using the following syntax:
HelpInfo.ShowDialog()
This statement opens the HelpInfo form as a dialog box by using the ShowDialog method.
Alternatively, you can use the Show method to open the form, but in that case, Visual Basic won't consider HelpInfo.vb to be a dialog box; the form is a non-modal form that the user can switch away from and return to as needed. In addition, the DialogResult property in the HelpInfo.vb form's Button1_Click event procedure won't close the HelpInfo.vb form. Instead, the program statement Me.Close is required.
TIP
Keep the differences between modal and non-modal forms in mind as you build your own projects. There are differences between each type of form, and you'll find that each style provides a benefit to the user.
Now you'll run the program to see how a multiple-form application works.
Run the program
Click the Start Debugging button on the Standard toolbar.
The first form in the Lucky Seven project appears.
Click the Spin button seven or eight times to play the game.
Your screen looks similar to this:

Click the Help button.
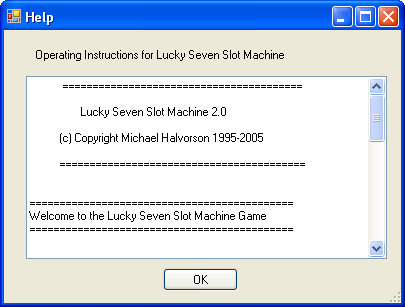
Visual Basic opens the second form in the project, HelpInfo.vb, and displays the Readme.txt file in the text box object. The form looks like this:
Use the vertical scroll bar to view the entire Readme file.
Click the OK button to close the HelpInfo.vb form.
The form closes, and the first form becomes active again.
Click the Spin button a few more times, and then click the Help button again.
The HelpInfo.vb form appears again and is fully functional. Notice that you cannot activate the first form while the second form is active. (To test this, try to click Spin on the first form while the second form is active.) Because the second form is a dialog box (a modal form), you must address it before you can continue with the program.
Click the OK button, and then click the End button on the first form.
The program stops, and the development environment returns.
Using the DialogResult Property in the Calling Form
Although I didn't demonstrate it in the sample program, you can use the DialogResult property that you assigned to the dialog box to great effect in a Visual Basic program. As I mentioned earlier, a more sophisticated dialog box might provide additional buttons to the user—Cancel, Yes, No, Abort, and so on. Each dialog box button can be associated with a different type of action in the main program. And in each of the dialog box's button event procedures, you can assign the DialogResult property for the form that corresponds to the button name, such as the following program statement:
Me.DialogResult = DialogResult.Cancel 'user clicked Cancel button
In the calling event procedure—in other words, in the Button3_Click event procedure of LuckySeven.vb—you can write additional program code to detect which button the user clicked in the dialog box. This information is stored in the form's DialogResult property, which can be evaluated using a basic decision structure such as If…Then or Select…Case. For example, the following code can be used in the Button3_Click event procedure to verify whether the user clicked OK, Cancel, or another button in the dialog box. (The first line isn't new, but reminds you of the HelpInfo form name that you are using in this example.)
My.Forms.HelpInfo.ShowDialog() If HelpInfo.DialogResult = DialogResult.OK Then MsgBox("The user clicked OK") ElseIf HelpInfo.DialogResult = DialogResult.Cancel Then MsgBox("The user clicked Cancel") Else MsgBox("Another button was clicked") End If By using creative event procedures that declare, open, and process dialog box choices, you can add any number of forms to your programs, and you can create a user interface that looks professional and feels flexible and user friendly.
EAN: N/A
Pages: 168