| The remainder of this chapter deals with nonblocking connects and accepts. In addition to read and write operations, sockets can block under two other circumstances: during a call to connect() when the remote host is slow to respond and during calls to accept() while waiting for incoming connections. connect() may block indefinitely under a variety of conditions, most typically when the remote host is down or a broken router makes it unreachable. In these cases, connect() blocks indefinitely until the error is corrected. Less often, the remote server is overtaxed by incoming requests and is slow to call accept() . In both cases, you can use a nonblocking connect() to limit the time that connect() will block. In addition, you can initiate multiple connects simultaneously and handle each one as it completes. accept() is typically used in a blocking mode by servers waiting for incoming connections. However, for servers that need to do some background processing between calls to accept() , you can use nonblocking accept() to limit the time the server spends blocked in the accept() call. The IO::Socket Timeout Parameter If you are just interested in timing out a connect() or accept() call after a certain period has elapsed, the object-oriented IO::Socket modules provide a simple way to do this. When you create a new IO::Socket object, you can provide it with a Timeout parameter indicating the number of seconds you are willing to block. Internally, IO::Socket uses nonblocking I/O to implement these timeouts. For outgoing connections, the connect() occurs automatically during object creation, so in the case of a timeout, the IO::Socket new() method returns undef . The following example attempts to connect to port 80 of the host 192.168.3.1, giving it up to 10 seconds for the connect() . If the connection completes during the time frame, then the connected IO::Socket object is returned and saved in $sock . Otherwise , we die with the error message stored in $@ . For reasons that will become clear later, the error message for timeouts is "IO::Socket::INET:Operation now in progress." $sock = IO::Socket::INET(PeerAddr => '192.168.3.1:80', Timeout => 10); $sock or die $@; The timeout for accepts is applied by IO::Socket at the time that accept() is called. The following bit of code creates a listening socket with a timeout of 5 seconds and then enters a loop awaiting incoming connections. Because of the timeout, accept() waits at most 5 seconds for an incoming connection, returning either the connected socket object, if one is available, or undef . In the latter case, the loop prints a warning and returns to the top of the loop. Otherwise, it processes the connected socket as usual. $sock = IO::Socket::INET->new( LocalPort => 8000, Listen => 20, Reuse => 1, Timeout => 5 ); while (1) { my $connected = $sock->accept(); unless ($connected) { warn "timeout! ($@)\n"; next; } # otherwise process connected socket ... } If accept() times out before returning a connection, $@ will contain "IO::Socket::INET: Operation now in progress." Nonblocking Connect() In this section we look at how IO::Socket implements timeouts on the connect() call. This will help you understand how to use nonblocking connect() in more sophisticated applications. To accomplish a nonblocking connect using the IO::Socket module, you need to create an IO::Socket object without allowing it to connect automatically, put it into nonblocking mode, and then make the connect() call manually. This code fragment illustrates the idiom: use IO::Socket; use Errno qw(EWOULDBLOCK EINPROGRESS); use IO::Select; my $TIMEOUT = 10; # ten second timeout my $sock = IO::Socket::INET->new(Proto => 'tcp', Type => SOCK_STREAM) or die $@; $sock->blocking(0); # nonblocking mode my $addr = sockaddr_in(80,inet_aton('192.168.3.1')); my $result = $sock->connect($addr); Because we're going to do the connect manually, we don't pass PeerAddr or PeerHost arguments to the IO::Socket new() method, either of which would trigger a connection attempt. Instead we provide Proto and Type arguments to ensure that a TCP socket is created. If the socket was created successfully, we put it into nonblocking mode by passing a false argument to the blocking() method. We now need to connect it explicitly by passing it to the connect() function. Because connect() doesn't accept any of the naming shortcuts that the object-oriented new() method does, we must explicitly create a packed Internet address structure using the sockaddr_in() and inet_aton() functions discussed in Chapter 3 and use that as the second argument to connect() . Recall that connect() will return a result code indicating whether the connection was successful. In a few cases, such as when connecting to the loopback address, a nonblocking connect succeeds immediately and returns a true result. In most cases, however, the call returns a variety of nonzero result codes. The most likely result is EINPROGRESS , which indicates simply that the nonblocking connect is in progress and should be checked periodically for completion. However, various failure codes are also possible; ECONNREFUSED , for instance, indicates that the remote host has refused the connection. If the connect() is immediately successful, we can proceed to use the socket without further ado. Otherwise, we check the result code. If it is anything other than EINPROGRESS , the connect was unsuccessful and we die: unless ($result) { # potential failure die "Can't connect: $!" unless $! == EINPROGRESS; Otherwise, if the result code indicates EINPROGRESS , the connect is still in progress. We now have to wait until the connection completes. Recall from Chapter 12 that select() will indicate that a socket is marked as writable immediately after a nonblocking connect completes. We take advantage of this feature by creating a new IO::Select object, adding the socket to it, and calling its can_write() method with a timeout. If the socket completes its connect before the timeout, can_write() returns a one-element list containing the socket. Otherwise, it returns an empty list and we die with an error message: my $s = IO::Select->new($sock); die "timeout!" unless $s->can_write($TIMEOUT); If can_write() returns the socket, we know that the connect has completed, but we don't know whether the connection was actually successful. It is possible for a nonblocking connect to return a delayed error such as ECONNREFUSED . We can determine whether the connect was successful by calling the socket object's connected() method, which returns true if the socket is currently connected and false otherwise: unless ($sock->connected) { $! = $sock->sockopt(SO_ERROR); die "Can't connect: $!" } } If the result from connected() is false, then we probably want to know why the connect failed. However, we can't simply check the contents of $! , because that will contain the error message from the most recent system call, not the delayed error. To get this information, we call the socket's sockopt() method with an argument of SO_ERROR to recover the socket's delayed error. This returns a standard numeric error code, which we assign to $! . Now when we die with an error message, the magical behavior of $! ensures that the error code will be displayed as a human-readable message when used in a string context. At the end of this block, we have a connected socket. We turn its blocking mode back on and proceed to work with it as usual: $sock->blocking(1); # handle IO on the socket, etc. ... Figure 13.8 shows the complete code fragment in the form of a subroutine named connect_with_timeout() . You can call it like this: Figure 13.8. A subroutine to connect() with a timeout 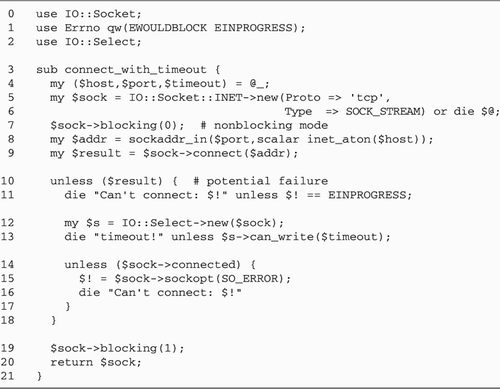 my $socket = connect_with_timeout($host,$port,$timeout); If you examine the source code for IO::Socket, you will see that a very similar technique is used to implement the Timeout option. Multiple Simultaneous Connects An elaboration on the idiom used to make a nonblocking connect with a timeout can be used to initiate multiple connections in parallel. This can dramatically improve the performance of certain applications. Consider a Web browser application. The sequence of events when a browser fetches an HTML page is that it parses the page looking for embedded images. Each image is associated with a separate URL, and each potentially lives on a different Web server, some of which may be slower to respond than others. If the client were to take the naive approach of connecting to each server individually, downloading the image, and then proceeding to the next server, the slowest server to respond would delay all subsequent operations. Instead, by initiating multiple connection attempts in parallel, the program can handle the servers in the order in which they respond. Coupled with concurrent data-transfer and page-rendering processes, this technique allows Web browsers to begin rendering the page as soon as the HTML is downloaded. A Simple HTTP Client To illustrate this, this section will develop a small Web client application on top of the HTTP protocol. This is not nearly as sophisticated as the functionality provided by the LWP library (Chapter 9), but it has the ability to perform its fetches in parallel, something that LWP cannot (yet) do. Because it isn't fancy, we won't do any rendering or browsing, but instead just retrieve a series of URLs specified on the command line and store copies to disk. You might use this application to mirror a set of pages locally. The program has the following structure: -
Parse URLs specified on the command line, retrieving the hostnames and port numbers . -
Create a set of nonblocking IO::Socket handles. -
Initiate nonblocking connects to each of the handles and deal with any immediate errors. -
Add each handle to an IO::Select set that will be monitored for writing, and select() across them until one or more becomes ready for writing. -
Send the request for the appropriate Web document and add the handle to an IO::Select set that will be monitored for reading. -
Read the document data from each of the handles in a select() loop, and write the data to local files as the sockets become ready for reading. In practice, steps 4, 5, and 6 can be combined in a single select() loop to increase parallelism even further. The script is basically an elaboration of the web_fetch.pl script that we developed in Chapter 5 (Figure 5.5). In addition to the nonblocking connects and the parallel downloads, we improve on the first version by storing each retrieved document in a directory hierarchy based on its URL. For example, the URL http://www.cshl.org/meetings/index.html will be stored in the current directory in the file http://www.cshl.org/meetings/index.html. In addition to generating the appropriate GET request, we will perform minimal parsing of the returned HTTP header to determine whether the request was successful. A typical response looks like this: HTTP/1.1 200 OK Date: Wed, 01 Mar 2000 17:00:41 GMT Server: Apache/1.3.6 (UNIX) Last-Modified: Mon, 31 Jan 2000 04:28:15 GMT Connection: close Content-Type: text/html <!DOCTYPE HTML PUBLIC "-//IETF//DTD HTML//EN"> <html> <head> <title>Presto Home Page</title> </head> <body> <h1>Welcome to Presto</h1> ... The important part of the response is the topmost line, which indicates the success or the failure status of the request. The line begins with a protocol version code, in this case HTTP/1.1, followed by the status code and the status message. The status code is a three-digit integer indicating the outcome of the request. As described in Chapter 9, there are a large number of status codes, but the one that we care about is 200, which indicates that the request was successful and the requested document follows . If the client sees a 200 status code, it will read to the end of the header and copy the document body to disk. Otherwise, it treats the response as an error. We will not attempt to process redirects or other fancy HTTP features. The script, dubbed web_fetch_p.pl , comes in two parts . The main script reads URLs from the command line and runs the select() loop. A helper module, named HTTPFetch, is used to track the status of each URL fetch. It creates the outgoing connection, reads and parses the HTTP header, and copies the returned document to disk. We'll look at the main script first (see Figure 13.9). Figure 13.9. The web_fetch script uses nonblocking connects to parallelize URL fetches 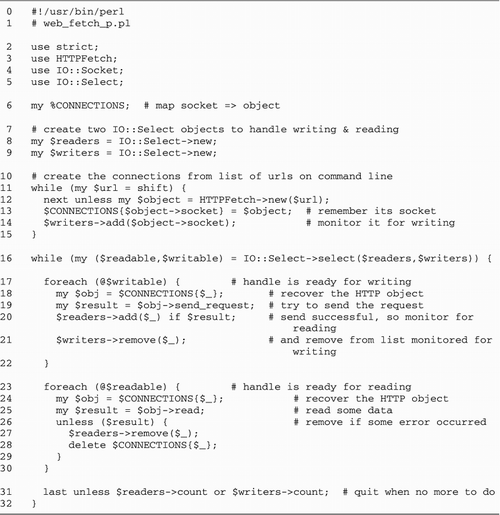 Lines 1 “6: Initialize script We begin by bringing in the IO::Socket, IO::Select, and HTTPFetch modules. We also declare a global hash named %CONNECTIONS , which will be responsible for maintaining the correspondence between sockets and HTTPFetch objects. Lines 7 “9: Create IO::Select objects We now create two IO::Select sets, one for monitoring sockets for reading and the other for monitoring sockets for writing. Lines 10 “15: Create the HTTPFetch connection objects In the next section of the code, we read a set of URLs from the command line. For each one, we create a new HTTPFetch object by calling HTTPFetch->new() with the URL to fetch. Behind the scenes, HTTPFetch->new() does a lot. It parses the URL, creates a TCP socket, and initiates a nonblocking connection to the corresponding Web server host. If any of these steps fail, new() returns undef and we skip to the next URL. Otherwise, new() returns a new HTTPFetch object. Each HTTPFetch object has a method called socket() that returns its underlying IO::Socket. We will monitor this socket for the completion of the nonblocking connect. We add the socket to the $writers IO::Select set, and remember the association between the socket and the HTTPFetch object in the %CONNECTIONS array. Line 16: Start the select loop The remainder of the script is a select() loop. Each time through the loop, we call IO::Select->select() on the $readers and $writers select sets. Initially $readers is empty, but it becomes populated as each of the sockets completes its connection. Lines 17 “22: Handle sockets that are ready for writing We first deal with the sockets that are ready for writing. This comprises those sockets that have either completed their connections or have tried and failed. We index into %CONNECTIONS to retrieve the corresponding HTTPFetch object and invoke the object's send_request() method. This method checks first to see that its socket is connected, and if so, submits the appropriate GET request. If the request was submitted successfully, send_request() returns a true result, and we add the socket to the list of sockets to be monitored for reading. In either case, we don't need to write to the socket again, so we remove it from the $writers select set. Lines 23 “30: Handle sockets that are ready for reading The next section handles readable sockets. These correspond to HTTPFetch sessions that have successfully completed their connections and submitted their requests to the server. Again, we use the socket as an index to recover the HTTPFetch object and call its read() method. Internally, read() takes care of reading the header and body and copying the body data to a local file. This is done in such a way that the read never blocks, preventing one slow Web server from holding all the rest up. The read() call returns a true value if it successfully read from the socket, or false in case of a read error or an end of file. In the latter case, we're done with the socket, so we remove it from $readers set and delete the socket from the %CONNECTIONS array. Line 31: Finish up The loop is done when no more handles remain in the $readers or $writers sets. We check for this by calling the select objects' count() methods . The HTTPFetch Module We turn now to the HTTPFetch module, which is responsible for most of this program's functionality (Figure 13.10). Figure 13.10. The HTTPFetch module 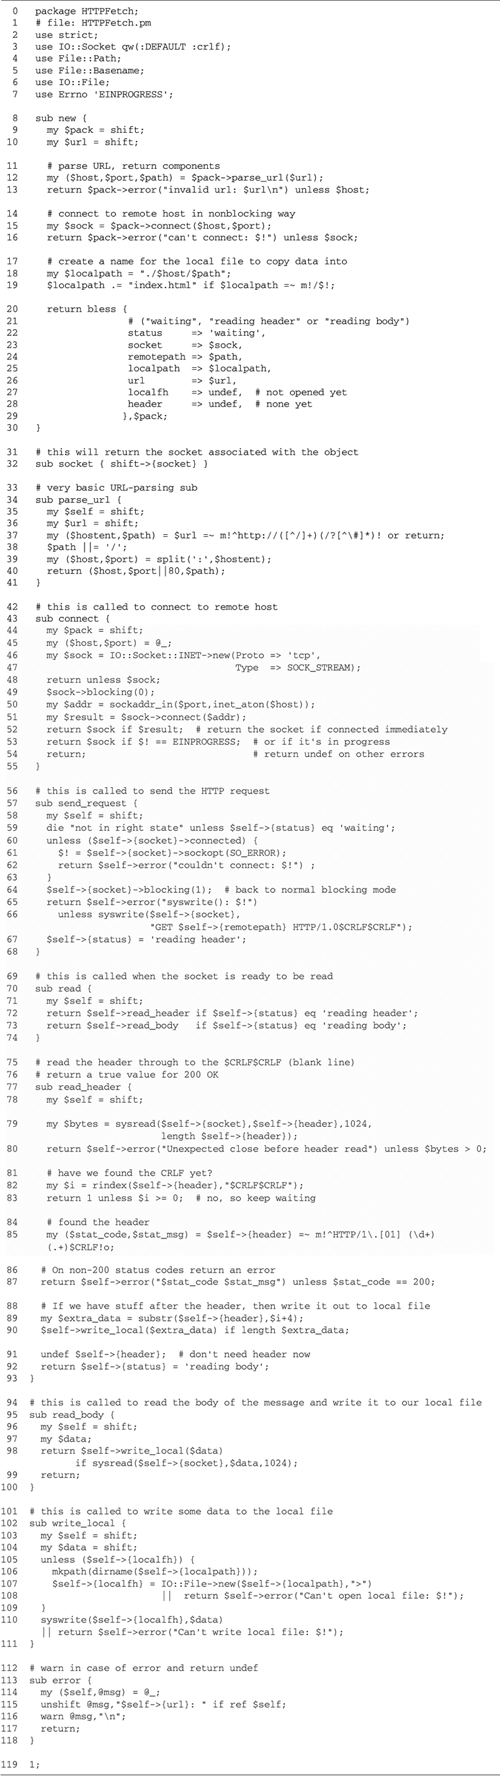 Lines 1 “7: Load modules We begin by bringing in the IO::Socket, IO::File, and Carp modules. We also import the EINPROGRESS constant from the Errno module and load the File:: Path and File::Basename modules. These import the mkpath() and dirname () functions, which we use to create the path to the local copy of the downloaded file. Lines 8 “31: The new() constructor The new() method creates the HTTPFetch object. Its single argument is the URL to fetch. We begin by parsing the URL into its host, port, and path parts using an internal routine named parse_url() . If the URL can't be parsed, we call an internal method called error() , which sends an error message to STDERR and returns undef . If the URL was successfully parsed, then we call our connect() method to initiate the nonblocking connect. If an error occurs at this point, we again issue an error message and return undef . The next task is to turn the URL path into a local filename. In this implementation, we create a local path based on the remote hostname and remote path. The local path is stored relative to the current working directory. In the case of a URL that ends in a slash, we set the local filename to index.html , simulating what Web servers normally do. This local filename ultimately becomes an instance variable named localpath . We now stash the original URL, the socket object, and the local filename into a blessed hash. We also set up an instance variable named status , which will keep track of the state of the connection. The status starts out at "waiting." After the completion of the nonblocking connect, it will be set to "reading header," and then to "reading body" after the HTTP header is received. Line 32: The socket() accessor The socket() method is a public routine that returns the HTTPFetch object's socket. Lines 33 “41: The parse_url() method The parse_url() method breaks an HTTP URL into its components in two steps, first splitting the host:port and path parts, and then splitting the host:port part into its two components . It returns a three-element list containing the host, port number, and path. Lines 42 “55: The connect() method The connect() method initiates a nonblocking connect in the manner described earlier. We create an unconnected IO::Socket object, set its blocking status to false, and call its connect() method with the desired destination address. If connect() indicates immediate success, or if connect() returns undef but $! is equal to EINPROGRESS , we return the socket. Otherwise, some error has occurred and we return false. Lines 56 “68: The send_request() method The send_request() method is called when the socket has become writable, either because it has completed the nonblocking connect or because an error occurred and the connection failed. We first test the status instance variable and die if it isn't the expected "waiting" state ”this would represent a programming error, not that this could ever happen ;- ). If the test passes , we check that the socket is connected. If not, we recover the delayed error, stash it into $! , and return an error message to the caller. Otherwise the connection has completed successfully. We put the socket back into blocking mode and attempt to write an appropriate GET request to the Web server. In the event of a write error, we issue an error message and return undef . Otherwise, we can conclude that the request was sent successfully and set the status variable to "reading header." Lines 69 “74: The read() method The read() method is called when the HTTPFetch object's socket has become ready for reading, indicating that the server has begun to send the HTTP response. We look at the contents of the status variable. If it is "reading header," we call the read_header() method. Otherwise, we call read_body() . Lines 75 “93: The read_header() method The read_header() method is a bit complicated because we have to read until we reach the two CRLF pairs that end the header. We can't use the <> operator, because that might block and would definitely interfere with the calls to select() in the main program. We call sysread () on the socket, requesting a 1,024-byte chunk. We might get the whole chunk in a single operation, or we might get a partial read and have to read again later when the socket is ready. In either case, we append what we get to the end of our internal header instance variable and use rindex() to see whether we have the CRLF pair. rindex() returns the index of a search string in a larger string, beginning from the rightmost position. If we haven't gotten the full header yet, we just return. The main loop will give us another chance to read from the socket the next time select() indicates that it is ready. Otherwise, we parse out the topmost line, recovering the HTTP status code and message. If the status code indicates that an HTTP error of some sort occurred, we call error() and return undef . Otherwise, we're going to advance to the "reading body" state. However, we need to deal with the fact that the last sysread() might have read beyond the header and gotten some of the document itself. We know where the header ends, so we simply extract the document data using substr() and call write_local() to write the beginning of the document to the local file. write_local() will be called repeatedly during subsequent steps to write the rest of the document to the local file. We set status to "reading body" and return. Lines 94 “100: The read_body() method The read_body() method is remarkably simple. We call sysread() to read data from the server in 1,024-byte chunks and pass this on to write_local() to copy the document data to the local file. In case of an error during the read or write, we return undef . We also return undef when sysread() returns 0 bytes, indicating EOF. Lines 101 “111: The write_local() method This method is responsible for writing a chunk of data to the local file. The file is opened only when needed. We check the HTTPFetch object for an instance variable named localfh . If it is undefined, then we call the mkpath() function to create the required parent directories, if needed, and IO::File->new() to open the file indicated by localpath . If the file can't be opened, then we exit with an error. Otherwise, we call syswrite() to write the data to the file, and stash the filehandle into localfh for future use. Lines 112 “118: The error() method This method uses carp() to write the indicated error message to standard error. For convenience, we precede the error message with the URL that HTTPFetch is responsible for. To test the effect of parallelizing connects, I compared this program against a version of the web_fetch.pl script that performs its fetches in a serial loop. When fetching the home pages of three popular Web servers (http://www.yahoo.com/, http://www.google.com/, and http://www.infoseek.com/) over several trials, I observed a speedup of approximately threefold. Nonblocking accept() Aside from its use in implementing timeouts, nonblocking accept() is infrequently used. One application of nonblocking accept() is in a server that must listen on multiple ports. In this case, the server creates multiple listening sockets and select() s across them. select() indicates that the socket is ready for reading if accept() can be called without blocking. This code fragment indicates the idiom. It creates three sockets, bound to ports 80, 8000, and 8080, respectively (these ports are typically used by Web servers): my $sock80 = IO::Socket::INET->new( LocalPort => 80, Listen => 20, Reuse => 1); my $sock8000 = IO::Socket::INET->new( LocalPort => 8000, Listen => 20, Reuse => 1); my $sock8080 = IO::Socket::INET->new( LocalPort => 8080, Listen => 20, Reuse => 1); Each socket is marked nonblocking and added to an IO::Select set: foreach ($sock80,$sock8000,$sock8080) { $_->blocking(0); } my $listeners = IO::Select->new($sock80,$sock8000,$sock8080); The main loop calls the IO::Select can_read() method, returning the list of sockets that are ready to accept() . We call each ready socket's accept() method, and handle the connected socket that is returned by turning on blocking again and passing it to some routine that handles the connection. It is possible for accept() to return undef and an error code of EWOULDBLOCK even if select() indicates that it is readable. This can happen if the remote host terminated the connection between the time that select() returned and accept() was called. In this case, we simply skip back to the top of the loop and try again later. while (1) { my @ready = $listeners->can_read; foreach (@ready) { next unless my $connected = $_->accept(); $connected->blocking(1); handle_connection($connected); } } | 