Lesson 2: Configuring a Routing and Remote Access Server
Once Routing and Remote Access is installed, you can configure it for inbound connections, lock it down with Remote Access Policies (RAPs), add remote access profiles for security, and control access with Bandwidth Allocation Protocol (BAP). In this lesson, you explore these configurable options.
After this lesson, you will be able to
- Explain how to allow inbound connections
- Create a RAP
- Describe how to configure a remote access profile
- Describe how to configure BAP
Estimated lesson time: 45 minutes
Allowing Inbound Connections
When Routing and Remote Access is started for the first time, Windows 2000 automatically creates five PPTP and five L2TP ports, as illustrated in Figure 12.3. The number of VPN ports that are available to any remote access server is not limited by the hardware and can be configured. You can configure VPN ports under Ports in the console tree of Routing and Remote Access.
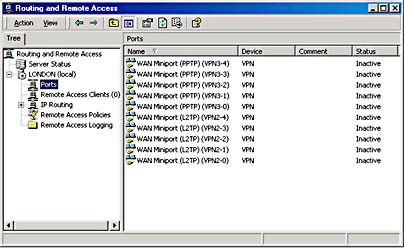
Figure 12.3 Routing and Remote Access ports
Creating a Remote Access Policy (RAP)
You can also add a parallel port by configuring Ports. Serial communication ports shows up only after a modem is installed for the Routing and Remote Access computer. Both types of ports can be configured for inbound and outbound connections.
RAPs are a named set of conditions, as illustrated in Figure 12.4, that are used to define who has remote access to the network and what the characteristics of that connection will be. Conditions for accepting or rejecting connections can be based on many different criteria, such as day and time, group membership, type of service, and so forth. Characteristics of the connection could be configured, for example, as an ISDN connection that can last only 30 minutes and that will not allow Hypertext Transfer Protocol (HTTP) packets.
NOTE
RAPs are shared between routing and remote access and IAS. They can be configured from either tool.
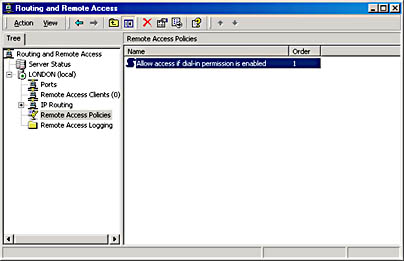
Figure 12.4 Routing and Remote Access policies
RAPs can be created, deleted, renamed, and reordered from the IAS administration tool or the Routing and Remote Access Manager. Note that there is no Save option, so it is not possible to save a copy to floppy disk. The order of policies is significant because the first matching policy will be used to accept or reject the connection.
NOTE
Remote Access Policies are not stored in Active Directory; they are stored locally in the IAS.MDB file. Policies need to be created manually on each server. Remote Access Policies are applied to users in a Mixed-mode domain, even though the user's dial-in permission can only be set to Allow Access or Deny Access, as illustrated in Figure 12.5 (Control Access Through Remote Access Policy is not available on Mixed-mode domain controllers). If the user's permission is Allow Access, the user still must meet the conditions set forth in a policy before being allowed to connect.

Figure 12.5 Configuring Remote Access policies
Conditions
Conditions can be added to a RAP in order for the system to grant or deny remote access permission. This works in conjunction with the dial-in permission associated with the user to determine whether the user is given access. The flowchart in Figure 12.6 shows the logic used to decide whether the connection request is granted or denied.
NOTE
If no Remote Access Policy exists (if the default policy is deleted, for example), users will not be able to access the network, regardless of their individual Routing and Remote Access permission settings.
By using this flowchart, one can predict the outcome of a connection request for any situation. For example, a user's dial-in property is set to Control Access Through Remote Access Policy and the RAP is the default Allow Access If Dial-In Permission Is Enabled (the policy is to deny access, and the condition is to permit any day, any time). By following the flowchart, it can be seen that the user connection attempt will be rejected.
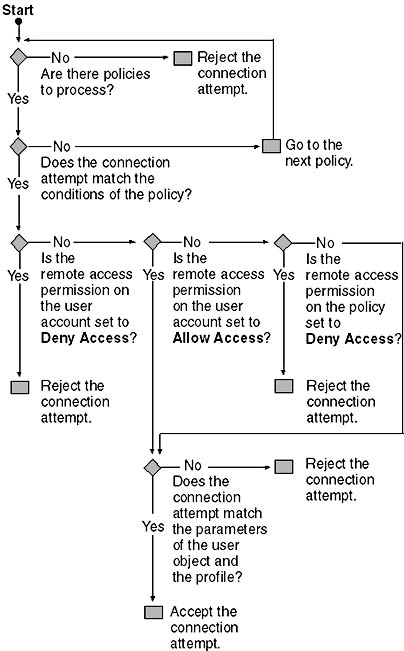
Figure 12.6 Flowchart of Remote Access Policy
However, if the user's dial-in property (illustrated in Figure 12.7) is set to Allow Access and the default policy mentioned earlier is used, the user connection attempt will be accepted.
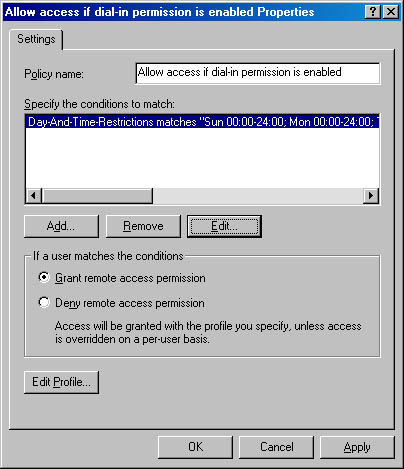
Figure 12.7 Setting dial-in properties to grant access
Grant or Deny Access
Policies can be configured to either grant or deny access. This works in conjunction with the user object's dial-in permission to decide whether or not a user is given access, by means of the logic shown in Figure 12.11.
Caller ID
Caller ID verifies that the caller is calling from the telephone number specified. If caller ID is configured, support for the passing of caller ID information all the way from the caller to Routing and Remote Access is required, or the connection attempt will be denied.
NOTE
For backwards compatibility with previous versions of Windows NT, RAP, Caller ID, Apply Static Routes, and Assign A Static IP Address are not available in Mixed mode.

Practice: Creating a New Remote Access Policy
In this practice, you create a new policy that allows remote access based on the user's group membership.
Exercise 1: Creating a New Remote Access Policy
- Using the Routing And Remote Access Administration tool, right-click Remote Access Policies and select New Remote Access Policy.
- Add a friendly name of "Allow Domain Users," and then click Next.
- Click Add to add a condition.
- Select Windows-Groups, and then click Add.
- Click Add, select Domain Users, and then click Add. Click OK.
- Click OK to exit the Groups dialog.
- Click Next, and then select Grant Remote Access Permission.
- Click Next, and then click Finish.
Configuring a Remote Access Profile
The profile specifies what kind of access the user will be given if the conditions match. There are six different tabs that can be used to configure a profile.
Dial-In Constraints
Constraints on the actual connection are configured in the Edit Dial-In Profile dialog box, on the Constraints tab, as shown in Figure 12.8. Possible settings include idle time disconnect, maximum session time, day and time, telephone number, and media type (ISDN, tunnel, async, and so forth).
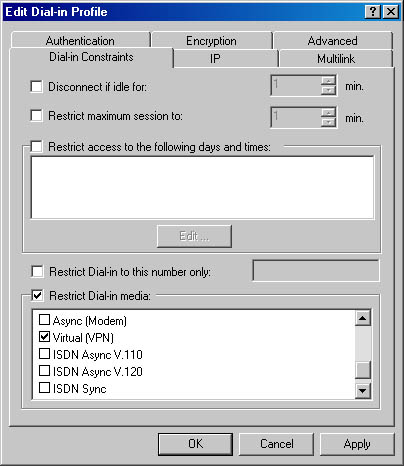
Figure 12.8 The Edit Dial-In Profile dialog box
IP
Configuration for client IP address assignment and IP packet filtering is set on this tab. Packet filters can be set for either inbound or outbound and can be configured for protocol and port.
Multilink
Set Multilink and BAP options here. A line can be dropped if bandwidth drops below a certain level for a given length of time.
Authentication
Authentication protocols such as Password Authentication Protocol (PAP), Challenge Handshake Authentication Protocol (CHAP), and Extensible Authentication Protocol (EAP) are set here.
Encryption
Encryption settings for Microsoft Routing and Remote Access servers are configured here. Options are to prohibit encryption, allow it, or require it.
Advanced
The Advanced tab allows for the configuration of additional network parameters that do not apply to Microsoft Routing and Remote Access servers. Included are standard RADIUS and Ascend attributes, which may apply to other manufacturers' NAS equipment.
Practice: Creating a Policy Filter
In this exercise, you edit the profile of the Allow Access If Dial-In Permission Enabled policy so that users who gain access through that policy cannot ping the Routing and Remote Access server's network, whereas users who are granted access via the Allow Domain Users policy can ping the Routing and Remote Access server.
Exercise 1: Create an ICMP Echo Filter in the Allow Access If Dial-In Permission Is Enabled Policy
- Right-click the Allow Access If Dial-In Permission Enabled policy and select Properties.
- Click the Edit Profile button.
- Select the IP tab.
- Click the From Client IP Packet filter.
- Click Add.
- Click the Destination Network box.
- For the IP address, type the network number and netmask of the Routing and Remote Access server.
- For the protocol, select ICMP.
- Enter 8 for ICMP type, and enter 0 for ICMP code. (ICMP type 8 designates an Echo request.)
- Click OK to exit the Add/Edit IP filter, and OK to exit the IP Packet Filters Configuration dialog box. Click OK again to exit the dialog box.
Configuring Bandwidth Allocation Protocol (BAP)
BAP and Bandwidth Allocation Control Protocol (BACP) enhance Multilink by dynamically adding or dropping links on demand. BAP and BACP are sometimes used interchangeably to refer to the same bandwidth-on-demand functionality. Both protocols are Point-to-Point (PPP) control protocols and work together to provide bandwidth on demand.
BAP functionality is implemented through a new Link Control Protocol (LCP) option, BACP, and BAP, as described in the following list:
- Link Discriminator. A new LCP option used as a unique identifier for each link of a Multilink bundle.
- BACP. BACP uses LCP negotiations to elect a "favored peer." The favored peer is used to determine which peer is favored if the peers simultaneously transmit the same BAP request.
- BAP. BAP provides a mechanism for link and bandwidth management. Link management allows you to add and drop links. This includes providing telephone numbers as well as type of hardware (modem or ISDN) of the additional available links. Bandwidth management decides when to add and drop links based on link utilization.
BAP and BACP are encapsulated in PPP Data-link layer frames with the following protocol field (in hex). This information may be useful when reading PPP logs. As illustrated in Figure 12.9, you can enable BAP and BACP bandwidth control using the PPP tab on the Connection Properties dialog box.
- C02D for BAP
- C02B for BACP

Figure 12.9 Setting PPP options for a remote access policy
Follow these steps to enable or disable BAP/BACP on a server-wide basis:
- In Routing and Remote Access Manager, right-click the server on which you want to enable BAP/BACP, and then click Properties.
- In the PPP tab, select the Dynamic Bandwidth Control Using BAP Or BACP check box.
BAP policies are enforced through profile settings or Remote Access Policies. Remote Access Policies are accessed from Routing and Remote Access Manager or from IAS Manager.
BAP Additional Phone Numbers
The server can provide the client with additional telephone numbers to dial if extra bandwidth is needed. Using this option, the client only needs to know one telephone number but can still bring up extra lines as needed, as illustrated in Figure 12.10.
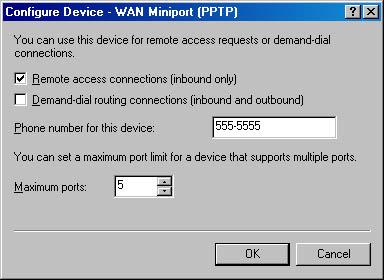
Figure 12.10 BAP additional telephone numbers
- From the Routing and Remote Access Manager, go to Ports, go to Properties, select a port, and then click Configure.
- Enter the telephone number of other modems to be used for Multilink.
Lesson Summary
In this lesson, you configured Routing and Remote Access for inbound connections, locked it down with RAPs, added remote access profiles for security, and controlled access with BAP.
EAN: N/A
Pages: 244