Project Window Areas
| [ LiB ] |
Project Window Areas
When you work with tracks in the Project window, most of your time is spent between the Inspector, the Track List, and the Event Display areas. The Inspector area displays information about a selected track and may be divided into several sections, depending on the track class or track type you have selected (explained later in this chapter). The Track List area displays all the tracks that are part of your project, stacked one on top of the other. Again, the content of the Track List area for a given track varies depending on its track class. Finally, the Event Display area displays recorded eventsthe actual audio and MIDI content of the project itselfand its associated automation.
The Inspector
As mentioned previously, you will want to use the Inspector area whenever you want to view or edit certain details pertaining to a selected track in your Project window. What you find in the Inspector area also varies depending on the track's class. For example, when a MIDI track is selected, the Inspector area is divided into six sections: the MIDI Track Setup, Parameters, Inserts, Sends, Channel, and Notepad. Each one of these sections allows you to modify a certain amount of information that affects how the events on the track behave or play back. So, in the same example of a MIDI Inspector's area, you can use the (Track) Parameters section to transpose all the events on the track. Other track classes, such as Folder Tracks (this is also explained later in Chapter 6), do not display as many sections in the Inspector area.
Nevertheless, you will find elements (such as buttons and fields) that are common to different Inspector areas of different track classes and also with other areas within the Project window. For example, this is the case with the Read/Write Automation buttons , which are found in both the Inspector and the Track List, as well as in the Mixer panel.
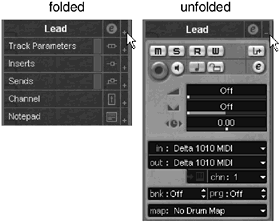
When the Inspector area holds more than one section, the title bar and a Control button for that section are always visible. The Control button is found on the right of the section's title bar. This button allows you to reveal or hide the content of the selected section. In Figure 5.1, you can see this button, which looks like a little arrow pointing down. This indicates that the section can be expanded or maximized. If the arrow points up, it indicates that you can minimize the panel. In addition, when a track supports an insert or send effect and an effect has been assigned to this track, the control button is colored (turquoise), indicating that there is an effect assigned in the section for that track. The same coloring applies to control buttons on tracks that support EQs, except in this case, an active EQ is displayed as green. Finally, when a yellow rectangle appears next to this Control button, it indicates that there might be some effects assigned in the section, but that they have been bypassed. Bypassing an effect or an EQ setting is a great way to compare before and after without having to reset all the parameters involved or to listen to a signal without any processing.
Figure 5.1. The upper-right corner of this image shows the Control button for this Inspector's area section.

By default, when you click on one section to expand it, any other expanded section automatically minimizes itself. When a section is minimized, all the settings you have made in that section remain intact.
NOTE
 CONTROLLING MULTIPLE SECTIONS SIMULTANEOUSLY
If you want to maximize more than one section of the Inspector area at once, hold the Ctrl(PC)/ ![]() (Mac) key down as you click the section's Control button. You can also minimize all opened panels at once by holding the Alt(PC)/Option(Mac) key down while clicking on any one of the section's Control buttons. Inversely, you can maximize all the sections at once by using the same key combination.
(Mac) key down as you click the section's Control button. You can also minimize all opened panels at once by holding the Alt(PC)/Option(Mac) key down while clicking on any one of the section's Control buttons. Inversely, you can maximize all the sections at once by using the same key combination.
The Track List
The Track List area allows you to view all of your tracks at once, which makes it easy to enable multiple tracks for recording or to organize your material by type of content. Whenever you move or change a setting in the track list, the changes are reflected in both the Inspector area of this track and in the Mixer panel. If you move the position of a trackplacing it above or below its current position, for exampleall the events in the event display area will follow this move. The content of each track in the Track List area also depends on the track's class. You can also use the Track List area to reveal any automation information available in a subtrack. When you want to record or edit automation for a track, the automation data is kept along with the track itself in a subtrack found below the track (hence the name "subtrack"). Usually, there is one subtrack for each type of automation your track contains. For example, you could have two subtracks to your track; one could contain volume automation and another, pan automation. Finally, you can also resize each track individually to fit its content on your screen from the Track List area.
How To
To change the order of a track in the Track List area (see Figure 5.2 ):
- Click the track you want to move in the Track List area.
A red line appears to indicate that Cubase knows you want to move this track (as shown in the first image on the left side of Figure 5.2). To select multiple consecutive tracks, click the first track, hold down the Shift key, and then click the last track you want to move. To select multiple nonconsecutive tracks, click the first track, hold down the Ctrl(PC)/
 (Mac) key, and then click on any other track you want to move (note that after the tracks are moved, all the nonconsecutive tracks appear consecutive).
 - Drag the track to the desired location.
In the middle section of Figure 5.2, you can see the (green) line indicating where the track would appear if you released the mouse.
-
Release the mouse button when you are satisfied with the new location. As you can see on the right side of Figure 5.2, the track appears where the (green) line was; in this case, between Audio 02 and 03.
Figure 5.2. Changing the order of a track in the Track List area.

How To
To reveal or hide a track's automation subtracks:
-
Right-click on the track for which you want to see the used automation in the Track List area.
-
Select the Show Used Automation option from the context menu. If you want the used automation visible for all tracks, select the Show Used Automation for All Tracks option instead.
Or:
-
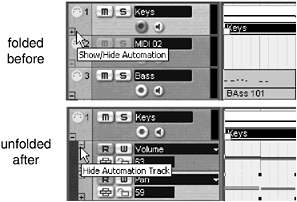
Click the plus sign in the bottom-left corner of the desired track in the Track List area to reveal its automation subtrack. In Figure 5.3, when you click the plus sign, two subtracks are revealed (lower portion of the figure). When you want to view more automation subtracks, you can click the plus sign found in the lower automation subtrack. In other words, clicking the plus sign of the track reveals the last state your subtracks were in, and if you click the track's minus sign, it hides all subtracks. Clicking the plus sign of an automation subtrack reveals the next automation subtrack, whereas clicking the minus sign of the automation subtrack hides only that subtrack from the Track List area.
Figure 5.3. Clicking the plus sign of a track in the Track List area reveals automation subtracks.

-
Click the minus sign when the track shows its subtrack(s) to hide the subtrack(s). Hiding the subtrack(s) does not remove the automation recorded on this track. It only hides it from view.
In each automation subtrack, you will find two fields. The first displays the automation parameter's name used by the subtrack. In Figure 5.3 these were Volume and Pan. The second field represents the value of the automation parameter at the location from the project cursor's position. In Figure 5.3, the volume is at 43 and the pan is at 58. You can also change the automation parameter displayed in the subtrack if you wish.
How To
To change the automation parameter displayed in a subtrack:
-
Expand your track to reveal its subtracks.
-
From the Automation Parameter drop-down menu, select the appropriate automation parameter that you want to view or edit in that subtrack. Note that parameters containing information appear with an asterisk at the end of their names in this menu.
If the parameter you want to view is not in the drop-down menu, select the More option at the bottom of the menu and then choose the appropriate automation parameter from the dialog box that appears.
How To
To resize an individual track's height:
-
Bring your cursor over the lower edge of the track you want to resize.
-
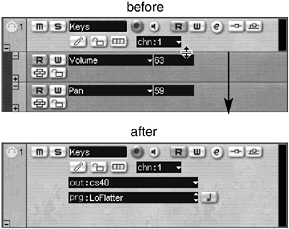
When your cursor changes into a double-headed arrow (see Figure 5.4), drag your mouse up to reduce the track's size or down to increase its size.
Figure 5.4. Resizing an individual track's height.

You can also resize the entire Track List's width and height by dragging the right edge of the Track List area when your cursor changes into a double-headed arrow or by dragging the lower edge of a track using the same method (see Figure 5.4). Moving the border to the left reduces the size, whereas moving it to the right increases the Track List's width. Note that you cannot resize the left edge of the Track List to increase the space used by the Inspector.
The Event Display
The Event Display area allows you to edit and view parts , events, and automation information found in your project. Because most of the work you will do in this area is related to editing, we discuss the functions and operations for the Event Display area in Chapter 9.
Nevertheless, for the time being, it is important to understand that you will find the content of each track (events, parts, and automation data) in this area. Whenever you record audio, MIDI, or automation, this is where it will appear.
| [ LiB ] |