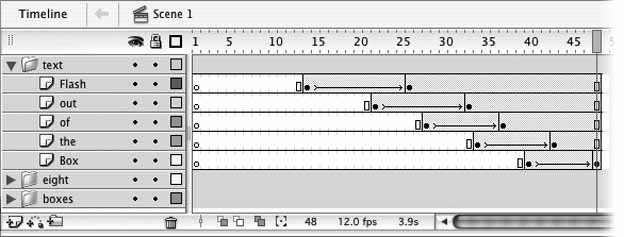
3.4. Staggering Animation The animation you have is getting there, but it's still slow and pretty boring. One way to spice it up easily, and simultaneously speed up the text tweens a bit, is to stagger the animation of the words. The word Flash should appear first, then Out, and so on. When you're done, you'll cap it off with a little flourish using the 8. To stagger the words in time (i.e., start them in succession), you need to shorten the animation span for each text segment and adjust the positions of the keyframes: Starting with the Flash layer, click once on the ending keyframe, and then click again and drag the selection to frame 26. On the Out layer, select the first keyframe and drag it to frame 22. Select and drag the last keyframe to frame 33. You'll start this movement a frame or two later than the others to give the 8 a little extra time to show itself. You'll get to that in a second. Select and drag the starting keyframes of the of, the, and Box layers to frames 28, 34, and 40, respectively. Select and drag the ending keyframes of the same layers to frames 37, 43, and 48 (where it should already be), respectively. Leave the starting keyframe for the eight layer where it is, but select and drag the ending keyframe to frame 32. Play the animation (Enter/Return). In the revised animation, each word moves onto the Stage at a different time. The staggered animation guides the eye from the first word to the last. Save your work. Your timeline should now look like Figure 3-11 and mirror the animation_07.fla file. Figure 3-11. Staggered text animations 
|
