Web Container Failover and High Availability
The Web container is a critical component in any Web-based WebSphere environment. In a nonfailover or non-Web container clustered configuration, should the Web container fail, all end user transactions will typically cease .
Let's look at the various options offered to improve availability within the Web container and the WebSphere application server WLM functions.
Web Container Overview
The Web container operates within the WebSphere application server JVM space for each configured application server. You'll recall from earlier chapters that the application server will operate both a Web and an EJB container under a single JVM.
The key to improving availability of your Web container is to configure the Web container to participate in WLM with other cloned application servers as well as configure the distribution of load via a WebSphere HTTP plug-in on your Web servers.
Let's first take a look at the HTTP plug-in file.
HTTP Web Server Plug-in
As you learned in Chapters 4 and 5, the WebSphere HTTP plug-in file is an XML plug-in configuration that provides you with the ability to configure WLM or load balancing of your user requests to your Web containers.
Let's look at an example plug-in file that isn't configured for failover support. The first configuration file, shown in Listing 7-1, is based on a WebSphere version 4 format. The second configuration file, shown in Listing 7-2, is based on a WebSphere version 5 format.
| |
<?xml version="1.0"?> <Config> <Log RefreshInterval="10" LogLevel="Error"Name="/opt/WebSphere/AppServer/logs/native.log" /> <VirtualHostGroup Name="default_host"> <VirtualHost Name="www.mysite.com:80" /> </VirtualHostGroup> <!-- ### Start of Main Section #### --> <!-- Portal Application --> <ServerGroup Name="portalApplication Server Group"> <Server CloneID="uk396h0g" Name="portalApp"> <Transport Hostname="serverA.mydomain.com"
Port="10000" Protocol="http" /> </Server> </ServerGroup> <UriGroup Name="portalAppEAR/portalApp_URIs"> <Uri Name="/portal/*" /> </UriGroup> <Route ServerGroup="portalApplication Server Group" UriGroup="portalAppEAR/portalApp_URIs" VirtualHostGroup="default_host" /> </Config>
| |
| |
<?xml version="1.0"?> <Config> <Log RefreshInterval="10" LogLevel="Error"Name="/opt/WebSphere/AppServer/logs/native.log" /> <VirtualHostGroup Name="default_host"> <VirtualHost Name="www.mysite.com:80" /> </VirtualHostGroup> <!-- ### Start of Main Section #### --> <!-- Portal Application --> <ServerCluster Name="portalApplication Server Group"> <Server Name="portalApp"> <Transport Hostname="serverA.mydomain.com"
Port="10000" Protocol="http" /> </Server> </ServerCluster> <UriGroup Name="portalAppEAR/portalApp_URIs"> <Uri Name="/portal/*" /> </UriGroup> <Route ServerCluster="portalApplication Server Group" UriGroup="portalAppEAR/portalApp_URIs" VirtualHostGroup="default_host" /> </Config>
| |
The key line item in these example HTTP plug-in files is highlighted in bold in each listing. This line, known as the Server or ServerCluster directive, provides a way to determine how the user requests via the frontend Web server will be routed through the environment.
| Note | Both WebSphere 4 and 5 plug-in files require the CloneID directive to be present for session management to function. However, if your environment doesn't require session management or server affinity, you can remove the clone ID from the plug-in file. Keeping it there creates overhead for the Web server to try to process the ID for each request. |
In these two configurations, there is no failover or secondary available clones or servers to service the end user requests. Therefore, if serverA.mydomain.com fails or isn't available, then the service will be unavailable. Therefore, you need to look at operating multiple Web containers on your WebSphere application servers.
You saw in Chapter 5 various ways that topologies can be deployed, and one of the common traits among high-availability topological architectures is to employ multiple application servers, which entails multiple Web containers. Consider for a moment that you added in an additional physical server to your topology, server B. Your topology would look like the diagram in Figure 7-10.
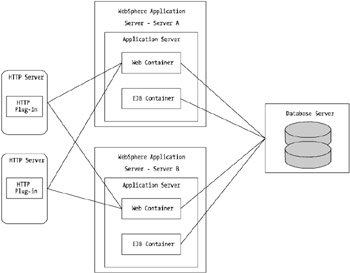
Figure 7-10: Dual application server configuration
You'll want to configure each HTTP plug-in file on the HTTP servers to route requests to all available, or configured, WebSphere Web containers on both server A and server B.
Now consider for a moment the two code examples, Listings 7-1 and 7-2. The key lines are the server group and server cluster directives. These two lines, which represent different nomenclature for WebSphere version 4 and version 5, are the drivers behind the routing process. Consider the following snippet of configuration code:
<ServerGroup Name="portalApplication Server Group"> <Server CloneID="uk396h0g" Name="portalApp"> <Transport Hostname="serverA.mydomain.com"  Port="10000" Protocol="http" /> </Server> </ServerGroup>
 Also consider this snippet:
<ServerCluster Name="portalApplication Server Group"> <Server Name="portalApp"> <Transport Hostname="serverA.mydomain.com"  Port="10000" Protocol="http" /> </Server> </ServerCluster>
 These lines basically state that should a route request be made to either the ServerGroup or ServerCluster "portalApplication Server Group," then send the request to the server entry, as defined in the Transport directive.
If you want to map this configuration to that of the dual instance Web container configurations, you'll need to make the following changes. First, the changes for WebSphere version 4 are shown in Listing 7-3.
| |
<?xml version="1.0"?> <Config> <Log RefreshInterval="10" LogLevel="Error"Name="/opt/WebSphere/AppServer/logs/native.log" /> <VirtualHostGroup Name="default_host"> <VirtualHost Name="www.mysite.com:80" /> </VirtualHostGroup> <!-- ### Start of Main Section #### --> <!-- Portal Application --> <ServerGroup Name="portalApplication Server Group"> <Server CloneID="uk396h0g" Name="portalApp"> <Transport Hostname="serverA.mydomain.com"
Port="10000" Protocol="http" /> </Server> <Server CloneID="ao356hib" Name="portalApp"> <Transport Hostname="serverB.mydomain.com"
Port="10000" Protocol="http" /> </Server> </ServerGroup> <UriGroup Name="portalAppEAR/portalApp_URIs"> <Uri Name="/portal/*" /> </UriGroup> <Route ServerGroup="portalApplication Server Group" UriGroup="portalAppEAR/portalApp_URIs" VirtualHostGroup="default_host" /> </Config>
| |
The changes for WebSphere version 5 are shown in Listing 7-4.
| |
<?xml version="1.0"?> <Config> <Log RefreshInterval="10" LogLevel="Error"Name="/opt/WebSphere/AppServer/logs/native.log" /> <VirtualHostGroup Name="default_host"> <VirtualHost Name="www.mysite.com:80" /> </VirtualHostGroup> <!-- ### Start of Main Section #### --> <!-- Portal Application --> <ServerCluster Name="portalApplication Server Group " RetryInterval="15" LoadBalance="RoundRobin"> <Server Name="portalApp" LoadBalanceWeight="5" > <Transport Hostname="serverA.mydomain.com"
Port="10000" Protocol="http" /> </Server> <Server Name="portalAppCloned" LoadBalanceWeight="5"> <Transport Hostname="serverB.mydomain.com"
Port="10000" Protocol="http" /> </Server> <PrimaryServers> <Server Name="portalApp"/> </PrimaryServers> <SecondaryServers> <Server Name="portalAppCloned"/> </SecondaryServers> </ServerCluster> <UriGroup Name="portalAppEAR/portalApp_URIs"> <Uri Name="/portal/*" /> </UriGroup> <Route ServerCluster="portalApplication Server Group" UriGroup="portalAppEAR/portalApp_URIs" VirtualHostGroup="default_host" /> </Config>
| |
Considering for a moment the WebSphere version 4 example in Listing 7-3, the essential changes to this file are those line items in bold shown in Listing 7-5.
| |
<Server CloneID="uk396h0g" Name="portalApp"> <Transport Hostname="serverA.mydomain.com"Port="10000" Protocol="http" /> </Server> <Server CloneID="ao356hib" Name="portalApp"> <Transport Hostname="serverB.mydomain.com"
Port="10000" Protocol="http" /> </Server>
| |
The CloneID directive is a unique identifier that WebSphere associates with cloned application servers. The other change, the secondary Server directive, is fairly self-explanatory.
| Note | The CloneID directive is generated by WebSphere when you create application server group clones. Don't change this value from the WebSphere-defined one. |
The WebSphere version 5 example is a little more in depth. Listing 7-6 highlights the changes.
| |
<ServerCluster Name="portalApplication Server Group " RetryInterval="15" LoadBalance="RoundRobin"> <Server CloneID="uk396h0g" Name="portalApp" LoadBalanceWeight="5" > <Transport Hostname="serverA.mydomain.com" Port="10000"Protocol="http" /> </Server> <Server CloneID="zm791h0b" Name="portalAppCloned"
LoadBalanceWeight="5"> <Transport Hostname="serverB.mydomain.com"
Port="10000" Protocol="http" /> </Server> <PrimaryServers> <Server Name="portalApp"/> </PrimaryServers> <SecondaryServers> <Server Name="portalAppCloned"/> </SecondaryServers> </ServerCluster>
| |
The addition of another server requires an additional directive to indicate the existence of another servicing server. The notable change here, though, in the WebSphere version 4 structure is the introduction of the PrimaryServer , SecondaryServer , and LoadBalanceWeight directives.
The PrimaryServer and SecondaryServer directives can be used to help support failover configurations (but this isn't mandatory). Essentially , these two directives allow you to support hot-standby or disaster recovery sites. With these directives in place, the configuration in Figure 7-10 will only see server A being used. Should server A fail and not respond to requests, the servers identified by SecondaryServer will be sent requests.
Without these PrimaryServer and SecondaryServer directives, the two servers, server A and server B, will receive requests from the HTTP plug-in based on the value of the LoadBalanceWeight directive. In the example case, the setting is 5 for each server. Given this, both servers will receive equal distribution of load.
As a rule of thumb, always keep this directive the same if you're using singlesite configurations. That is, if you have all your backend WebSphere application servers located in the same server room or data center, keep the value the same and try to avoid distributing weight differently to different servers.
This value can be helpful in maintaining a good distribution of load where you may have a split-site configuration simultaneously processing requests. In this case, you may want to have the two HTTP servers configured opposite one another in terms of their LoadBalanceWeight setting. For example, if you set up a HTTP server plug-in file in Seattle, where server A is located, you set the LoadBalanceWeight value to be, for example, 2. However, server B is located in Washington; therefore, you may want to set the LoadBalanceWeight directive to, say, 5. The Washington-based HTTP server would be configured with the mirror configuration of server A, such as server A's LoadBalanceWeight being 5 and server B's LoadBalanceWeight being 2.
A common setting in both WebSphere version 4 and 5 plug-in configurations is the LoadBalance directive. This directive allows you to set up the master load-balancing configuration type for your environment. The options available are round- robin with weighting and random. WebSphere version 5 has a more sophisticated load distribution system than WebSphere version 4, which I discuss this further shortly.
By default, round-robin is the type of load distribution used if there is no LoadBalance directive implemented.
| Note | The round-robin value is overruled when you define session affinity settings. That is, in most cases, this value is only valid if you don't have any active sessions and all requests are stateless or the request is a new connection without a session. |
WebSphere 5 Weighted Load Distribution
WebSphere version 5 introduced a sophisticated load distribution model that favors session affinity. Remember that by not having session affinity (in which your subsequent requests aren't sent to the server or clone that initially set up the session), you'll incur additional load overhead while your Web containers retrieve persisted session data from the session database or from in-memory replication.
Suppose, for instance, that you have an environment with only one Web server but two backend WebSphere application servers. With the LoadBalanceWeight setting, as each request that isn't sessionized (i.e., it isn't a user request that contains an active or valid session cookie) is sent to a server, the plug-in decrements the LoadBalanceWeight ratio by 1. This occurs until the value reaches 0. After all servers have had their ratio decremented to 0, the plug-in resets all weighted ratios to their original value and starts the process again. Let's look at an example.
Say you have a plug-in file on the Web server that is configured in a way that has the following directives set as follows :
-
The LoadBalance directive is set to RoundRobin
-
For server A, LoadBalanceWeight is 5
-
For server B, LoadBalanceWeight is 2
As a user request initially comes into the Web server, the plug-in randomly picks the first server to send the request to (regardless of the RoundRobin setting). Here's the process:
-
If the plug-in selects server A for the first request, the LoadBalanceWeight value for server A is decremented by 1 to 4.
-
Another request comes in, and this request is sent to server B, which has its ratio decremented by 2 to 1.
-
The next request comes in and this request has a session cookie tagged to server A. This request is therefore sent to server A, but server A's LoadBalanceWeight value doesn't get decremented on this request.
-
The next new request comes in and is sent to server B, whose LoadBalanceWeight value is decremented by 1 to 0.
-
The next request comes in and has a valid session cookie tagged to server B. Server B handles the request and its LoadBalanceWeight value isn't decremented.
-
The next request is new and is sent to server A. The LoadBalanceWeight value for server A is decremented by 1 to 3.
-
The next request is new and is sent to server B. The LoadBalanceWeight value for server B is unchanged; it stays at 0.
-
The next request is new and is sent to server A. The LoadBalanceWeight value for server A is decremented by 1 to 2.
-
The next request comes in and has a valid session cookie tagged to server A. Server A handles the request and its LoadBalanceWeight value isn't decremented.
-
The next request is new and is sent to server B. The LoadBalanceWeight value for server B is unchanged; it stays at 0.
-
The next request is new and is sent to server A. The LoadBalanceWeight value for server A is decremented by 1 to 1.
-
The next request is new and is sent to server B. The LoadBalanceWeight value for server B is unchanged; it stays at 0.
-
The next request is new and is sent to server A. The LoadBalanceWeight value for server A is decremented by 1 to 0.
-
The next request arrives and triggers all values to be reset back to their original settings. The request is deemed new and is sent to server B.
-
And on the process goes.
As you can see, this method of weighting your requests can provide a powerful mechanism for distributing your load. As you add in additional HTTP servers, this distributing mechanism becomes even more powerful.
An important point is that WebSphere 5.0.1 was released with changes to the operation of this weighting. Effectively, the change is that valid session cookie-based requests also decrement the value, but, as the value passes 0 and goes negative, this doesn't trigger a reset or any other state. Each time a request is sent to a server that has a negative value, the server will check to see if the other server had reached 0. If so, then the plug-in checks to see if by adding the original value of LoadBalanceWeight to the negative number it will increase beyond 0. If it does, the plug-in performs the operation and increments the LoadBalanceWeight of the once negatively valued server to the negative_value + original starting value of LoadBalanceWeight .
For example, if server A has its value at -3 and server B is at 0, the plug-in will attempt to take server A's value and add into the initial LoadBalanceWeight , which is 5. Because this takes the value back over 0, the process continues until both servers are at 0 (or the value of one of the servers is at negative something, and the negative_value + original value check is performed again).
If the value of server A is in fact -7, for example, then adding the initial value of a LoadBalanceWeight of 5 won't increase the value above 0. In this case, both servers will have their result of current_value + initial_value multiplied by another HTTP plug-in directive, maxWeight . By default, this is set to 2, so both servers will be reset to the following:
-
Server A: (-7 + 5 — 2) = 3
-
Server B: (0 + 2 — 2) = 4
Let's take a look at another key WebSphere version 5 HTTP plug-in directive that you can use to support external software or hardware-based load-balancing gear.
WebSphere 5 and External Load Balancers
On occasions, there may be a valid reason why you may not want to use the load-balancing capabilities supported within the HTTP plug-in. There's another plug-in directive, ClusterAddress , that allows you to force non-session affinity requests to an external load balancer.
The ClusterAddress directive is located at the top of the ServerCluster group directive as follows:
<ServerCluster Name="portalApplication Server Group" RetryInterval="15" LoadBalance="RoundRobin"> <ClusterAddress Name="myCiscoLoadBalancer"> <Transport Hostname="myLoadBalancer.myDomain.com"Port="80" Protocol="http" /> </ClusterAddress> <Server Name="portalApp" LoadBalanceWeight="5"> <Transport Hostname="serverA.mydomain.com" Port="10000"
Protocol="http" /> </Server> <Server Name="portalAppCloned" LoadBalanceWeight="5"> <Transport Hostname="serverB.mydomain.com" Port="10000"
Protocol="http" /> </Server> <PrimaryServers> <Server Name="portalApp"/> </PrimaryServers> <SecondaryServers> <Server Name="portalAppCloned"/> </SecondaryServers> </ServerCluster>
This directive works as follows: For all new requests that don't have an active session cookie, the plug-in will route the request to the ClusterAddress device ” myLoadBalancer.mydomain.com in this example ”for the external load balancer to handle which server the request should be sent to. Subsequent requests or requests that do have active session cookies will be sent to their affinity server.
Why use this directive? Consider for a moment all the discussion about load balancing and availability around the HTTP plug-in to date. In all cases, you've only been able to route requests to backend servers based on a rule (e.g., a defined route group) or an already established link via a session cookie.
This form of "soft" request distribution can fall down, however, in the case in which the next selected server, based on LoadBalanceWeight , is heavily loaded. This may be due to one large request that's consuming a lot of system resources or there could be a DoS attack or something else that is slowing the environment down (e.g., a bad network). Although it's possible to tweak the RetryInterval to lower values (under 5 seconds), which may provide a "quasi-server load litmus test," this doesn't provide an accurate test of server load.
Many of the high-end load balancers, and even many of the feature-rich software load balancers, allow you to configure them to do one of two things. First, you can configure them to probe the remote WebSphere application servers with a basic HTTP GET call and time the response, distributing the load accordingly . Second, you can install the load balancer's software on your WebSphere application server host and configure it so that the load balancer will continuously interrogate to determine the true load on the server. The load balancer will then route the initial request in a session to the least truly loaded server.
WebSphere 5 ConnectTimeout Setting
In Chapter 6, you explored various tuning options and settings associated with various operating systems' TCP/IP stack configurations. One key point that I discussed related to decreasing the TCP/IP time-out values within the operating system of your choice. I also discussed the risks associated with this, especially because your server that is hosting your WebSphere application server instance may be supporting other TCP/IP-based services. In this case, the setting changes would affect all TCP/IP-based services on the physical node.
To get around this, WebSphere version 5 supports a setting called ConnectTimeout that is accessible and tunable within the HTTP plug-in file used by your chosen HTTP server.
| Note | This setting has no bearing on your environment if you're using a thick UI-based model in the place of a Web-based UI. |
Within the Server directive of the HTTP plug-in configuration file, you can declare the ConnectTimeout setting and value as shown in Listing 7-7.
| |
<Server CloneID="uk396h0g" Name="portalApp" LoadBalanceWeight="5" ConnectTimeout=10> <Transport Hostname="serverA.mydomain.com" Port="10000" Protocol="http" /> </Server>
| |
As you can see from Listing 7-7, the ConnectTimeout value is set to 10, which refers to 10 seconds. This setting sets the plug-in manager to use a nonblocking TCP connect sequence with a timeout of 10 seconds. There isn't a rule of thumb for this setting. The best way to determine its value, if required at all, is to perform testing. Of course, the setting should be lower than that of the TCP/IP time-out value to be of any use.
If the server defined in the Server directive (to which the ConnectTimeout directive is associated) doesn't respond with a TCP connect within the defined value period (e.g., 10 seconds), the plug-in will mark that server as down for the retry period. The setting needs to be set based on your network bandwidth (i.e., speed, capacity, and latency) and the load of the remote server. If you're happy with 15 seconds of lag between client transactions because of a heavily loaded WebSphere application server, this ConnectTimeout directive should be set accordingly.
Finally, this setting can be very useful if you have frontend HTTP servers distributing user requests to backend WebSphere application servers that are located both locally and via WAN (e.g., such as servers located in another city for disaster recovery purposes). For remote servers, you may want to increase the value of this time-out directive, whereas as for local servers, you may want the setting to be lower (e.g., 10 to 20 seconds). For this reason, it's possible to set a different ConnectTimeout value on each server.
Session Failover and Persistence
Session persistence is an integral part of most Web-based applications. Because the primary protocol that Web transactions are conducted over, HTTP, is essentially stateless, there is no default mechanism for storing state. This is different from thick client environments, which may have a Java GUI operating on end user desktops. In this case, the application, or Java GUI that operates on the desktop, stores state in its memory space, like the majority of other client/server-based applications.
The way to get around the stateless environment situation is to employ a mechanism that binds itself to the user's session. There are several ways to implement this "stickiness," but the crux of the solution works by creating a token or identifier that is maintained by the Web client through each URL transaction and having that identifier associate itself with an object on the backend server.
In a Web-based Java world, this works by having a value, known as the session ID, tagged for each active end-user session. That session ID is then maintained by the Web container operating the WebSphere application server. The Web container builds up a session object that incorporates all the session attributes required for the user to use the Web-based application.
You'll need to take into account a number of performance and operational considerations with implementing failover and high availability when session objects are used. Here are a few of them:
-
The J2EE Servlet specification requires that all requests for any one particular session is routed back to the originating Web container.
-
Session objects can become large. Failing them over and maintaining them in memory can present a performance issue.
-
If session persistence is used, consideration needs to be given to the database impact.
Within WebSphere, there are three forms of session affinity and persistence:
-
No sessions ”no affinity and no persistence required
-
Session affinity with no persistence
-
Session affinity with session persistence
The important point to remember is that once a session has been created, all subsequent requests made by that particular session will go back to the originating WebSphere application server (Web container). This is important to remember when modeling and designing your topological architecture. Consider it from an application perspective.
Let's say the application that you're serving on a WebSphere platform is some form of online payment system. You may have three pages to get through in order to make your payment. That is, page 1 is where you enter in your invoice or bill number, page 2 would be your personal details such as delivery address and so forth, and page 3 may be where you enter in your credit card details. Each page click will most likely store the preceding built-up information into a session object. Going from page 1 to page 2 will store the tax and invoice details into the user session, going from page 2 to page 3 will add in the personal details of the user, and so on.
Consider what will happen if between page 2 and page 3 the application server crashed. If you had no session persistence, your user would have to start all over again. This is only an annoyance, but it's something that users don't like (a studied, proven fact). If your application is more critical than for producing payments, then the consequences of a lost session could be higher.
Session persistence is therefore the key to surviving Web container failovers within WebSphere. The version of WebSphere you're running will determine your options for session persistence. With WebSphere version 4, the only option available is a database as data store. For version 5, you have the option of either using a database or using the WebSphere memory-to-memory replication or Dynamic Replication Service (DRS).
Before moving on, let's look at how a session failover would take place, as shown in Figure 7-11.

Figure 7-11: An example of session management with WebSphere
Figure 7-11 shows a user, user 1, logging into a WebSphere-based application. The heavier thick lines show the path user 1's requests would take after establishing a session with server A. You'll also note the session lists for both server A and server B, which depict what sessions are active on each server, on the right side of the image.
If server A failed, for whatever reason, the way in which persistent sessions work is that the subsequent request will be redirected by the plug-in to the next available server in the ServerGroup or ServerCluster list.
| Note | It's at this point that tuning the RetryInterval is important, because you don't want clients timing out in their browsers while the plug-in continues to attempt to send requests off to dead clones or application servers. I discuss this setting in more detail in the next few sections. |
Figure 7-12 shows how the plug-in redirects all user requests away from the dead server to one of the remaining active servers, which in turn retrieves the session objects from the database.
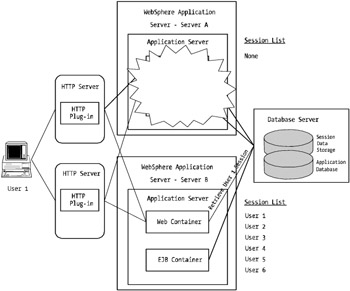
Figure 7-12: An example of session management with WebSphere in a failover scenario
As you can see, the session failover is transparent to the user with the caveat that there may be a slight delay (a couple of seconds) while the session is retrieved.
It goes without saying that persisting user sessions to a database introduces extra load onto the database tier . Be sure that you account for this type of load, as well as peak load periods when failover events are taking place. It's worthwhile assuming that during a peak period such as a failover situation, your load on specific components of your environment may increase threefold during initial transaction cutover.
You'll need to factor in a few other considerations into your design when you implement sessions or, more specifically , persistent sessions. That is, how do you ensure that your developers or the applications you're deploying into WebSphere support your chosen method of gluing sessions to requests?
WebSphere Session Identifiers
To make your sessions sticky and have them routed to the correct or desired application server, you need to configure your WebSphere Session Manager to support a specific session identifier type. WebSphere versions 4 and 5 support three types of session identifiers:
-
Cookies
-
URL rewriting
-
SSL ID
WebSphere supports a new session management scope that is available as of WebSphere version 5. Unlike in WebSphere version 4, in which session identifiers were configured for the entire scope of the active Web container, it's possible with WebSphere version 5 to configure session management at a far more granular level. For example, it's possible to now configure session management at the following three levels:
-
WebSphere application server level: Default configuration and settings are applied to all WAR/Web modules within the WebSphere application server.
-
Application level: This setting allows configuration to be set for all WAR/Web modules in the deployed application.
-
Web module level: This setting specifically sets session management properties at the WAR/Web module level.
Keeping all of this in mind, let's look at each of the session identifier types in more detail and examine their pros and cons.
Cookies
Standard cookies are the most popular way of managing sessions within J2EE applications or, more specifically, WebSphere. Cookies provide an easy method of hooking applications into sessions via the use of a servlet standard session construct called JSESSIONID .
The downside to cookies is that the user must support them in his or her browser ”more specifically, the user must allow cookies. The upside to cookies is that they work well with WLM and session replication during failover events. They also don't require specific coding in your deployed applications to be supported. Unlike URL rewriting, which requires modification to application code to use it, cookies use standard get and set methods to obtain and store information into the session object.
URL Rewriting
URL rewriting is a form of managing sessions via placing a cookie ID blatantly in the URL string.
My personal preference is to avoid this option wherever possible and use cookies as the first alternative. Having the cookie ID in the URL opens the door to problems through URL correction and exposes some of the workings of your applications to the world.
URL rewriting is, however, the best choice when/if your end users don't use or support cookies. By placing the cookie ID in the URL, you can get around security issues and blockages imposed by personal firewalls and browsers.
The biggest downside to URL rewriting is the need for your developers to modify their application code to support the URL rewriting. URL rewriting also can't be used in static sites. You'll always need to push the cookie ID along from page to page and link to link to preserve the hook back into the session. As soon as one page is moved that doesn't have a URL rewrite in the linkage, the cookie ID is lost.
| Note | URL rewriting is a sound backup solution to standard cookies. If you configure WebSphere to use cookies and URL rewriting, WebSphere will use cookies as first preference and, if it isn't supported by the remote browser, it will revert back to URL rewriting for that session. |
SSL ID
SSL ID session linkage is the least used of all session identifier types. It's provided as an absolute last-chance option for application environments to support sessions. Because of this, it does have many limitations, some of which may be acceptable to you if this is your last chance to use sessions.
Essentially, SSL ID session linkage works by requiring that you configure your Web server as an HTTPS- or SSL-based server. WebSphere in turn can access the SSL session ID (different from the WebSphere user session ID) and use that SSL session ID to generate a user session ID.
The downside to SSL ID-based configurations is that you must employ some form of stick load-balancer in front of the Web servers to ensure that subsequent users requests go back to the originating Web server (not necessarily WebSphere). Because the SSL ID is generated via the SSL engine within the Web server, as soon as the user accesses the backend WebSphere application server via a different Web server, the SSL ID will change and the user session will be lost.
Not all Web servers support SSL ID-based tracking. Currently, WebSphere only supports iPlanet Web server/SunOne Web server and IBM HTTPD server. As previously mentioned, to support the SSL ID sticky routing requirement an intelligent hardware or software load-balancing switch is also needed, such as products from Cisco and Alteon (now owned by NortelNetworks), and the IBM WebSphere Edge server.
If you also want your user sessions to participate in workload management, you'll need to employ either URL rewriting or cookies to attach the CloneID directive to the session identifier. Without this, the requests can't find their way back to the appropriate application server.
Web Container Failover
The Web container failover is a fairly simply affair with the control and responsibility for container failover being that of the HTTP plug-in. Via specific IP network responses (or lack of response), the HTTP plug-in will determine that a specific Web container is dead.
Table 7-1 outlines some likely reasons why a Web container would fail in a typical environment.
| Reason | Failure Type | HTTP Plug-in Response Time to Problem |
|---|---|---|
| Physical server unavailable (i.e., it's being shut down) | Physical | Lengthy |
| Environment overload ”incorrect queue settings, DoS attack | Software | Variable; can be lengthy |
| Application JVM crash | Software | Fast |
| Network infrastructure problem ”broken NIC or cable | Physical | Lengthy |
| Manual intervention ”stopping application for deployment or upgrade | Software | Fast |
These causes may seem fairly obvious and are typically the reasons why most Java components fail or cease to work. They are all, however, factors that I've touched on or will touch on during this book; therefore, they shouldn't be a problem or cause (a large) impact to your WebSphere platform.
Removing single points of failure such as adding in additional cluster members (WebSphere application servers) and using redundant hardware components is the best advice for big-picture platform availability. However, to ensure your Web container is able to sustain outages and failover user transactions to other nodes, you must use ServerGroup s (for WebSphere version 4) and ServerCluster s (for WebSphere version 5).
You explored the definition of these two concepts back in Chapter 4, and you've covered them again at length in this chapter with respect to HTTP plugins and WLM. Essentially, the result of a container failover is handled by the HTTP plug-in configuration. It is this small but vital piece of your WebSphere platform that handles the interface to your Web container's WLM functionality.
If a Web container fails, the Web container doesn't "failover" to the remaining WebSphere application servers (all operating their own clustered Web containers), the HTTP plug-in determines that a server has died and there's a need to divert all subsequent requests to another server.
Failover Process
In the event the HTTP plug-in identifies that a Web container has stopped listening, the HTTP plug-in will perform one of many functions. Referring back to Table 7-1, the third column suggests approximate times for how long it will take a HTTP plug-in to acknowledge that a Web container is unavailable, mark that server as dead, and move on to the next available server. This is important because all the backend application servers in the world won't help you out if you're banking up connections waiting for response times on your user requests.
The "lengthy" time interval items, being "Physical server unavailable" and "Network infrastructure problem," are probably the worst offenders to user transaction delays. The reason for this is that the plug-in will continue to try to connect to the host system until the local host system's TCP connection time-out threshold has been reached. This is different from the "Application JVM crash" scenario. In this case, the operating system of the WebSphere application server, while functional, doesn't have an active listening port on the specific port that the HTTP plug-in is attempting to connect to. In this scenario, the operating system responds back immediately with a connection refused message (no different from a connection refused message if you try to telnet into a server in which the telnet daemon has been shut down or deactivated).
As you saw in Chapter 6, you need to undertake changing these types of settings with great care. If you're running WebSphere version 5, there is a HTTP plug-in feature to get around this problem, which I discuss shortly. If you're running WebSphere version 4, you may want to consider reducing the TCP connection time-out setting on your operating system if you have stand-alone Web servers.
| Caution | Unless you know exactly what you're doing, don't change the TCP connection time-out settings on your WebSphere application server if you're running a combined HTTP server/WebSphere application server on the same physical node. Also note that changing the connection setting on some operating systems may affect both inbound and outbound connections. |
There are several settings configured in the WebSphere version 5 HTTP plugin on the Web servers that can help you eliminate delays between when servers are made unavailable. Unfortunately, these options are only available in WebSphere version 5. The settings that you can change to help eliminate delays in recognizing dead or unresponsive clones are as follows:
-
RetryInterval
-
ConnectTime
In the next sections you'll examine these settings in more detail.
WebSphere Version 5 RetryInterval Setting
The RetryInterval setting is a HTTP plug-in directive that allows you to specify the time between when a marked clone or application server is down and when the HTTP plug-in will try again to connect to it. Having this setting too low will result in a "flip-flop" situation in which servers may not respond fast enough after the interval has expired , and the HTTP plug-in will simply continue to mark it bad. There maybe in-flight transactions currently active on the specific Web container or application server that are marked as bad, yet it takes just one failure to cause them to be marked as bad. If this setting is set too high, cascade failures in your environment in which one of two servers is down and the other server is faulting because it's overloaded by full peak load of all transactions will occur.
Consider a situation in which you have two clones on two servers (four clones in total). Server A crashes and requires a reboot. In this scenario (see Table 7-1), the plug-in keeps sending requests to the downed server's clones because it (the plug-in) is still waiting for a response back from the downed server. Instead of there being a response of any kind, there is nothing, so the plug-in assumes that the server is simply bogged down.
If this setting then is set to a value that's too low, say 120 seconds, and it takes 180 seconds to reboot a server, you'll be waiting for up to 4 minutes for the clones on server A to be available again. All the while, end users are experiencing what they see as poor performance and time-outs unless they've persisted session affinity to the clones on server B. New requests will either connect randomly or round-robin between the servers, in which case up to 50 percent of all new requests will suffer time-outs and delays.
You should also be conscious of the fact that if server B becomes overloaded with too many connections, the plug-in will mark all of its clones as bad also. If this happens, it could be several minutes before any user transactions take place. Therefore, as a guide, you should set the RetryInterval value quite high, in the vicinity of 300 to 900 seconds, depending on your environment configuration.
The reason I recommend setting the value high is so that you can help to eliminate lengthy delays for customers as much as possible. If you set this value to 600 seconds, and your TCP connect time-out value is 45 seconds, the most your users will have to wait is 45 seconds until the plug-in realizes that the remote clone is down and marks it bad for 10 minutes. In most cases, a downed server or application server will be rebooted or brought back up within 10 to 15 minutes, so long as there are no critical failures.
One alternative here is to reduce time-out waiting periods is to decrease the TCP time-out value which, as I mentioned, is only recommended if you know what you're doing and this occurs preferably only on a dedicated HTTP server. To set this value, insert the directive RetryInterval=<value> in the <ServerCluster> line (e.g., <ServerCluster name="MyCluster" RetryInterval=900> ). The other alternative is to look at the ConnectTime value, as discussed in the next section.
WebSphere Version 5 ConnectTime Setting
The ConnectTime setting is another HTTP plug-in directive that helps to alleviate the problems presented in the previous section with relation to connection time-outs for downed servers.
Because the plug-in operates at an application layer rather at the IP layer, it's not able to directly detect a server's operational network status. As such, scenarios like those discussed in the previous section can occur.
The ConnectTime directive allows you to override the HTTP plug-in server's TCP time-out values by clocking the time it takes to actually perform a connection from the plug-in to the desired clone or application server. This value shouldn't be set to a level so low that it's disadvantaged by moderately loaded systems, and it shouldn't be set so high that it becomes ineffective . My belief is that if a WebSphere application server or clone can't respond to a connect within 15 seconds, there's something wrong other than load (and you should dust off your performance management models!).
The setting can be tied in with the other WebSphere version 5 settings you've looked at such as RetryInterval and LoadBalanceWeight , as well as using round-robin load-balancing. As an example, consider an environment in which if you had two servers operating four WebSphere clones in total (two clones per physical node), you could set the plug-in file up as follows, in this order:
| First clone | Clone A, server A, ConnectTime=10, LoadBalanceWeight=5 |
| Second clone | Clone B, server B, ConnectTime=10, LoadBalanceWeight=6 |
| Third clone | Clone B, server A, ConnectTime=12, LoadBalanceWeight=7 |
| Fourth clone | Clone A, server B, ConnectTime=15, LoadBalanceWeight=8 |
Configuring your environment in this fashion means that you're distributing your load "odd-even" between your servers to eliminate single server overloading and, as a safety blanket , you slightly increase the connection time-out in the plug-in as you go along to cater for potential extra delays should you start to have an unstable environment.
This is a very conservative approach. If you're comfortable with your stress and volume testing, and the overall sizing of your environment, the plug-in file would be better tuned as follows:
| First clone | Clone A, server A, ConnectTime=10, LoadBalanceWeight=5 |
| Second clone | Clone B, server B, ConnectTime=10, LoadBalanceWeight=5 |
| Third clone | Clone B, server A, ConnectTime=10, LoadBalanceWeight=5 |
| Fourth clone | Clone A, server B, ConnectTime=10, LoadBalanceWeight=5 |
Keeping all servers equal helps squash any slight load distribution differential that may creep in.
In summary, Web container failover is simply a configuration item in your WebSphere administration console. The control and management of the transitions affected by the failover are managed by the HTTP plug-in. As you've seen, there are a vast number of optional strategies that you can employ to help with Web container failover and availability.
EAN: 2147483647
Pages: 111