SBS ConfigurationTo-Do List Part 1


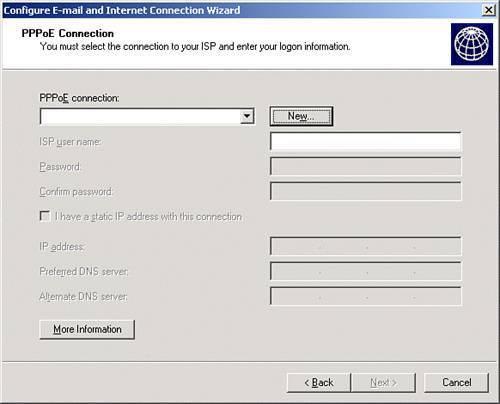
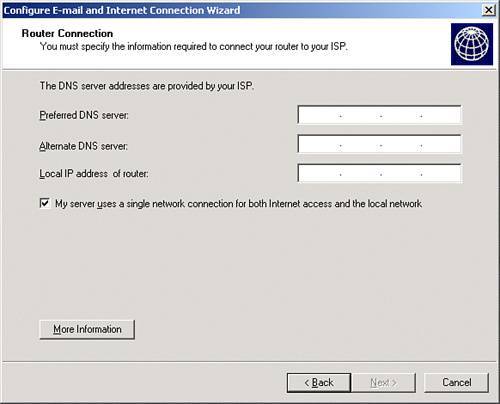
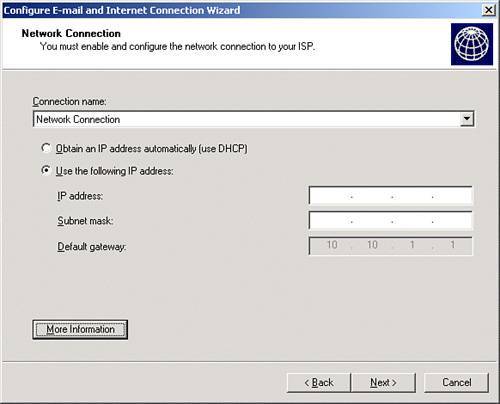
After the server restarts, it automatically logs in with the Administrator's account (if you provided the Administrator's password earlier during setup) and launches the To-Do list. To finish the configuration of the server, you need to perform the appropriate tasks in the To-Do list.

The To-Do list, shown in Figure 4.8, is broken down into two sections: Network Tasks and Management Tasks. This section of the chapter covers the features of the Management Tasks.

Figure 4.8. The To-Do List helps you track your configuration process.
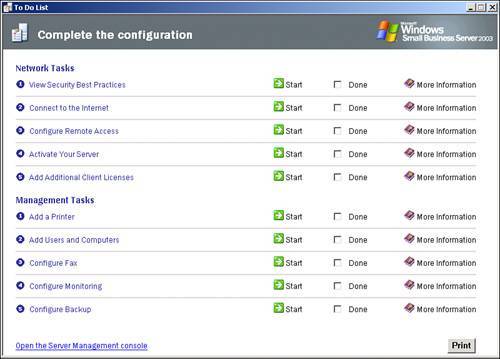

Connect to the Internet

Before performing any other tasks on the server, you need to run the Connect to the Internet Wizard, otherwise known as the Configure E-mail and Internet Connection Wizard (CEICW). Click on the Start button on the Connect to the Internet line of the To-Do list to start the wizard.

Note

When SBS is installed on a server with two network cards, the NIC that connects to the Internet (referred to as the external NIC as opposed to the internal NIC) is disabled at the end of the setup process. The CEICW enables the external NIC as the wizard progresses.


When the CEICW launches, the first page of the wizard introduces the tasks that the wizard will perform. Clicking Next starts the wizard, which is divided into three main sections: Network Configuration, Firewall Configuration, and E-Mail configuration. Each section of the wizard is described in more detail in the following sections.

Note

In the list of tasks is a link that connects to the Required Information for Connecting to the Internet form. If you click on this link, you see a form that contains all the information you need to complete the wizard and configure the network correctly. However, the window is small, and even though it provides instructions on how to print the form, at this stage in the server setup no printers are defined or connected. The next few subsections of this chapter provide a table of the information needed to complete each section of the wizard.


Network Configuration

The first page of the wizard is the Connection Type page. Here is where you must select whether your Internet connection is dial-up or broadband. If you will be using a modem for the Internet connection, the modem must be connected to the server and installed as a device before launching the wizard. Select either Broadband or Dial-Up and click Next to move on to the next page in the wizard. Tables 4.2 and 4.3 list the information you need to complete both the dial-up and broadband connection settings.

Table 4.2. Dial-Up Connection Information

Dial-Up Connection Information

Description

Phone number

The number to dial in to the ISP

ISP username

The username needed to authenticate with the ISP

Password

The password needed to authenticate with the ISP

Static IP address (optional)

Needed only if the ISP has designated a static IP address for the connection

Preferred DNS server

The public DNS server provided by the ISP

Alternate DNS server (optional)

Another DNS server address provided by the ISP, if needed


Table 4.3. Broadband Connection Information

Broadband Connection Information

Description

Static IP address (optional)

Provided by the ISP if a static address has been designated for the connection

Subnet mask (optional)

Provided by the ISP if a static address has been designated for the connection

Default gateway (optional)

Provided by the ISP if a static address has been designated for the connection

Preferred DNS server

The public DNS server provided by the ISP

Alternate DNS server (optional)

Another DNS server address provided by the ISP, if needed

Service name (optional)

Needed only for a PPPoE connection

ISP username

Needed only for a PPPoE connection

Password

Needed only for a PPPoE connection


Note

Hopefully most server installs taking place these days use a high-speed broadband connection, so the remainder of steps in this chapter assumes a broadband configuration. Where applicable, information pertaining to dial-up configurations is included.


Follow these steps to complete the network configuration portion of the wizard:

1.

In the Broadband Connection page of the wizard, select the appropriate connection typelocal router with an IP address, connection that requires a username and password (PPPoE), or direct broadband connectionand click Next.

If the connection that requires a username and password (PPPoE) option is selected, complete the page shown in Figure 4.9 and click Next.

Figure 4.9. Information about a PPPoE connection can be entered in the PPPoE Connection page.


Best Practice: Dealing with PPPOE

In those installations where broadband network access is provided through a PPPoE configuration, the SBS server should not be set to handle the PPPoE login configuration. Instead, get a third-party hardware router/firewall to sit between the SBS server and the Internet and let that device maintain the PPPoE login configuration.


If the local router with an IP address option is selected, complete the page shown in Figure 4.10 and click Next.

Figure 4.10. Enter the ISP's DNS servers and the router's local address in the Router Connection window.


2.

In the Network Connection page, select the DHCP or Static IP option and click Next. If the Static IP option is selected, complete the information shown in Figure 4.11 before clicking Next. If the setup process detects a Universal Plug-n-Play (UPnP) router, it asks whether you want the wizard to configure the router. Click No if this dialog box appears.

Figure 4.11. The address for the Network Connection, also known as the External NIC, is configured in the Network Connection page.


3.

Review the network configuration information and click Next.

Note

This chapter does not include information about ISA 2004 configuration on a new install. The installation and configuration of ISA 2004 is included in Chapter 23.


Firewall Configuration

The firewall section of the CEICW configures the Routing and Remote Access service as well as IIS to determine which resources can be accessed by computers coming in from the Internet. Follow these steps to complete this section of the wizard:

1.

Select Enable Firewall and click Next.

2.

Select the services that can be access from the Internet and click Next. If you select VPN from the list, you get a note that you must run the Remote Access Wizard after the CEICW completes to configure the server for inbound VPN connections.

3.

Select the web services you want available to the Internet and click Next.

4.

Select Create a new Web server certificate and then enter the public name for your server in the Web Server Name field. Then click Next.

Exchange Configuration

The last portion of the CEICW configures the Exchange server to act as either an SMTP server or as a POP3 collector. It also determines whether email is sent out directly to other servers (DNS) or to a server at your ISP (smarthost). Review the information listed in Table 4.4 and then follow the steps to complete the CEICW.

Table 4.4. Exchange Information

Email Options

Information Needed

Exchange uses DNS to deliver email

None

Exchange forwards all email to a smarthost

Name of the smarthost mail server

Exchange receives email directly from the Internet

None

Exchange connects to the ISP's mail server to retrieve messages (not the POP3 connector)

ISP's mail server name, type of connection (ETRN, TURN after authentication)

Internet Mail Domain

The address used for the mail serverthat is, smallbizco.net.


1.

Select Enable Internet email and click Next.

2.

Select the appropriate email routing method and click Next.

If you plan to route mail directly to other servers, select Use DNS to Route Email.

If you plan to use a smarthost, select Forward All E-mail to E-mail Server at Your ISP and then enter the name of the mail server in the E-mail Server field.

3.

Select Use Exchange in the E-mail Retrieval Method page and click Next. Even if you plan to use the POP3 connector to retrieve mail, do not select the Use the Microsoft Connector for POP3 Mailboxes check box at this time. Wait until all your users are defined and Internet access is working; then re-run the CEICW to configure the POP3 connector.

4.

Enter your email domain name (do not include the "@") and click Next.

5.

In the Remove E-mail Attachments page, leave the default settings to remove all attachments listed on the page. If you want to save attachments for later review, enable the Save Removed E-mail Attachments in a Folder check box and then browse to a folder on the server hard drive to store those attachments. Click Next.

Caution

If you save the removed attachments to a folder, make sure to exclude that folder from real-time scanning by your antivirus software. If the antivirus software tries to block the file from being saved by Exchange, the Exchange mail delivery process can break and cause other Exchange problems. The files in the folder can be scanned for viruses during a scheduled scan but must not be allowed to be scanned in real-time.


Finishing the Wizard

When the wizard has collected all the information necessary, you are presented with the summary page of the actions the wizard will take. After you have reviewed the summary and believe the information to be correct, click Finish to let the wizard make the necessary changes.

Note

Information about the settings used in the CEICW and the actions taken by the wizard are summarized in C:\Program Files\Microsoft Windows Small Business Server\Networking\Icw\Icwdetails.htm.


After the wizard completes the changes, you are prompted to enable password policies on the network. At this point, click No. You then see an alert advising you to check for the latest updates for the server now that it is connected to the Internet. When you click OK to close this alert, setup launches Internet Explorer and takes you to the Small Business Server 2003 downloads page. This behavior is different from the original release of SBS, which took you directly to the Windows Update site.

Additionally, you can check the Microsoft Update site (http://update.microsoft.com/microsoftupdate) to get the latest security updates installed before continuing with the server configuration.

Configure Remote Access

If you will be allowing incoming VPN connections to the network, you need to run the Configure Remote Access Wizard to establish the correct settings in Routing and Remote Access. Click on the Start button on line 3 of the To-Do list to start the wizard. Then follow these steps to complete the wizard:

Best Practice: Be Cautious When Setting Up VPN Access Into The SBS Network

THE SBS community is divided on the issue of VPN access. One camp takes the stand that VPN should never be opened because of the security risks. The other proclaims that with proper configuration, VPN can be more secure than other remote access methods. To make matters more interesting, both groups are correct.

Before opening up a VPN connection into your SBS network, you need to weigh the risks versus the benefits to determine whether VPN is really the best solution for you. A poorly planned VPN implementation can open your network to a number of virus, Trojan, and worm attacks. Using the Remote Web Workplace features of SBS can limit these risks, but even that solution has its own limitations and security holes. Review the information on VPN Quarantine in Chapter 24, "Internet Security and Acceleration Server 2004 Advanced Administration," for best practices on using ISA 2004 to help secure your VPN connections.


1.

In the Welcome page, click Next.

2.

In the Remote Access Method page, click Next.

3.

In the VPN Server Name page, confirm that the value entered in the Server Name field is correct; then click Next.

4.

Click Finish to close the wizard.

Activate the Server

Even though you have 30 days to activate the server, go ahead and run the Activate Your Server Wizard from the To-Do list at this point. After you have launched the wizard, follow these instructions to complete server activation:

1.

Select the Yes, Let's Activate Windows over the Internet Now radio button and click Next.

2.

If you want to register with Microsoft, click the Yes radio button. Otherwise, click No and then click Next.

3.

After the activation process has completed, click OK to close the wizard.

Add Client Licenses

SBS 2003 comes with five Client Access Licenses (CALs) by default. To allow more users or devices to authenticate to the server, you need to add more CALs. If you have already purchased additional client license packs, you can launch the Add Additional Licenses Wizard from the To-Do list and follow these steps to add the licenses:

1.

In the Welcome page, click Next.

2.

In the License Agreement page, click the I Agree radio button; then click Next.

3.

In the Contact Method page, click the Internet radio button; then click Next.

4.

Enter the 25-character license code and click Add.

5.

Verify that the license code has the correct number of licenses; then click Next.

6.

After the licenses are activated, click Finish to close the wizard.


Microsoft Small Business Server 2003 Unleashed
ISBN: 0672328054
EAN: 2147483647
Year: 2005
Pages: 253

flylib.com © 2008-2017.
If you may any questions please contact us: flylib@qtcs.net