Configuration
COM components used the registry to configure components. Configuration of .NET applications is done by using configuration files. With registry configurations, an xcopy deployment is not possible. The configuration files use XML syntax to specify startup and runtime settings for applications.
This section explores the following:
-
What you can configure using the XML base configuration files
-
How you can redirect a strong named referenced assembly to a different version
-
How you can specify the directory of assemblies to find private assemblies in subdirectories and shared assemblies in common directories or on a server
Configuration Categories
The configuration can be grouped into these categories:
-
Startup settings enable you to specify the version of the required runtime. It’s possible that different versions of the runtime could be installed on the same system. The version of the runtime can be specified with the <startup> element.
-
Runtime settings enable you to specify how garbage collection is performed by the runtime, and how the binding to assemblies works. You can also specify the version policy and the code base with these settings. You take a more detailed look into the runtime settings later in this chapter.
-
Remoting settings are used to configure applications using .NET Remoting. You deal with these configurations in Chapter 37, “.NET Remoting.”
-
WCF settings are used to configure applications using WCF. You deal with these configurations in Chapter 40, “Windows Communication Foundation.”
-
Security settings are introduced in Chapter 19, “.NET Security,” and configuration for cryptog-raphy and permissions is done there.
These settings can be provided in three types of configuration files:
-
Application configuration files include specific settings for an application, such as binding information to assemblies, configuration for remote objects, and so on. Such a configuration file is placed into the same directory as the executable; it has the same name as the executable with a .config extension appended. ASP.NET configuration files are named web.config.
-
Machine configuration files are used for systemwide configurations. You can also specify assembly binding and remoting configurations here. During a binding process, the machine configuration file is consulted before the application configuration file. The application configuration can override settings from the machine configuration. The application configuration file should be the preferred place for application-specific settings so that the machine configuration file stays smaller and more manageable. A machine configuration file is located in %runtime_install_path%\config\Machine.config.
-
Publisher policy files can be used by a component creator to specify that a shared assembly is compatible with older versions. If a new assembly version just fixes a bug of a shared component, it is not necessary to put application configuration files in every application directory that uses this component; the publisher can mark it as compatible by adding a publisher policy file instead. In case the component doesn’t work with all applications, it is possible to override the publisher policy setting in an application configuration file. In contrast to the other configuration files, publisher policy files are stored in the global assembly cache.
How are these configuration files used? How a client finds an assembly (also called binding) depends on whether the assembly is private or shared. Private assemblies must be in the directory of the application or in a subdirectory thereof. A process called probing is used to find such an assembly. If the assembly doesn’t have a strong name, the version number is not used with probing.
Shared assemblies can be installed in the global assembly cache or placed in a directory, on a network share, or on a Web site. You specify such a directory with the configuration of the codeBase shortly. The public key, version, and culture are all important aspects when binding to a shared assembly. The reference of the required assembly is recorded in the manifest of the client assembly, including the name, the version, and the public key token. All configuration files are checked to apply the correct version policy. The global assembly cache and code bases specified in the configuration files are checked, followed by the application directories, and probing rules are then applied.
Versioning
For private assemblies, versioning is not important because the referenced assemblies are copied with the client. The client uses the assembly it has in its private directories.
This is, however, different for shared assemblies. This section looks at the traditional problems that can occur with sharing. With shared components, more than one client application can use the same component. The new version can break existing clients when updating a shared component with a newer version. You can’t stop shipping new versions because new features are requested and introduced with new versions of existing components. You can try to program carefully to be backward compatible, but that’s not always possible.
A solution to this dilemma could be an architecture that allows installation of different versions of shared components, with clients using the version that they referenced during the build process. This solves a lot of problems but not all of them. What happens if you detect a bug in a component that’s referenced from the client? You would like to update this component and make sure that the client uses the new version instead of the version that was referenced during the build process.
Therefore, depending on the type in the fix of the new version, you sometimes want to use a newer version, and you also want to use the older referenced version as well. The .NET architecture enables both scenarios.
In .NET, the original referenced assembly is used by default. You can redirect the reference to a different version using configuration files. Versioning plays a key role in the binding architecture - how the client gets the right assembly where the components live.
Version Numbers
Assemblies have a four-part version number, for example, 1.1.400.3300. The parts are <Major>.<Minor>.<Build>.<Revision>.
How these numbers are used depends on your application configuration.
| Important | A good policy would be to change the major or minor number on changes incompatible with the previous version, but just the build or revision number with compatible changes. This way, it can be assumed that redirecting an assembly to a new version where just the build and revision changed is safe. |
With Visual Studio 2005, you can define the version number of the assembly with the assembly information in the project settings. The project settings write the assembly attribute [AssemblyVersion] to the file AssemblyInfo.cs:
[assembly: AssemblyVersion("1.0.0.0")] Instead of defining all four version numbers you can also place an asterisk in the third or fourth place:
[assembly: AssemblyVersion("1.0.*")] With this setting, the first two numbers specify the major and minor version, and the asterisk (*) means that the build and revision numbers are auto-generated. The build number is the number of days since January 1, 2000, and the revision is the number of seconds since midnight divided through two. While the automatic versioning might help during development time, before shipping it is a good practice to define a specific version number.
This version is stored in the .assembly section of the manifest.
Referencing the assembly in the client application stores the version of the referenced assembly in the manifest of the client application.
Getting the Version Programmatically
To make it possible to check the version of the assembly that is used from the client application, add the method GetAssemblyFullName() to the SharedDemo class created earlier to return the strong name of the assembly. For easy use of the Assembly class, you have to import the System.Reflection namespace:
public string GetAssemblyFullName() { return Assembly.GetExecutingAssembly().FullName; } The FullName property of the Assembly class holds the name of the class, the version, the locality, and the public key token, as you see in the following output, when calling GetAssemblyFullName() in your client application.
In the client application, just add a call to GetAssemblyFullName() in the Main() method after creating the shared component:
static void Main() { SharedDemo quotes = new SharedDemo(@"C:\ProCSharp\Assemblies\Quotes.txt"); Console.WriteLine(quotes.GetAssemblyFullName()); Be sure to register the new version of the shared assembly SharedDemo again in the global assembly cache using gacutil. If the referenced version cannot be found, you will get a System.IO.FileLoadException, because the binding to the correct assembly failed.
With a successful run, you can see the full name of the referenced assembly:
SharedDemo, Version=1.0.0.0, Culture=neutral, PublicKeyToken=7d886a6f7b9f0292 Press any key to continue ...
This client program can now be used to test different configurations of this shared component.
Application Configuration Files
With a configuration file, you can specify that the binding should happen to a different version of a shared assembly. Assume that you create a new version of the shared assembly SharedDemo with major and minor versions 1.1. Maybe you don’t want to rebuild the client but just want the new version of the assembly to be used with the existing client instead. This is useful in cases where either a bug is fixed with the shared assembly or you just want to get rid of the old version because the new version is compatible.
Figure 16-23 shows the Global Assembly Cache Viewer, where the versions 1.0.0.0 and 1.0.3300.0 are installed for the SharedDemo assembly.
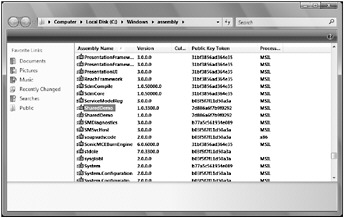
Figure 16-23
Figure 16-24 shows the manifest of the client application where the client references version 1.0.0.0 of the assembly SharedDemo.
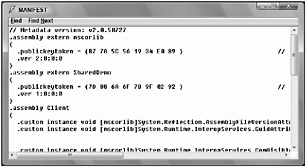
Figure 16-24
Now an application configuration file is needed. It is not necessary to work directly with XML; the .NET Framework Configuration tool can create application and machine configuration files. Figure 16-25 shows the .NET Framework Configuration tool, which is an MMC Snap-in. You can start this tool from Administrative Tools in the Control Panel.
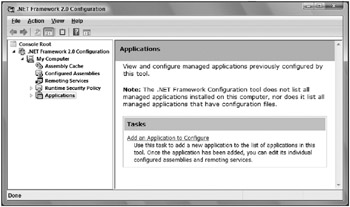
Figure 16-25
| Tip | This tool is shipped with Framework SDK and not with the .NET runtime, so don’t expect this tool to be available to system administrators. |
When you select Applications on the left side, and then select Action ![]() Add, you can choose a .NET application to configure. If the Client.exe application does not show up with the list, click the Other/... button and browse to the executable. Select the application Client.exe to create an application configuration file for this application. After adding the client application to the .NET Configuration utility, the assembly dependencies can be listed, as shown in Figure 16-26.
Add, you can choose a .NET application to configure. If the Client.exe application does not show up with the list, click the Other/... button and browse to the executable. Select the application Client.exe to create an application configuration file for this application. After adding the client application to the .NET Configuration utility, the assembly dependencies can be listed, as shown in Figure 16-26.
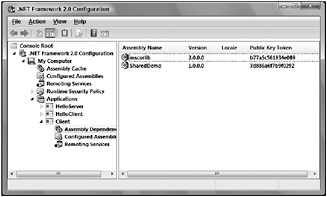
Figure 16-26
Select Configured Assemblies in the tree view and the menu Action ![]() Add... to configure the dependency of the assembly SharedDemo from the dependency list. Select the Binding policy tab to define the version that should be used as is shown in Figure 16-27.
Add... to configure the dependency of the assembly SharedDemo from the dependency list. Select the Binding policy tab to define the version that should be used as is shown in Figure 16-27.
For the Requested Version, specify the version referenced in the manifest of the client assembly. New Version specifies the new version of the shared assembly. In Figure 16-33, it is specified that the version 1.0.3300.0 should be used instead of any version in the range of 1.0.0.0 to 1.0.3300.0.
Now you can find the application configuration file Client.exe.config in the directory of the Client.exe application that includes this XML code:
<?xml version="1.0"?> <configuration> <runtime> <assemblyBinding xmlns="urn:schemas-microsoft-com:asm.v1"> <dependentAssembly> <assemblyIdentity name="SharedDemo" publicKeyToken="7d886a6f7b9f0292" /> <publisherPolicy apply="yes" /> <bindingRedirect oldVersion="1.0.0.0-1.0.3300.0" newVersion="1.0.3300.0" /> </dependentAssembly> </assemblyBinding> </runtime> </configuration> Runtime settings can be configured with the <runtime> element. The subelement of <runtime> is <assemblyBinding>, which in turn has a subelement <dependentAssembly>. <dependentAssembly> has a required subelement <assemblyIdentity>. You specify the name of the referenced assembly with <assemblyIdentity>. name is the only mandatory attribute for <assemblyIdentity>. The optional attributes are publicKeyToken and culture. The other subelement of <dependentAssembly> that’s needed for version redirection is <bindingRedirect>. The old and the new versions of the dependent assembly are specified with this element.
When you start the client with this configuration file, you will get the new version of the referenced shared assembly.
Publisher Policy Files
Using assemblies shared in the global assembly cache allows you to use publisher policies to override versioning issues. Assume that you have an assembly used by some applications. What can be done if a critical bug is found in the shared assembly? You have seen that it is not necessary to rebuild all the applications that use this shared assembly, because you can use configuration files to redirect to the new version of this shared assembly. Maybe you don’t know all the applications that use this shared assembly, but you want to get the bug fix to all of them. In that case, you can create publisher policy files to redirect all applications to the new version of the shared assembly.
| Important | Publisher policy files only apply to shared assemblies installed in the global assembly cache. |
To set up publisher policies, you have to do the following:
-
Create a publisher policy file
-
Create a publisher policy assembly
-
Add the publisher policy assembly to the global assembly cache
Create a Publisher Policy File
A publisher policy file is an XML file that redirects an existing version or version range to a new version. The syntax used here is the same as for application configuration files, so you can use the same file you created earlier to redirect the old versions 1.0.0.0 through 1.0.3300.0 to the new version 1.0.3300.0.
Rename the previously created file to mypolicy.config to use it as a publisher policy file and remove the element <publisherPolicy>:
<?xml version="1.0"?> <configuration> <runtime> <assemblyBinding xmlns="urn:schemas-microsoft-com:asm.v1"> <dependentAssembly> <assemblyIdentity name="SharedDemo" publicKeyToken="7d886a6f7b9f0292" /> <bindingRedirect oldVersion="1.0.0.0-1.0.3300.0" newVersion="1.0.3300.0" /> </dependentAssembly> </assemblyBinding> </runtime> </configuration>
Create a Publisher Policy Assembly
To associate the publisher policy file with the shared assembly, it is necessary to create a publisher policy assembly, and to put it into the global assembly cache. The tool that can be used to create such files is the assembly linker al. The option /linkresource adds the publisher policy file to the generated assembly. The name of the generated assembly must start with policy, followed by the major and minor version number of the assembly that should be redirected, and the file name of the shared assembly. In this case the publisher policy assembly must be named policy.1.0.SharedDemo.dll to redirect the assemblies SharedDemo with the major version 1 and minor version 0. The key that must be added to this publisher key with the option /keyfile is the same key that was used to sign the shared assembly SharedDemo to guarantee that the version redirection is from the same publisher.
al /linkresource:mypolicy.config /out:policy.1.0.SharedDemo.dll /keyfile:..\..\mykey.snk
Add the Publisher Policy Assembly to the Global Assembly Cache
The publisher policy assembly can now be added to the global assembly cache with the utility gacutil:
gacutil –i policy.1.0.SharedDemo.dll
Now remove the application configuration file that was placed in the directory of the client application and start the client application. Although the client assembly references 1.0.0.0, you use the new version 1.0.3300.0 of the shared assembly because of the publisher policy.
Overriding Publisher Policies
With a publisher policy, the publisher of the shared assembly guarantees that a new version of the assembly is compatible with the old version. As you know, from changes of traditional DLLs, such guarantees don’t always hold. Maybe all except one application is working with the new shared assembly. To fix the one application that has a problem with the new release, the publisher policy can be overridden by using an application configuration file.
With the .NET Framework configuration tool you can override the publisher policy by deselecting the Enable Publisher Policy check box, as shown in Figure 16-28.
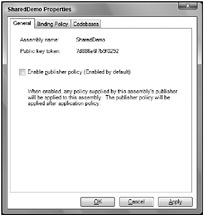
Figure 16-28
Disabling the publisher policy with the .NET Framework Configuration results in a configuration file with the XML element <publisherPolicy> and the attribute apply=”no”.
<?xml version="1.0"?> <configuration> <runtime> <assemblyBinding xmlns="urn:schemas-microsoft-com:asm.v1"> <dependentAssembly> <assemblyIdentity name="SharedDemo" publicKeyToken="7d886a6f7b9f0292" /> <publisherPolicy apply="no" /> </dependentAssembly> </assemblyBinding> </runtime> </configuration> By disabling the publisher policy, you can configure different version redirection in the application configuration file.
Runtime Version
Installing and using multiple versions is not only possible with assemblies but also with the .NET runtime (CLR). The versions 1.0, 1.1, and 2.0 (and later versions) of the CLR can be installed on the same operating system side by side. Visual Studio 2005 targets applications running on CLR 2.0. .NET 2.0 is a major release following .NET 1.1. With 2.0 the assembly file format changed, so it is not possible to run .NET 2.0 applications with .NET 1.1.
| Important | .NET Framework 3.0 looks like the next major release. However, .NET Framework 3.0 is using CLR 2.0, the same runtime that is used with .NET Framework 2.0. With versioning nothing changed with .NET Framework 3.0. |
If the application is built with CLR 1.1, it is possible to target systems that have only the CLR 1.0 runtime installed. The same can be expected about future minor releases in that they can target CLR 2.0 runtime versions.
An application that was built using CLR 1.0 may run without changes on CLR 1.1. If an operating system has both versions of the runtime installed, the application will use the version with which it was built. However, if only version 1.1 is installed with the operating system, and the application was built with version 1.0, it tries to run with the newer version. The registry key HKEY_LOCAL_MACHINE\Software\Microsoft\.NETFramework\policy lists the ranges of the versions that will be used for a specific runtime.
If an application was built using .NET 1.1, it may run without changes on .NET 1.0, in case no classes or methods are used that are only available with .NET 1.1. Here an application configuration file is needed to make this possible.
In an application configuration file, it’s not only possible to redirect versions of referenced assemblies; you can also define the required version of the runtime. Different .NET runtime versions can be installed on a single machine. You can specify the version that’s required for the application in an application configuration file. The element <supportedVersion> marks the runtime versions that are supported by the application:
<?xml version="1.0"?> <configuration> <startup> <supportedRuntime version="v1.1.4322" /> <supportedRuntime version="v1.0.3512" /> </startup> </configuration> There is one major point in case you still have .NET 1.0 applications that should run on .NET 1.1 runtime versions. The element <supportedVersion> was new with .NET 1.1. .NET 1.0 used the element <requiredRuntime> to specify the needed runtime. So for .NET 1.0 applications, both configurations must be done as shown here:
<?xml version="1.0"?> <configuration> <startup> <supportedRuntime version="v1.1.4322"/> <supportedRuntime version="v1.0.3705"/> <requiredRuntime version="v1.0.3512" safeMode="true" /> </startup> </configuration> | Tip | <requiredRuntime> does not overrule the configuration for <supportedRuntime> as it may look like, because <requiredRuntime> is used only with .NET 1.0, while <supportedRuntime> is used by .NET 1.1 and later versions. |
| Important | You cannot configure a supported runtime for a library. The library always uses the runtime selected by the application process. |
Configuring Directories
You’ve already seen how to redirect referenced assemblies to a different version so that you can locate your assemblies, but there are more options to configure! For example, it’s not necessary to install a shared assembly in the global assembly cache. It’s also possible that shared assemblies can be found with the help of specific directory settings in configuration files. This feature can be used if you want to make the shared components available on a server. Another possible scenario arises if you want to share an assembly between your applications, but you don’t want to make it publicly available in the global assembly cache, so you put it into a shared directory instead.
There are two ways to find the correct directory for an assembly: the codeBase element in an XML configuration file, or through probing. The codeBase configuration is available only for shared assemblies, and probing is done for private assemblies.
<codeBase>
The <codeBase> can also be configured using the .NET Configuration utility. Code bases can be configured by selecting the properties of the configured application, SimpleShared, inside the Configured Assemblies in the Applications tree. Similarly to the Binding Policy, you can configure lists of versions with the Codebases tab. Figure 16-29 shows that the version 1.1 should be loaded from the Web server http://www.christiannagel.com/WroxUtils.
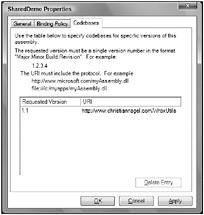
Figure 16-29
The .NET Configuration utility creates this application configuration file:
<?xml version="1.0"?> <configuration> <runtime> <assemblyBinding xmlns="urn:schemas-microsoft-com:asm.v1"> <dependentAssembly xmlns=""> <assemblyIdentity name="SimpleShared" publicKeyToken="7d886a6f7b9f0292" /> <codeBase version="1.1" href="http://www.christiannagel.com/WroxUtils" /> </dependentAssembly> </assemblyBinding> </runtime> </configuration> The <dependentAssembly> element is the same used previously for the version redirection. The <codeBase> element has the attributes version and href. With version, the original referenced version of the assembly must be specified. With href, you can define the directory from where the assembly should be loaded. In the example, a path using the HTTP protocol is used. A directory on a local system or a share is specified using href=”file:C:/WroxUtils”.
| Tip | Using that assembly loaded from the network causes a System.Security.Permissions exception to occur. You must configure the required permissions for assemblies loaded from the network. In Chapter 19, “.NET Security,” you learn how to configure security for assemblies. |
<probing>
When the <codeBase> is not configured and the assembly is not stored in the global assembly cache, the runtime tries to find an assembly through probing. The .NET runtime tries to find assemblies with either a .dll or an .exe file extension in the application directory, or in one of its subdirectories, that has the same name as the assembly searched for. If the assembly is not found here, the search continues. You can configure search directories with the <probing> element in the <runtime> section of application configuration files. This XML configuration can also be done easily by selecting the properties of the application with the .NET Framework Configuration tool. You can configure the directories where the probing should occur by using the search path in the .NET Framework configuration (see Figure 16-30).
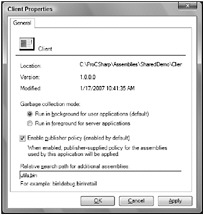
Figure 16-30
The XML file produced has these entries:
<?xml version="1.0"?> <configuration> <runtime> <gcConcurrent enabled="true" /> <assemblyBinding xmlns="urn:schemas-microsoft-com:asm.v1"> <probing privatePath="bin;utils;" xmlns="" /> </assemblyBinding> </runtime> </configuration> The <probing> element has just a single required attribute: privatePath. This application configuration file tells the runtime that assemblies should be searched for in the base directory of the application, followed by the bin and the util directory. Both directories are subdirectories of the application base directory. It’s not possible to reference a private assembly outside the application base directory or a subdirectory thereof. An assembly outside of the application base directory must have a shared name and can be referenced using the <codeBase> element, as you saw earlier.