Array Members
Array Members
Arrays are similar to movie clips in that they can have both have variables and functions attached to them. Anything that is attached to an array, such as a variable or function, is said to be a member of the array. Variables that are attached are called properties , and functions that are attached are called methods . The array object has both properties and methods, so let's take a look at them now.
| Note | In Chapter 6, you'll learn that all objects have members ”both properties and methods. Because arrays are a type of object, they have properties and methods as well. |
Array Properties
There is only one property of the array object. It's called length , and it represents the size of the array. You have to be careful with this property because it doesn't always tell you the number of elements in the array. Instead, it tells you the index of the last element + 1. It's possible to add elements to an array in another order other than incrementing the index from 0 to whatever. You could just as well execute the following script:
myArray = new Array(); myArray[0] = 100; myArray[3] = 100; myArray[5] = 100; trace(myArray);
As you can see, we're only adding values to the array locations at indexes 0, 3, and 5. So technically, there are only three values in this array, but the array's length property is 6. That's because Flash actually adds elements in the spaces between the ones you use. The value of those empty spaces would be undefined . You can see a representation of the array created by this script in Figure 5.3.
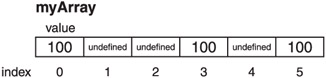
Figure 5.3: Skipping elements in an array causes Flash to fill in missing elements with undefined .
| Caution | The length property of an array is not read only. This differs from most objects we'll see in Chapter 6. If you manually increase the length of an array, new locations will be created and given the value undefined . On the other hand, if you decrease the length of an array, any values you had in those locations beyond the new length will be erased. If you later try to access the locations, they will be listed as undefined . |
Generally, you can use the length property to tell you how many elements are in the array. That works well for most situations because you, as the programmer, can decide where things will be added to the array. By placing things in the array in an orderly fashion, the length property allows you to keep constant track of how many elements you have.
Because length is the only property of an array, we're ready to move on to array methods.
Array Methods
Each array object comes with several predefined methods for your use. Table 5.1 lists them all.
| |
| Method Name | Description |
|---|---|
| Array.toString | Returns a string that represents the elements in an array |
| Array.join | Joins all the elements of an array into a string |
| Array.concat | Joins two strings and returns the conglomeration |
| Array.reverse | Reverses the order of all elements in an array |
| Array.pop | Removes the last element from an array and returns its value |
| Array.push | Adds a new element to the end of an array and returns the array's length |
| Array.shift | Removes the first element from an array and returns its value |
| Array.unshift | Adds a new element to the beginning of an array and returns the array's length |
| Array. sort | Sorts an array |
| Array.sortOn | Sorts an array based on one element of the array |
| Array.slice | Removes a section of an array and returns it as a new array |
| Array.splice | Adds and removes elements from an array |
| |
These methods are all quite powerful, and we'll be using them from time to time, so let's look at each individually.
The toString Method
This method is convenient for testing your code, and occasionally it has uses in your final movie as well. The method is quite simple; it just returns a string containing the concatenation of all array elements. If you want to print the entire contents of an array, you can use this method to do so. It has the following general form:
String myArray .toString();
The method returns a string that contains all elements in the array separated by commas, in one large concatenated string. This string is, of course, suitable for use in a trace function, and that's exactly what we're going to use as an example:
myArray = new Array(); for(i=0; i<20; ++i) myArray[i] = i; trace(myArray.toString());
This code creates an array, initializes the first 20 elements to the numbers 0 “19, and then calls the toString method inside a call to trace . The output can be seen in Figure 5.4.
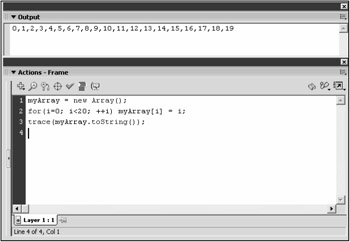
Figure 5.4: The toString method prints out all the values in an array separated by commas.
| Note | I'm using a for loop here without curly braces. Remember that in that form, only the single statement following the loop is executed as part of the loop. In this case, the myArray[i]=i; code is the only thing that will be executed 20 times. |
| Tip | If you call trace on the array without using an index, you'll actually get a call to toString . Note that trace(myArray); will give you the same output as calling trace(myArray.toString()); . |
The join Method
This somewhat confusing method is similar to the toString method except that you can choose your own separator for the concatenated list. The function has the following general form:
String myArray.join(separator);
The method returns a string that, as stated earlier, contains all the values in the array concatenated as one long string, but instead of commas as separators as in toString , the separator is given as an argument. Consider the following script, which parallels the script in the previous section:
myArray = new Array(); for(i=0; i<5; ++i) myArray[i] = i; trace(myArray.join(": ")); trace(myArray.join("-- ")); You can see the output in Figure 5.5. The array is simply output twice, first using a colon (:) as a separator and then again using a hyphen and the pipe character in combination (--).
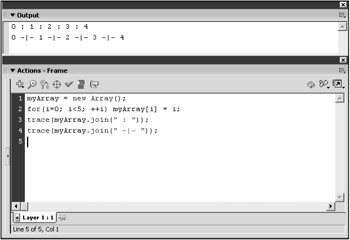
Figure 5.5: The join method is like toString , but it allows you to choose your separator.
The concat Method
This method concatenates two arrays together. It's similar to the idea of string concatenation that we've been using for a long time now. The concat method has the following general form:
Array myArray .concat( value0 , value1 , valueN ); | Note | During concatenation, neither the original array ” myArray ”nor any of the elements given as arguments are altered in any way. The return value is a new array containing copies of all the elements in myArray as well as all elements given as arguments. Please note that if a reference variable is given as an argument, the reference will be copied , not the object it refers to. In other words, both references point to the same original array. |
This method returns a new array, which contains the contents of myArray concatenated by any values contained as arguments to the method. These arguments can be of nearly any type. They can be numbers, strings, objects, movie clips, or other arrays.
Therefore, when you have two arrays and you want to merge them into one big array, this is the method you use. Let's look at an example, the output of which can be seen in Figure 5.6:
myArray1 = new Array(); myArray2 = new Array(); for(i=0; i<6; ++i){ myArray1[i]= "array1,element"+i; myArray2[i]= "array2,element"+i; } myBigArray = myArray1.concat(myArray2); for(i=0; i<myBigArray.length; ++i) trace(myBigArray[i]); 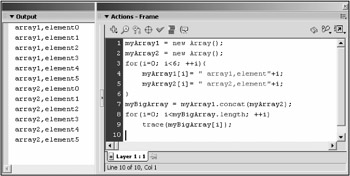
Figure 5.6: A concatenated array contains copies of all the values in the array it's called on, as well as the values given as arguments.
The first thing this script does is create two new arrays: myArray1 and myArray2 . Then the script populates both arrays with six strings containing a message with the array number and element number in each. After that, concat is called on myArray1 with myArray2 used as the argument. This returns a new array containing copies of all elements in both arrays. This return value is assigned to myBigArray . Finally, a final for loop outputs the message contained in each of the elements of myBigArray .
| Note | Notice the way the for loop uses the length property in its condition. That's a convenient way to make a for loop that iterates an array because you don't need to know the size of the array at author-time . Instead, you let the array dictate how many times the for loop iterates. |
| Note | Notice that neither array is changed, but a new array is returned from concat . A function that does not alter the original object is called a nondestructive function . Some of the functions, like the next one ( reverse ), change the array they are called on. These are called destructive functions (methods). |
The reverse Method
You can probably guess what this method does. It reverses the elements in an array. Consider the following example:
myArray = new Array(); for(i=0; i<5; ++i) myArray[i] = i; trace(myArray.toString()); myArray.reverse(); trace(myArray.toString());
First, an array is populated , as in our previous examples. Then the contents are traced using the toString function. Finally, the array is reversed and its values are output again. You can see the result in Figure 5.7.
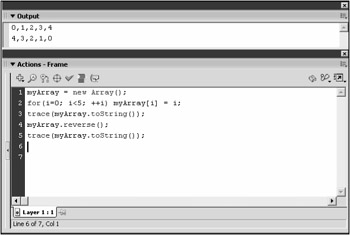
Figure 5.7: The reverse method swaps all the elements in an array so that their order is reversed.
| Caution | The reverse method is destructive. In other words, the original array is altered. Take care when you're using methods of arrays that you know whether each call is altering the original array. |
The pop Method
The pop method first removes the last element in an array. Then the value of that element is returned from the method. The pop method has the following general form:
element myArray .pop();
| Tip | You can use arrays to store mixed types although it is usually not a good idea. You can, for example, store a couple numbers in the first array spots, follow those up with some strings, and conclude with some movie clip references. Flash lets you do this, but it's not a good idea because when you are accessing the elements, you must keep track of which is which and what each is for. For that reason, I use separate arrays for each type of object I need to store. |
As you can see, the method takes no arguments and returns an element. There isn't really such a thing as an "element" in Flash, but I don't have anything better to call the return value because it can be anything. Because arrays can store any type of variable including strings, numbers, booleans, and references, giving a specific type to the return value is impossible .
Let's see an example of the pop method at work. Consider the following script:
myArray = new Array(); for(i=0; i<5; ++i) myArray[i] = i; while(myArray.length > 0){ trace(myArray.toString()); trace("popping "+ myArray.pop()); } After the standard population of the array, this script goes into a while loop. The loop uses an array length greater than 0 as its condition. In other words, this loop iterates until the array is empty (has length == 0). During each iteration, the entire array contents are output using the toString method. After that, pop is called inside a trace function, which prints the value of the popped element. The output of this script can be seen in Figure 5.8.
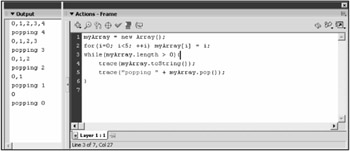
Figure 5.8: The pop method can be used to remove the last element in an array and return its value.
The push Method
This is the complement method to pop . Instead of removing an item, push is used to add a new element to the end of the array. The method has the following general form:
number myArray .push( element );
The function requires one argument: the new element to add to the array. Notice that the function returns a number. This return value indicates the new size of the array. This value is usually discarded, but occasionally it has utility to us. Consider the following example of push :
myArray = new Array(); for(i=0; i<5; ++i) { myArray.push(i); trace("pushing "+ i); trace(myArray.toString()); } As you can see in Figure 5.9, the preceding script simply adds the numbers 0 “4 to the array using the push method. It works the same as using the assignment operator to add elements, except that you don't need to know the index of the last element.

Figure 5.9: The push method allows you to add a new element to the end of an array without knowing the index of the last element.
| Tip | You could simply use the length property to determine the last element of an array before using the assignment operator to add a new element, but the push method gives us a more elegant solution to the same problem. Consider this line: newLength = myArray.push(14.2); This is quite an elegant way to add the number 14.2 to an array and store the new length. Compare that to the following solution, which does not use push. myArray[myArray.length] = 14.2; newLength = myArray.length; |
The shift Method
This method is almost identical to the pop method except that instead of removing the last element in an array, shift removes the first. Like pop , shift returns this element. Its general form is as follows :
element myArray .shift();
As you can see, shift has no arguments, just like pop , and the return value is the element removed. It's time for an example:
myArray = new Array(); for(i=0;i<5;++i) myArray[i] = i; trace(myArray.toString()); myArray.shift(); trace(myArray.toString());
As you can see from the output in Figure 5.10, the array is first populated and then traced. From there, shift is called and the first element is removed, as seen in the second line of output.
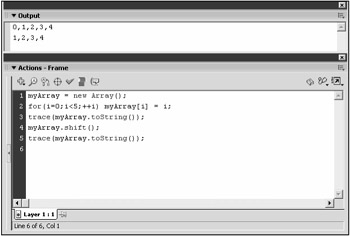
Figure 5.10: The shift method removes and returns the first element in an array. The remaining elements are copied down one location.
| Caution | Adding and removing elements to and from the end of an array is vastly more efficient than doing the same to the front of an array. When the first element is removed with shift , all the rest of the array locations must be copied up one location so that the second element becomes the first and so on. This copying of data takes a great deal of time and as such, shift should be used sparingly. |
The unShift Method
As push is to pop , so is unShift to shift . In other words, unShift adds a new element to the beginning of an existing array. That means that all the elements must be copied to the right one location to make room for the new element. The unShift method has the following general form:
number myArray .unShift( element );
Just like push , the unShift method returns the new array length, which is, of course, one larger than the old length. Let's look at another example, the output of which can be seen in Figure 5.11:
myArray = new Array(); for(i=0;i<5;++i) { myArray.unShift(i); trace("unshifting "+i); trace(myArray.toString()); } 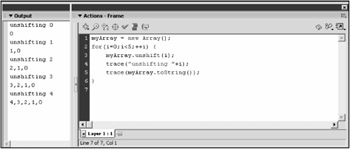
Figure 5.11: The unShift method adds a new element to the beginning of an array. All elements in the array are first copied up one space.
The sort Method
This powerful method is used to sort an array. Unlike the concat method, sort does not leave the original array intact; instead, it alters it. The general form of sort follows:
Variable myArray .sort([ compareFunction, option1 option2 optionN ]); Normally, sort makes changes to the array that the method is being called on without returning anything. However, if you add some of the options, you can change the return value. The first argument, named compareFunction , is optional. Flash MX 2004 also adds options that allow you to modify the default sorting parameters so that you can do the sort you want without having to write your own comparison function.
Without options or a compareFunction , Flash sorts each element with the less than operator ( < ). A compareFunction takes two members of the array and returns a numeric value that indicates which of the two should be stored first in the sorted array. -1 means that the A element passed to the array should go first, 1 means that the B element should come first, and 0 means that A and B are equivalent.
In Table 5.2, you can see the new options available. You can use either the ID or the name in the function. If you would like to use more than one option, you can separate the options by a pipe ( ) or simply by adding the numeric values of the IDs.
| |
| Option Name | ID | Description |
|---|---|---|
| Array.CASEINSENSITIVE | 1 | The case of the sorted elements do not affect the sort. |
| Array.DESCENDING | 2 | The order of the sort is reversed. |
| Array.UNIQUE | 4 | This causes sort to return 0 and not sort the array if the same value appears more than once in the array. |
| Array.RETURNINDEXEDARRAY | 8 | This returns the sorted array without modifying the original. |
| Array.NUMERIC | 16 | This treats elements as numbers, allowing proper ordering. |
| |
Consider the following script:
myArray = new Array(); myArray.push("cabbage"); myArray.push("apple"); myArray.push("Billy"); myArray.push("dog-bone"); myArray.push("banana"); trace(myArray.toString()); myArray.sort(); trace(myArray.toString()); This script creates an array and populates it with several strings. The array is then traced, once before the call to sort and once afterward. Look at the output in Figure 5.12. Notice that at first, the elements are in the order they were added in, but after the sort , they are sorted. The elements are not in alphabetical order. That's because when you use the less than symbol to compare strings, you get lexicographic order, not alphabetical order.
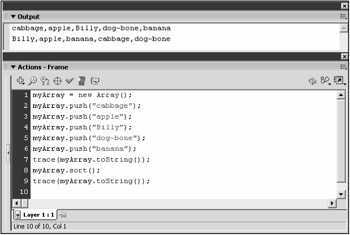
Figure 5.12: Our array gets sorted by the sort method, but not alphabetically .
Lexicographic order has to do with the ASCII values of the characters in the string. In this ordering, uppercase letters come before lowercase letters , so the ordering has all the capitalized words listed first. To use sort to alphabetize words, we can use one of the options from Table 5.2. Array.CASEINSENSITIVE can do what we need quite well.
If we change the sort function to the following, our output will be correct for alphabetical order, as seen in Figure 5.13:
myArray = new Array(); myArray.push("cabbage"); myArray.push("apple"); myArray.push("Billy"); myArray.push("dog-bone"); myArray.push("banana"); trace(myArray.toString()); myArray.sort(Array.CASEINSENSITIVE); trace(myArray.toString()); 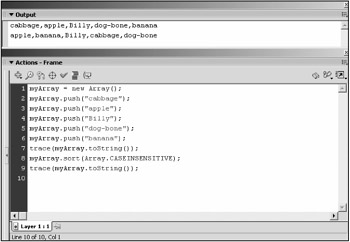
Figure 5.13: By using our own comparison function we can get sort to alphabetize our array of strings.
Now the invocation of sort takes the alphabetize function as an argument.
The sortOn Method
The sortOn method is somewhat complicated. It is used when an array contains objects that have a common property (variable attached). If you call sortOn and supply the name of the property to use for sorting as the argument, the objects will be sorted according to the value contained in the property you supplied. Because movie clips are objects, as you will learn in Chapter 6, we might be able to use this function to sort clips by any property we like. Because we haven't really covered objects yet, let's leave this method alone for now.
The slice Method
This method is used to create a new array that contains a partial copy of the original. A section, but not all, of the original array elements will be copied into the new array. You can specify the beginning and end of the subsection you want to slice. The original array is unaffected. The slice method has the following general form:
String myArray .slice( start , [ end ]);
The string that is returned is the new array containing copies of the sliced elements. The argument end is optional. If end is left out, all the elements from index start through the last element in the array are sliced.
When start is given a number, it implies the first element to slice. However, when end is given a number, it implies the element after the end of the slice. The element at index end is not actually sliced.
Let's see an example of the use of slice . Consider the following script:
myArray = new Array(); myArray.push("apple"); myArray.push("banana"); myArray.push("cabbage"); myArray.push("dog-bone"); trace(myArray.toString()); mySubArray1 = myArray.slice(2,3); trace(mySubArray1.toString()); mySubArray2 = myArray.slice(0,1); trace(mySubArray2.toString()); mySubArray3 = myArray.slice(1); trace(mySubArray3.toString()); mySubArray4 = myArray.slice(); trace(mySubArray4.toString()); In this code, we populate myArray with four strings. Then we output the array to give us something to compare. From there, we create four subarrays using the slice method, outputting each. The results can be seen in Figure 5.14.
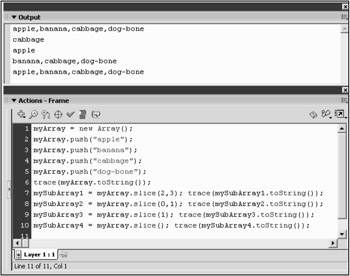
Figure 5.14: The slice method can be used to copy a portion of an array into a new array.
Notice that the third slice uses only one argument. The end argument is omitted, so everything starting with index 1 is sliced. Also notice that the fourth slice uses no arguments at all. In this case, the value of the argument to the slice function is undefined . When converted to a number, undefined becomes 0 and slice assumes a starting index of 0 and no ending index. slice happily copies the entire array for you, as it should.
Another final trick you can use with slice is to give it negative arguments. When you give slice a negative start argument, it assumes the index is from the end of the array. (It counts backward from length -1). Likewise, when you make the end argument negative, slice counts from the end of the array as well. So if you wanted to use the last element, you could use -1 to refer to it. Consider the following example:
myArray = new Array(); myArray.push("apple"); myArray.push("banana"); myArray.push("cabbage"); myArray.push("dog-bone"); trace(myArray.toString()); mySubArray1 = myArray.slice(-3,-2); trace(mySubArray1.toString()); mySubArray2 = myArray.slice(-2); trace(mySubArray2.toString()); mySubArray3 = myArray.slice(-3,3); trace(mySubArray3.toString()); In this example, we're using negative values to index from the end of the array. As you can see by the output in Figure 5.15, you can use negative numbers for both arguments as in the first slice call, or you can use a single negative and omit the end argument, as in the second call to slice . Finally, you can mix a negative and a positive as in the final slice call.
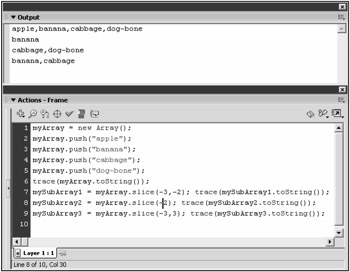
Figure 5.15: The slice method can take negative arguments. When doing so, it counts backward from the last element, instead of from the front of the array as it did with positive arguments.
The splice Method
This is our final array method, and it's a powerful one. Its name, splice , is almost identical to our previous method's name, which was slice . However, don't confuse the two because they do vastly different things. For starters, splice changes the array it's called on. That differs from slice because slice is only used to make a copy. The original array is not altered in any way with slice , but it is with splice .
The main purpose of splice is to add or remove elements from an array. splice has a general form as follows:
void myArray .splice( start , deleteCount [, value0 , value1 , valueN ]); As you can see, the method has no return value. Further, it requires several arguments. The first argument, start , gives the index of the first position to be spliced. The second argument, deleteCount , signifies the number of elements to remove, starting with the element at index start . The deleteCount argument can be 0. The final set of arguments, which are optional, add new elements to the array in place of the deleted ones. This set of arguments makes the splice method quite powerful:
myArray = new Array(); myArray.push("apple"); myArray.push("banana"); myArray.push("cabbage"); myArray.push("dog-bone"); trace(myArray.toString()); myArray.splice(1,1); trace(myArray.toString()); myArray.splice(1,0," freddy"); trace(myArray.toString()); myArray.splice(0,2," zebra"); trace(myArray.toString()); myArray.splice(-1,1); trace(myArray.toString()); You can see the output of this script in Figure 5.16.
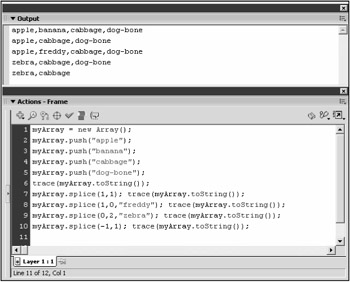
Figure 5.16: The splice method adds and deletes elements from an array. Unlike slice , the original array is altered with this method call.
As you can see, the preceding script populates an array and then calls splice four times. The first splice deletes one element, starting at index 1. The second splice doesn't delete elements, but it adds the element freddy at index 1. The third splice deletes two elements starting at index 0, and the fourth element deletes one element, starting at 1 element in front of the end of the array (the last element). Notice in the fourth splice that a negative argument is used as it was in the slice method earlier.
We've looked at all the methods of the Array object. From here, we're going to look at how to use arrays to make our lives easier.
EAN: 2147483647
Pages: 161