The Timeline
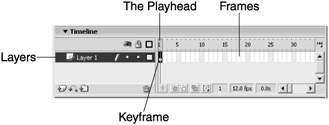
Directly above the stage is the Timeline panel, which can be seen in Figure 1.14.

Figure 1.14: The timeline breaks down a movie clip into frames .
In Flash, every movie has a timeline, and the timeline's job is to tell the movie what to do. The timeline is broken down into several pieces, including frames, the playhead, keyframes, and layers . Let's look at each piece.
Frames
You should see a long row of thin white rectangles, labeled in Figure 1.14, which represents the frames in your timeline. Each frame represents one slice of time during movie playback. Flash plays each frame in a timeline, one at a time, in succession. By placing different objects and scripts in various frames, you can control what happens during movie playback. At any given moment of time, Flash will be working in one frame of the timeline. Whichever frame is the current one is said to have the playhead over it.
The Playhead
The playhead is labeled in Figure 1.14. This pink rectangle tells you which frame is currently being displayed on the stage. By dragging the playhead left and right, you can change the currently displayed frame on the stage. During movie playback, the playhead will move from frame to frame, displaying stage instances and executing scripts attached to the frames it passes over. (Attaching scripts to instances is covered in Chapter 2.)
Right-click on frame 10 in the timeline and select Insert Frame. This adds new frames to the timeline and automatically moves the playhead into the last frame. You can now drag the playhead into any of the frames in the timeline and see the contents of the stage during that frame. Any time you add an instance or alter something on the stage, you must make that frame into a special kind of frame called a keyframe.
Keyframes
These are special frames where things change on the stage. When a keyframe is present on a timeline, the frame gets a black dot inside, as in Figure 1.14. You can add a keyframe by right-clicking a frame and selecting Insert Keyframe. Inside a keyframe, you can place art on the stage. The art will appear to the user when his movie has reached that frame.
| Note | A keyframe is used when something on the stage changes, such as a new instance appearing or an old instance disappearing . When you want the stage to remain as it is, you will use regular (blank) frames instead of keyframes. |
You can add a keyframe by selecting either Insert Keyframe or Insert Blank Keyframe. If you insert a keyframe, you get a copy of any objects on the stage in the last keyframe before the frame you are adding a keyframe to. This is convenient if you want to make small changes to the position of objects on the stage. If you add a blank keyframe, you don't get copies of the art; instead, you get a blank stage in that frame.
As you can probably tell, if you are creating an animated movie or something similar, you're going to have a vast number of art objects on your stage in any particular frame. This begs for a system of organization for the art objects, and Flash gives us one. It's called layers.
Layers
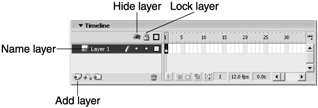
Layers are primarily a method of organizing objects on your stage. If you look at your time-line, you'll see one layer that is labeled Layer 1. You can see this by referring to Figure 1.15.

Figure 1.15: The timeline has layers that can be locked, hidden, named, and ordered.
All new movies have just one layer, but you can add more by clicking the Add button in the lower-left corner of the timeline. Click that button now to add a second layer to your main movie timeline. When you drag an instance of a movie clip onto the stage, it is assigned to whichever layer is currently highlighted.
Layers give us some tools for working more efficiently with our stage instances. Layers can be locked, hidden, named, and ordered. These are all important concepts, so let's look at each of them.
Locking Layers
Each layer can be locked so that any movie clip instances on it cannot be moved or deleted. This allows you to create complex scenes in your movie and not mess things up by accidentally dragging the wrong clip around the stage. To lock a layer, simply click on the dot to the right of the layer's name that is below the little lock icon, as seen in Figure 1.15. This causes the layer to lock, which is indicated by a red X where the dot used to be. To unlock a layer, simply click the red X.
Hiding Layers
You can also hide a layer if you need to. When you hide a layer, it still shows up in your final movie, but it is hidden while you are authoring. This is convenient when you have many clips on the stage and things are getting too chaotic . If you hide some of the layers, you can see the clips that you are trying to arrange more easily. To hide and reveal layers, click the dot that is to the right of the layer name underneath the eyeball icon, as shown in Figure 1.15.
Naming Layers
You can change the name of a layer by double-clicking its name. Try to name layers based on the kind of content you plan to place in them. By giving layers good names , you can easily find your content in the timeline even when you have hundreds of clip instances inside dozens of layers.
Ordering Layers
Another important feature of layers is that you can drag them up and down in relation to each other. The stacking order of movie clip instances on the stage reflects the ordering of the layers in the timeline. In other words, if some of your movie clip instances are overlapping on the stage, you can change which one is on top by changing the layer order. Right-click on the veggie movie clip instance on the stage and select Cut from the pop-up menu. Now click the Insert Layer button in the lower-left corner of the Timeline panel. The icon is labeled in Figure 1.15. A new layer should have appeared above Layer 1 called Layer 2. This new layer should also be highlighted. Right-click on the stage and select Paste from the pop-up menu. This should paste the veggie movie clip instance onto the stage in the first frame of Layer 2. Drag the veggie clip around the stage until it's sitting on top of one of the balls. Then go up into the timeline and drag Layer 1 down below Layer 2. Notice that the veggie movie clip is now sitting below the ball because the layer order changed. Putting clips into separate layers allows you to easily manipulate the stacking order of clips on the stage.
Now that we've seen the majority of properties of the timeline, we're ready to move on. From here, we're going to look at more of the objects that we can use on our stage, as well as the ability to add text to the stage.
| Tip | You can use folders to organize your layers, much like you did with symbols in the library. In some movies, you might have dozens of layers, and organizing them into folders that you can open and close will help you keep everything straight. |
EAN: 2147483647
Pages: 161