Creating a DLL Project with Visual Studio .NET


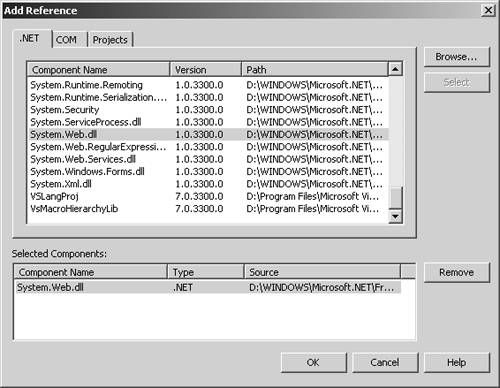
Part of Web development involves properly partitioning your code. As a general rule, developers put business logic (code that has to do with business rules) in a separate DLL and put code that has to do with the visual elements of the program in another DLL. This enables one set of developers to write the business logic while another set works on the front end. DLLs also enable you to share the same code with multiple applications. So it's important to learn how to move code to other DLLs and call them from your Web application.

To create a DLL in VS.NET:

  1. Start VS.NET.

  2. Select File > New Project.

  3. In the New Project Dialog select Class Library from the list of Visual C# projects.

  4. Type the name you want to assign to the project in the Name field of the New Project Dialog. For example: BankLib ( Figure 13.1 ).

    Figure 13.1. The Class Library project creates a standalone DLL that can be used with Web applications as well as Windows Form applications.

    graphics/13fig01.gif

  5. Click OK.

  6. The wizard will generate a project with two source files: AssemblyInfo.cs and Class1.cs . The wizard will also open the file Class1.cs . AssemblyInfo.cs contains attributes for the DLL (or more specifically , the assembly). Class1.cs contains code for a simple class.

  7. Rename the file for the first class to Account.cs . Do this by right-clicking on the file Class1.cs from the Solution Explorer window and selecting Properties. In the Properties window type a new name in the File Name field ( Figure 13.2 ).

    Figure 13.2. The default name for the main file is Class1.cs . For this example, change the filename to Account.cs .

    graphics/13fig02.gif

  8. Change the class name for the wizard-generated class to Account . Remember also to rename the constructor function (constructors have the same name as the class name) ( Figure 13.3 ).

    Figure 13.3 Renaming the file doesn't change the class's name, unfortunately . The default class name is Class1. Change it to something more meaningful, like Account, and remember to change the constructor name as well.
     using System; namespace BankLib {    /// <summary>    /// Summary description for Class1.    /// </summary>    public class Account    {       public Account()       {          //          // TODO: Add constructor logic here          //       }    } } 

    To have your DLL code interact with the Web objects (like Response, Request, etc.) continue on to step 9. Otherwise, you're done.

  9. Right-click on the References branch in the Solution Explorer window and choose Add Reference. You will see the Add Reference dialog ( Figure 13.4 ).

    Figure 13.4. Because DLLs aren't just for Web applications, the wizard doesn't automatically add a reference to System.Web.Dll. If we want to have our DLL interact with the Web objects, we need to add this reference.

    graphics/13fig04.jpg

  10. Find System.Web.Dll in the list of assemblies and double-click on the entry. This will add System.Web.Dll to the Selected Components list. Then click OK.

  11. Type using System.Web; at the top of the code file.

  12. Inside of a function for your class, type: HttpContext ctx=HttpContext.Current; if (ctx != null) ctx.Response.Write(msg); ( Figure 13.5 ).

    Figure 13.5 HttpContext.Current is a static property. If the DLL code is being executed by a Web application, the property will be a non-null value. If the property is null, the application is not being run by a Web application.
     using System;  using System.Web;  namespace BankLib {    /// <summary>    /// Summary description for Class1.    /// </summary>    public class Account    {       decimal _amount;       public Account()       {          //          // TODO: Add constructor logic here          //       }       void MakeDeposit(decimal amount)       {          _amount=amount;       }       void PrintBalance()       {  HttpContext ctx = HttpContext.Current;   if (ctx != null)   ctx.Response.Write(msg);  }    } } 

graphics/tick.gif Tips

  • Steps 9-12 explain how to interact with the Web objects. To do so you first add a reference to System.Web.dll to your project. From that assembly you will use the HttpContext class. This class has a static property called Current (see step 12). If your function is being invoked in the context of a Web application, the Current property will point to an object of type HttpContext that will enable you to interact with the Web server. Otherwise Current will return null.

  • Table 13.1 shows a list of the most common properties in the HttpContext object. With this object you can find out about the client's request and participate in the response.

Table 13.1. Properties of HttpContext Object (Most Common Properties in HttpContext Object)

PROPERTY

PURPOSE

Request

The request object is of type HttpRequest and it encapsulates the user's request. The HttpContext.Request.QueryString returns the information the user entered in the browser's address box after the URL. HttpContext.Request. Forms can be used to examine the contents of fields on a form, and HttpContext.Request. Cookies can be used to get cookie information sent from the client.

Response

The response object is of type HttpResponse and it is used to build the client's output. HttpContext.Response. Write is a common method for sending output to the client. HttpContext.Response. StatusCode can be used to read or set the server status code; for example 200 means ok, 400 means bad request, 301 means page moved. For more information on status codes look for "HttpStatusCode Enumeration" in the documentation. HttpContext.Response.Redirect tells the client's browser to go to a different page.

Server

Returns an HttpServerUtility object. HttpContext.Server.MapPath is a favorite of many, it gives the physical path of afile in your machine when givena virtual path . Remember thatIIS (the Web Server) workswith virtual directories. HttpContext.Server.Transfer switches to a different page without notifying the client's browser. HttpContext.Server.Execute lets you collect the output for another web page.

Session

Returns an HttpSessionState object. We have been using the Session object throughout the book to store information that gets sent back and forth between the client and the server. A session is the term used for communication with a single client.

Application

Returns an HttpApplicationState object. We have been using the Application object to store information pertaining to all users of the application.


C#
C# & VB.NET Conversion Pocket Reference
ISBN: 0596003196
EAN: 2147483647
Year: 2003
Pages: 198
Authors: Jose Mojica

flylib.com © 2008-2017.
If you may any questions please contact us: flylib@qtcs.net