Windows Passwords
| Passwords are your first line of defense for both local and remote attacks on your computer. However, the vast majority of home users simply do not use passwords for their Windows user accounts. For some it is too much of an inconvenience, while others just do not see why they need to use one because they trust everyone (family and friends ) who has physical access to their computer. If your computer is never connected to any type of a network, including the Internet, then you are in the clear. But if you are like the majority of computer users and connect to the Internet through some type of medium, even if just for a few minutes at a time via a dial-up connection, you are leaving the door wide open . The fact that your computer is in a secure location (a home, office, and so on) will protect physical access to your computer. But the moment that you log on to the Internet, or turn your PC on (if you are a broadband user), you could potentially be sharing all of your data files with the world. Basically, anyone who knows your user name can access your computer. And for those who don't, it only takes a little effort from a clever attacker to figure out your user name . There is a reason why more and more people are getting their identity stolen every year. Many are not taking the steps necessary to protect their sensitive data. A password on all of the user accounts on your computer will not solve all of your security problems, but it's a necessary first step that goes a long way in protecting access to your computer by shutting the door to attackers looking for easy access. If you do not already have a password assigned to all of the accounts on your computer, it is very easy to set it up. Just open the Control Panel and click on User Accounts. Then click on the name of the account and click the Create Password button. To set a password for a user, right-click on the name of the account and select Set Password. (General management of user accounts is covered in Chapter 5, "Managing Windows.") Tip In Windows 2000/XP, you can just run lusrmgr.msc from either the command prompt or the Run box in the Start menu (click Start, Run). This starts up the Local User and Group manager. Keep in mind that a password is only as good as an attacker's ability to guess or crack it using any number of simple brute-force utilities. Here are my recommendations for a good password:
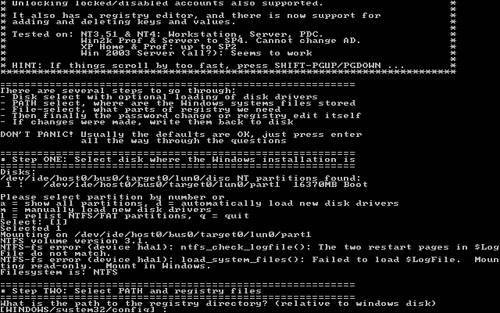
Aside from these guidelines, I also recommend you use different passwords for each of your online accounts. Using the same one is like using the same exact key for your car, your home, your office, and your safety deposit box. If someone discovers your password, a lot of your personal information as well as any financial data could be at risk. Tip Following the good password security guidelines and using different passwords for all of your online accounts can result in a big variety of passwords that you have to remember. I have dozens of online accounts and trying to remember them all is next to impossible . If you have a lot of passwords as well, or just have a hard time remembering them all, I recommend using a password utility such as the free application called Password Safe, located at http://passwordsafe. sourceforge .net. This handy tool makes it possible to securely store all of your passwords for all of your accounts in a single location using an encrypted file. How Windows Implements PasswordsThe early versions of Windows had a very different method of implementing passwords than the NTbased operating systems NT, 2000, and XP. In Windows 98/Me, passwords were encrypted in a very weak encryption and then stored in a password file on the file system, available to anyone who wanted to play with it. This was extremely insecure , as anyone could just delete the password file and then have full access to your computer. Starting with Windows NT, passwords were handled much more securely. Today, with Windows 2000 and Windows XP Home and Pro, user passwords are stored in what is called the Security Account Manager, commonly known as the SAM, similar to how Unix password protection works. The SAM is placed in a restricted part of the system registry that can only be accessed by the system account. This prevents a user, either locally or remotely, from loading up the registry editor and retrieving password information. To add another level of security, the passwords are stored in a 128-bit one-way hash with an industry standard encryption method known as MD4 Message Digest. This makes the password very difficult to crack even if access is somehow gained to the SAM database. You can find more information on user passwords and account management in the "Managing Users" section of Chapter 5, "Managing Windows." Recovering a Lost PasswordForgetting a password to an account on your computer can be very frustrating. In Windows 2000/XP, a new security mechanism based on Windows NT was used to replace the extremely vulnerable mechanism used in Windows 98/Me. Back in the Windows 98/Me days, you could very easily get into any account on the computer. With the help of a DOS boot disk, all you had to do was delete the Windows password file. Because Windows 2000 and XP are based on the NT kernel, a much more robust and secure system is in place. This system makes it next to impossible to figure out what a user's password is because all of the password data is encrypted. In theory, it would be possible to use an application that would try to "crack" the encryption on the password data and recover the actual password. However, with the large number of bits that are used in encryption these days, it would take you several years on the fastest hardware available to "crack" the password. Unless you have your own super computer, this is not a valid solution for most of us. If you know the Administrator user account password on your computer then you can log in with that account and then run lusrmgr.msc from the command prompt to get to the Local User and Group Manager (or activate it from the Control Panel). From there, you can right-click on any account and use its password. Tip In Windows XP the Administrator account will not be shown on the Welcome screen. In order to log on with the Administrator account on Windows XP, you will need to press CTRL + ALT + DEL twice to get the Windows 2000style logon screen to show up. Then just manually type in the username and enter your password. If you do not remember the Administrator password, the only feasible way to get into an account that you forgot the password for is to use a third-party utility to essentially overwrite the specific account's password data. This will not allow you to recover the password, but it will allow you to get into any account on your machine because the account will be assigned a new password. Using a third-party utility to assign any account a new password is straightforward but there are a lot of steps are involved. They all work in a similar method but can be stored on either a floppy boot disk or a bootable CD-ROM. In general, you would turn on your computer with the utility disk in the drive so that the computer loads the utility's operating system instead of Windows. Then, a utility is run that will do the work of replacing the password. There are hundreds of password utilities available for use. Some are free and others cost hundreds of dollars. The majority of these utilities work similarly so it really does not seem worthwhile to pay for something that is so widely available for free on the Web. From all of the available utilities, I selected two of the leading utilities that are used to replace Windows account passwords. One utility is booted from a floppy disk, and the other is burned to a CD-ROM and booted from the CD drive. Caution Before you get started, you should be aware of the consequences of replacing user account passwords. Because of the more robust security system in Windows 2000/XP, when a password for a user is replaced, any encrypted files, folders, and saved passwords will be lost. The files will still exist, but they will be encrypted with a key that your account with the replaced password will not have, leaving them inaccessible and essentially lost forever. Using a Floppy Boot Disk to Change PasswordsTo replace a user's password with a floppy boot disk, I recommend using the Offline NT Password & Registry Editor located at http://home.eunet.no/~pnordahl/ntpasswd/. While it's not exactly the most user-friendly tool, it is by far one of the most popular and reliable utilities in its class.
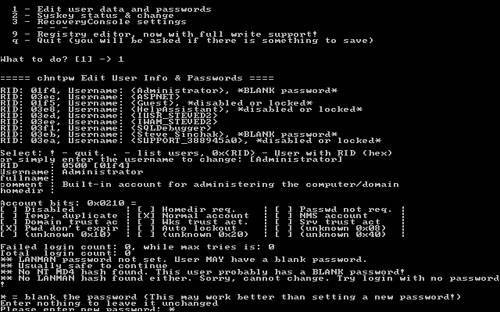
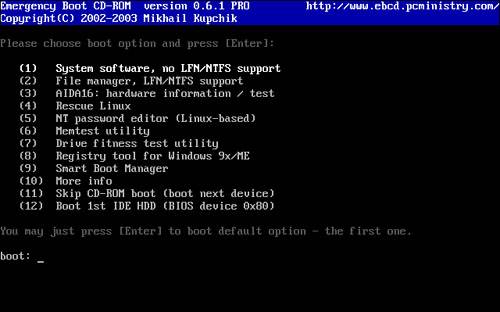
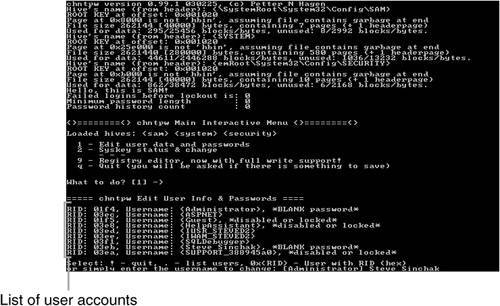
If all went well, when your computer reboots, you should be able to log in to the account you edited with either a blank password or with the password you supplied. Tip If while using the Offline NT Password & Registry Editor you experience any onscreen errors or if the application just does not work for you, check out the software developer's FAQ located at http://home.eunet.no/~pnordahl/ntpasswd/faq.html. Using a Bootable CD-ROM to Change PasswordsIf the floppy boot method does not work for you or if you just don't have a floppy disk drive on your computer, there are other tools you can use to reset a user's password. I personally like to use a suite of utilities called the Emergency Boot CD. The EBCD is a collection of useful utilities that you can use to fix your computer from a wide variety of disasters. It also has the ability to reset passwords, which makes it a great tool for any IT professional or power user. Note Emergency Boot CD requires the use of a separate CD burning software utility, such as Nero Burning ROM from Ahead Software or Easy CD Creator, published by Roxio. Follow the procedure below to make your own bootable CD and replace passwords with it:
Now that you have reset the password for the account, it is a good idea to log in and change the password to one that follows the guidelines mentioned earlier to make your data secure. |
EAN: 2147483647
Pages: 128
- ERP System Acquisition: A Process Model and Results From an Austrian Survey
- Healthcare Information: From Administrative to Practice Databases
- A Hybrid Clustering Technique to Improve Patient Data Quality
- Relevance and Micro-Relevance for the Professional as Determinants of IT-Diffusion and IT-Use in Healthcare
- Development of Interactive Web Sites to Enhance Police/Community Relations