Maintenance Tools
| To troubleshoot and repair laptop systems properly, you need a few basic tools. If you intend to troubleshoot and repair systems professionally, you may want to purchase many more specialized tools as well. These advanced tools enable you to more accurately diagnose problems and make jobs easier and faster. Here are the basic tools that should be in every troubleshooter's toolbox:
You may want to consider the following items, although they're not required for most work:
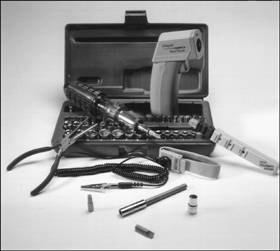
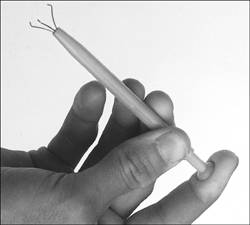
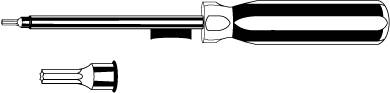
These tools are discussed in more detail in the following sections. Hand ToolsWhen you work with laptop PCs, the tools required for nearly all service operations are simple and inexpensive. You can carry most of the required tools in a small pouch. Even a top-of-the-line "master mechanics" set fits inside a briefcase-sized container. The cost of these toolkits ranges from about $20 for a small service kit to $500 for one of the briefcase-sized deluxe kits. Compare these costs with what might be necessary for an automotive technician. An automotive service technician normally has to spend $5,000$10,000 or more for a complete set of tools. Not only are computer tools much less expensive, but I can tell you from experience that you don't get nearly as dirty working on computers as you do working on cars. In this section, I'll cover the tools required to perform basic, board-level service on most systems. One of the best ways to start such a set of tools is to purchase a small kit sold especially for servicing computers and then augment this with a miniature screwdriver set. Note that the small screwdriver sets are often called "jeweler's" sets because they are commonly used in jewelry applications. Figure 3.1 shows some of the basic tools you'll want to have at your disposal when working on laptop systems. Figure 3.1. The basic tools you need to work on a laptop are shown here, although you might also need to obtain sets of smaller-sized flat-blade and Phillips screwdrivers and a set of small Torx drivers or Torx bits. Note Some tools aren't recommended as a separate purchase because they might be of limited use. However, they often come with these types of kits. Most laptop systems use numerous small Phillips or Torx screws, so those drivers are the ones you'll be using most frequently. The screwdrivers that come in some standard tool sets may be too big, so you'll want to purchase a good set of miniature screwdrivers, or a set of miniature screwdriver bits and a handle. If slotted screws are used on a system you are working on, you need to be very careful because it is easy for the flat-blade screwdriver head to slip off and possibly damage the system. Caution When you're working in a cramped environment, such as the inside of a laptop, screwdrivers with magnetic tips can be a real convenience, especially for retrieving that screw you dropped into the case, as well as for holding a screw on the tip of the tool when inserting it into the threaded hole. However, although I have used these types of screwdrivers many times with no problems, you should be aware of the damage a magnetic field can cause to magnetic storage devices such as floppy disks. Laying the screwdriver on or near a floppy can damage the data on the disk. Fortunately, floppy disks aren't used that much anymore. Hard drives are shielded by a metal case; CD/DVD drives are not affected because they work optically; and memory and other chips are not affected by magnetic fields (unless they are magnitudes stronger than what you'll see in a hand tool). Chip-extraction tools, shown in Figure 3.2, are rarely needed to remove chips these days because memory chips are mounted on SIMMs or DIMMs, and processors use zero insertion force (ZIF) sockets (which are found in Pentium M and Pentium 4-M systems) or other user-friendly connectors; however, in some cases, they can be used as general-purpose prying or grabbing tools. The ZIF socket has a lever or screw lock that, when opened, releases the grip on the pins of the processor, enabling you to easily lift it out with your fingers. Figure 3.2. The chip extractor (left) was originally designed to remove individual RAM or ROM chips from a socket. An extractor such as the one on the right is used for extracting socketed processorsif the processor does not use a ZIF socket. That said, these tools can still be handy in current systems when used to pull out keyboard keys (even from integrated keyboards on a laptop system). In fact, for this role it works quite well. By placing the tool over a keycap on a keyboard and squeezing the tool so the hooks grab under the keycap on opposite sides, you can cleanly and effectively remove the keycap from the keyboard without damage. This technique works much better than trying to pry the caps off with a screwdriver, which often results in damaging them or sending them flying across the room. Although I prefer magnetic tipped screwdrivers, the tweezers or parts grabber can be used to hold any small screws or jumper blocks that are difficult to hold in your hand. The parts grabber, shown in Figure 3.3, is especially useful when you're starting screws or when trying to retrieve one that has fallen into a nook or cranny inside the system. If you have dropped a screw inside and can't see it, you might try turning the system upside down and gently shaking it until the screw falls out. Figure 3.3. The parts grabber has three small metal prongs that can be extended to grab a part. Finally, the Torx driver is a star-shaped driver that matches the special screws found in most systems (see Figure 3.4). Torx screws are vastly superior to other types of screws for computers because they offer greater grip, and the Torx driver is much less likely to slip. The most common cause of new circuit board failures is due to people using slotted screwdrivers and slipping off the screw head, scratching (and damaging) the motherboard. I never allow slotted screws or a standard flat-bladed screwdriver anywhere near the interior of my systems. You also can purchase tamperproof Torx drivers that can remove Torx screws with the tamper-resistant pin in the center of the screw. A tamperproof Torx driver has a hole drilled in it to allow clearance for the pin. Torx drivers come in a number of sizes, the most common being the T-10 and T-15. However, many laptops use smaller sizes from T-9 down through T-5. It is a good idea to have a set of miniature Torx drivers on hand when you're working on laptop systems. Figure 3.4. A Torx driver and bit. Although a set of basic tools is useful, you should supplement your toolkit with some additional tools, such as the following:
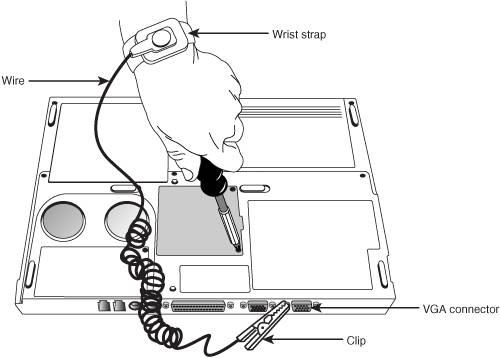
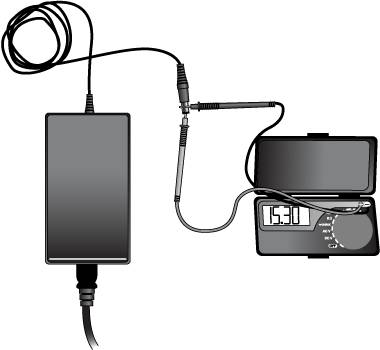
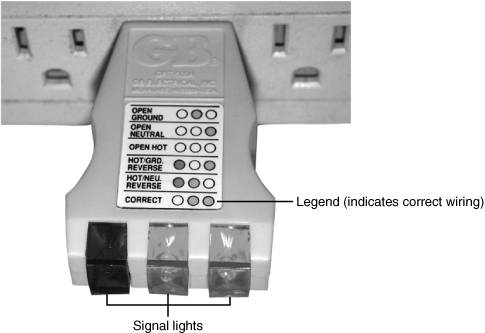
SafetyBefore you begin working on a system, you should follow certain safety procedures. Some are to protect you; others are to protect the system you are working on. From a personal safety point of view, there really isn't that much danger in working on a laptop computer. Even if it is open with the power on, computers run on 20 volts or less internally, meaning there are no dangerous voltages present that are life threatening. Before working on a laptop computer, you should unplug it from the wall. This is not really to protect you so much as it is to protect the system. Modern systems are always partially runningthat is, as long as they are plugged in. Even if a system is off, standby voltages are still present. To prevent damage, it is recommended that the system be completely unplugged and the main power battery removed. If you accidentally turn the system all the way on, and plug in or remove a card or memory module, you can fry the card, module, or even the motherboard. ESD Protection ToolsElectrostatic discharge (ESD) protection is another issue. While working on a PC, you should wear an ESD wrist strap, which is clipped to the chassis of the machine (see Figure 3.5). On a laptop, generally the best place to clip the cable is to one of the cable connector retention hex nuts adjacent to the external video connector on the system. This will ensure that you and the system remain at the same electrical potential and will prevent static electricity from damaging the system as you touch it. Some people feel that the system should be plugged in to provide an earth ground. Working on any system that is plugged in is not a good idea at all, as previously mentioned. No "earth" ground is necessary; all that is important is that you and the system remain at the same electrical potential, which is accomplished via the strap. Another issue for personal safety is to use a commercially available wrist strap rather than making your own. Commercially made wrist straps feature an internal 1 Meg ohm resistor designed to protect you. The resistor will ensure that you are not the best path to ground should you touch any "hot" wire. When you remove components from the system, they should be placed on a special conductive antistatic mat, which is also a part of any good ESD protection kit. The mat will also be connected via a wire and clip to the system chassis. Any components removed from the system, especially items such as the processor, motherboard, adapter cards, and disk drives, should be placed on the mat. The connection between you, the mat, and the chassis will prevent any static discharges from damaging the components. Note It is possible (but not recommended) to work without an ESD protection kit if you're disciplined and careful about working on systems. If you don't have an ESD kit available, you can discharge yourself by touching any exposed metal on the chassis or case. In a laptop are exposed metal brackets and screws you could touch, and in most cases, even if the entire chassis is plastic, it will be coated with metallic paint on the inside, which acts as a shield for electromagnetic interference. Again, also be sure that any system you are working on is unplugged. Laptop systems should also have the main battery removed. Many systems today continue to feed power to the motherboard through the motherboard power connection whenever the computer is plugged in, even when the power switch is turned off. Working inside a laptop that is still connected to a power source, or with a main battery installed, can be very dangerous. The ESD kits, as well as all the other tools (and much more), are available from a variety of tool vendors. Specialized Products Company and Jensen Tools are two of the most popular vendors of computer and electronic tools and service equipment. Their catalogs show an extensive selection of very high quality tools. (These companies and several others are listed in the Vendor List on the CD.) With a simple set of hand tools, you will be equipped for nearly every computer repair or installation situation. The total cost of these tools should be less than $150, which is not much considering the capabilities they provide. A Word About HardwareThis section discusses some problems you might encounter with the hardware (screws, nuts, bolts, and so on) used in assembling a system. Types of HardwareOne of the biggest aggravations you encounter in dealing with various systems is the different hardware types and designs that hold the units together. Laptop and portable systems are notorious for using many more screws than desktop systems in their assembly, and the screws are often of several different types. For example, a typical laptop is assembled with up to 85 or more screws of up to eight or more different types! Most systems use a variety of small Phillips, Torx, tamperproof Torx, and hex-head screws. A Torx screw has a star-shaped hole driven by the correct-size Torx driver. These drivers carry size designations from T-5 through T-40, although only sizes T-5 through T-10 are commonly used in laptops. A variation on the Torx screw is the tamperproof Torx screw found in some systems. These screws are identical to the regular Torx screws, except that a pin sticks up from the middle of the star-shape hole in the screw. This pin prevents the standard Torx driver from entering the hole to grip the screw; a special tamperproof driver with a corresponding hole for the pin is required. Many manufacturers also use the more standard slotted-head and Phillips-head screws. Slotted-head screws should almost never be used in a computer, because it is too easy for the screwdriver to slip, thus damaging a board. Using tools on these screws is relatively easy, but tools do not grip these fasteners as well as they do hexagonal head and Torx screws. In addition, the heads can be stripped more easily than the other types. Extremely cheap versions tend to lose bits of metal as they're turned with a driver, and the metal bits can fall onto the motherboard. Stay away from cheap fasteners whenever possible; the headaches of dealing with stripped screws aren't worth it. English Versus MetricAnother area of aggravation with hardware is the fact that two types of thread systems exist: English and metric. Most laptop systems use metric fasteners. Tip Before you discard an obsolete computer, remove the screws and other reusable parts, such as cover plates, jumper blocks, and so on. Label the bag or container with the name and model of the computer to help you more easily determine where else you can use the parts later. Caution Some screws in a system can be length-critical, especially screws used to retain hard disk drives. You can destroy some hard disks by using a mounting screw that's too long; the screw can puncture or dent the sealed disk chamber when you install the drive and fully tighten the screw. When you install a new drive in a system, always make a trial fit of the hardware to see how far the screws can be inserted into the drive before they interfere with its internal components. When in doubt, the drive manufacturer's OEM documentation will tell you precisely which screws are required and how long they should be. Most drives sold at retail include correct-length mounting screws, but OEM drives usually don't include screws or other hardware. Test EquipmentIn some cases, you must use specialized devices to test a system board or component. This test equipment is not expensive or difficult to use, but it can add much to your troubleshooting abilities. Electrical Testing EquipmentI consider a voltmeter to be required gear for proper system testing. A multimeter can serve many purposes, including checking for voltage signals at various points in a system, testing the output of the power supply, and checking for continuity in a circuit or cable. An outlet tester is an invaluable accessory that can check the electrical outlet for proper wiring. This capability is useful if you believe the problem lies outside the computer system. Loopback Connectors (Wrap Plugs)For diagnosing serial- and parallel-port problems, you need loopback connectors (also called wrap plugs), which are used to circulate, or wrap, signals (see Figure 3.6). The plugs enable the serial or parallel port to send data to itself for diagnostic purposes. Figure 3.6. Typical wrap plugs, including 25-pin and 9-pin serial and 25-pin parallel versions. Various types of loopback connectors are available. To accommodate all the ports you might encounter, you need one for the 9-pin serial port and one for the 25-pin parallel port. It is highly unlikely that a laptop will have a 25-pin serial port, although these ports are sometimes found on docking stations or port replicators. Many companies, including IBM, sell the plugs separately, but be aware that you also need diagnostic software that can use them. Some diagnostic software products, such as Micro 2000's Micro-Scope, include loopback connectors with the product, or you can purchase them as an option for about $30 a set. Note that there are some variations on how loopback connectors can be made, and not all versions work properly with all diagnostic software. It is best to use the loopback connectors recommended by the diagnostic software you will be using. IBM sells a special combination plug that includes all three possible connector types in one compact unit. The device costs about the same as a normal set of wrap plugs. If you're handy, you can even make your own wrap plugs for testing. I include wiring diagrams for the three types of wrap plugs in Chapter 8, "Expansion Card Buses." In that chapter, you also will find a detailed discussion of serial and parallel ports. Besides simple loopback connectors, you also might want to have a breakout box for your toolkit. A breakout box is a DB25 connector device that enables you to make custom temporary cables or even to monitor signals on a cable. For most serial or parallel port troubleshooting uses, a "mini" breakout box works well and is inexpensive. MetersSome troubleshooting procedures require that you measure voltage and resistance. You take these measurements by using a handheld digital multimeter (DMM). The meter can be an analog device (using an actual meter) or a digital-readout device. The DMM has a pair of wires called test leads or probes. The test leads make the connections so that you can take readings. Depending on the meter's setting, the probes measure electrical resistance, direct current (DC) voltage, or alternating current (AC) voltage. Figure 3.7 shows a typical DMM being used to test the AC adapter on a typical laptop. In this particular example, I am testing an AC adapter that is rated for 15V output. As you can see, the DMM is reading 15.30V. The normal tolerance for voltage readings is plus or minus 5%, which in this case would be 14.25V through 15.75V. Therefore, the reading is well within that specification, meaning the adapter checks out as good. Figure 3.7. A typical digital multimeter tests a laptop AC adapter. Most newer meters are autoranging, which means they automatically select the appropriate measurement range when you take a reading. All you have to do is set the meter properly to read DC volts or AC volts. All readings will normally be DC. The only time you'll measure AC voltage is when checking wall outlets. In some meters, each measurement setting has several ranges of operation. DC voltage, for example, usually can be read in several scales, to a maximum of 200 millivolts (mV), 2V, 20V, 200V, and 1,000V. Because computers use +3.3V, +5V, and +12V for internal operations, and up to 20V for things like batteries and AC adapters, you should use the 20V scale for making your measurements. Making these measurements on the 200mV or 2V scale could "peg the meter" and possibly damage it because the voltage would be much higher than expected. Using the 200V or 1,000V scale works, but the readings at 5V and 12V are so small in proportion to the maximum that accuracy is low. If you are taking a measurement and are unsure of the actual voltage, start at the highest scale and work your way down. Most of the better meters have an autoranging capability; the meter automatically selects the best range for any measurement. This type of meter is much easier to operate. You simply set the meter to the type of reading you want, such as DC volts, and attach the probes to the signal source. The meter selects the correct voltage range and displays the value. Because of their design, these types of meters always have a digital display rather than a meter needle. Caution Whenever you are using a multimeter to test any voltage that could potentially be 50V or above (such as AC wall socket voltage), always use one hand to do the testing, not two. Either clip one lead to one of the sources and probe with the other, or hold both leads in one hand. If you hold a lead in each hand and accidentally slip, you can very easily become a circuit, allowing power to conduct or flow through you. When power flows from arm to arm, the path of the current is directly across the heart. The heart muscle tends to quit working when subjected to high voltages. It's funny that way. I prefer the small digital meters. You can buy them for only slightly more than the analog style, and they're extremely accurate and much safer for digital circuits. Some of these meters are not much bigger than a cassette tape; they fit in a shirt pocket. RadioShack sells a good unit in the $25 price range; the meter (refer to Figure 3.7) is a half-inch thick, weighs 3 1/2 ounces, and is digital and autoranging, as well. This type of meter works well for most, if not all, computer troubleshooting and test uses. Caution You should be aware that many analog meters can be dangerous to digital circuits. Larger analog meters often use a 9V battery to power the meter for resistance measurements. If you use this type of meter to measure resistance on some digital circuits, you can damage the electronics because you essentially are injecting 9V into the circuit. The digital meters universally run on 3V5V or less. Logic Probes and Logic PulsersA logic probe can be useful for diagnosing problems in digital circuits (see Figure 3.8). In a digital circuit, a signal is represented as either high (+5V) or low (0V). Because these signals are present for only a short time (measured in millionths of a second) or oscillate (switch on and off) rapidly, a simple voltmeter is useless. A logic probe is designed to display these signal conditions easily. Figure 3.8. A typical logic probe. Logic probes are especially useful for troubleshooting a dead system. By using the probe, you can determine whether the basic clock circuitry is operating and whether other signals necessary for system operation are present. In some cases, a probe can help you cross-check the signals at each pin on an integrated circuit chip. You can compare the signals present at each pin with the signals a known-good chip of the same type would showa comparison that is helpful in isolating a failed component. Logic probes also can be useful for troubleshooting some disk drive problems by enabling you to test the signals present on the interface cable or drive-logic board. A companion tool to the probe is the logic pulser, which is designed to test circuit reaction by delivering a logical high (+5V) pulse into a circuit, usually lasting from 1 1/2 to 10 millionths of a second. Compare the reaction with that of a known-functional circuit. This type of device normally is used much less frequently than a logic probe, but in some cases it can be helpful for testing a circuit. Outlet (Receptacle) TestersOutlet testers (also called receptacle testers) are very useful test tools. These simple, inexpensive devices, sold in hardware stores, test electrical outlets. You simply plug in the device, and three LEDs light up in various combinations, indicating whether the outlet is wired correctly (see Figure 3.9). Figure 3.9. A typical outlet/receptacle tester. Although you might think that badly wired outlets would be a rare problem, I have seen a large number of installations in which the outlets were wired incorrectly. Most of the time, the problem is in the ground wire. An improperly wired outlet can result in unstable system operation, such as random parity checks and lockups. With an improper ground circuit, currents can begin flowing on the electrical ground circuits in the system. Because the system uses the voltage on the ground circuits as a comparative signal to determine whether bits are 0 or 1, a floating ground can cause data errors in the system. Caution Even if you use a surge protector, it will not protect your system from an improperly wired outlet. Therefore, you still should use an outlet tester to ensure your outlet is computer friendly. Once, while running one of my PC troubleshooting seminars, I used a system that I literally could not approach without locking it up. Whenever I walked past the system, the electrostatic field generated by my body interfered with the system and the PC locked up, displaying a parity-check error message. The problem was that the hotel at which I was giving the seminar was very old and had no grounded outlets in the room. The only way I could prevent the system from locking up was to run the class in my stocking feet because my leather-soled shoes were generating the static charge. Other symptoms of bad ground wiring in electrical outlets are continual electrical shocks when you touch the case or chassis of the system. These shocks indicate that voltages are flowing where they should not be. This problem also can be caused by bad or improper grounds within the system. By using the simple outlet tester, you can quickly determine whether the outlet is at fault. If you just walk up to a system and receive an initial shock, it's probably only static electricity. Touch the chassis again without moving your feet. If you receive another shock, something is very wrong. In this case, the ground wire actually has voltage applied to it. You should check the outlet with an outlet/receptacle tester, and if it fails, have a professional electrician check the outlet immediately. If the outlet checks out okay, then the power supply inside the PC is probably failing (even though the system may seem to be otherwise running normally); it should be replaced. Although I recommend using an outlet/receptacle tester, if you don't have one handy, it is possible to test an outlet using a multimeter. First, remember to hold both leads in one hand. Test from one blade hole to another. This should read between 110V and 125V, depending on the electrical service in the area. Then check from each blade to the ground (the round hole). One blade hole, the smaller one, should show a voltage almost identical to the one you got from the blade holetoblade hole test. The larger blade hole when measured to ground should show less than 0.5V. Because ground and neutral are supposed to be tied together at the electrical panel, a large difference in these readings indicates that they are not tied together. However, small differences can be accounted for by current from other outlets down the line flowing on the neutral, when there isn't any on the ground. If you don't get the results you expect, call an electrician to test the outlets for you. More weird computer problems are caused by improper grounding and other power problems than people like to believe. Special Tools for the EnthusiastAll the tools described so far are commonly used by most technicians. However, a few additional tools do exist that a true computer enthusiast might want to have. Electric ScrewdriverPerhaps the most useful tool I use is an electric screwdriver. It enables me to disassemble and reassemble a computer in record time and makes the job not only faster but easier as well. I like the type with a clutch you can use to set how tight it will make the screws before slipping; such a clutch makes it even faster to use. If you use the driver frequently, it makes sense to use the type with replaceable, rechargeable batteries, so when one battery dies, you can quickly replace it with a fresh one. Caution Note that using an electric screwdriver when installing circuit boards can be dangerous because the bit can easily slip off the screw and damage the board. A telltale series of swirling scratches near the screw holes on the board can be the result, for which most manufacturers rightfully deny a warranty claim. Be especially careful when using an electric screwdriver on Phillips-head screws because when the screw is either fully loose or fully tight, an electric screwdriver tip will continue rotating and tend to walk out of the screw. Torx-head or hex-head screws are less likely to allow this to happen, but care should be taken when using an electric screwdriver on them as well. With the electric screwdriver, I recommend getting a complete set of English and metric nut driver tips as well as various sizes of Torx, flat-head, and Phillips-head screwdriver tips. Tamperproof Torx BitsAs mentioned earlier, many laptop systems as well as devices such as power supplies and monitors are held together with tamperproof Torx screws. Tamperproof Torx driver sets are available from any good electronics tool supplier. Temperature ProbeDetermining the interior temperature of a laptop is often useful when diagnosing whether heat-related issues are causing problems. This requires some way of measuring the temperature inside the unit as well as the ambient temperature outside the system. The simplest and best tools I've found for the job are the digital thermometers sold at most auto parts stores for automobile use. They are designed to read the temperature inside and outside the car and normally come with an internal sensor, as well as one at the end of a length of wire. With this type of probe, you can run the wired sensor inside the case (if it is metal, make sure it does not directly touch any exposed circuits where it might cause a short) with the wires slipped through a crack in the case or out one of the drive bays. Another option without opening the system is to clip the sensor to the exhaust vents to measure the air temperature exiting the system. Then, with the system running, you can take the internal temperature as well as read the room's ambient temperature. Many chips in the system can run at extremely high temperatures. For example, the Pentium 4-M is rated for a maximum die temperature of 100°C (212°F) and will automatically shut down if it reaches 135°C (275°F)! However the internal air temperature should be much less. Normally, internal air temperature should be 113°F (45°C) or less. If your system is running above that temperature, the chips will be running much hotter, and problems can be expected. Probing the temperature with a device such as this enables you to determine whether overheating might be the cause of lockups or other problems you may be having. Infrared ThermometerAnother useful temperature tool is a noncontact infrared (IR) thermometer, which is a special type of sensor that can measure the temperature of an object without physically touching it (see Figure 3.10). You can take the temperature reading of an object in seconds by merely pointing the handheld device at the object you want to measure and pulling a trigger. Figure 3.10. A noncontact infrared thermometer. An IR thermometer works by capturing the infrared energy naturally emitted from all objects warmer than absolute zero (0° Kelvin or 459°F). Infrared energy is a part of the electromagnetic spectrum with a frequency below that of visible light, which means it is invisible to the human eye. Infrared wavelengths are between 0.7 microns and 1000 microns (millionths of a meter), although infrared thermometers typically measure radiation in the range 0.714 microns. Because IR thermometers can measure the temperature of objects without touching them, they are ideal for measuring component temperatures directlyespecially the temperature of the CPU heatsink. Unfortunately, most laptops are not designed to be powered on while partially disassembled, and in some cases the normal airflow will be disrupted enough to cause overheating problems. Still, you can use the IR thermometer to measure any hot spots on the surface of the system. By merely pointing the device at the place you wish to measure and pulling the trigger, you can get a very accurate measurement in about 1 second. To enable more accuracy in positioning, many IR thermometers incorporate a laser pointer, which is used to aim the device. IR thermometers are designed to measure IR radiation from a device; they can't be used to measure air temperature. The sensors are specifically designed so that the air between the sensor and target does not affect the temperature measurement. Although several IR thermometers are available on the market, I use and recommend the Raytek (www.raytek.com) MiniTemp series, which consists of the MT2 and MT4. Both units are identical, but the MT4 includes a laser pointer for aiming. The MT2 and MT4 are capable of measuring temperatures between 0° and 500°F (18°260°C) in one-half of a second with an accuracy of about plus or minus 3°F (2°C). They cost $80$100 and are available from NAPA Auto Parts stores (these devices have many uses in automotive testing as well) and other tool outlets. |


EAN: 2147483647
Pages: 180