| Troubleshooting laptop and portable PC hardware problems can seem like a huge challenge, even if you're experienced with solving problems on desktop PCs. Some components that can be easily removed and replaced on desktop computers, such as hard disks, floppy drives, optical drives, processors, and BIOS chips, are built in to the system or use different interfaces than desktop PCs. Some types of diagnostic procedures, such as power supply testing, BIOS POST code analysis, and others, must be performed in different ways because of the differences between portable and desktop hardware. The proprietary nature of typical portable hardware is another challenge. Although the basic layout of one desktop PC is similar to another, different brands of portables are often extremely different internally, making it essential to obtain model-specific information before you open the system or make repairs. Although these challenges make laptop and portable computer problem solving and troubleshooting a bigger challenge than for desktop systems, you can still solve many hardware problems yourself by applying the techniques covered in this chapter. Modern Laptop ComputersMore Complicated and More Reliable Consider this: The modern laptop computer is an incredible collection of hardware and software. When you consider only the hardware, there are tens of millions of transistors in typical processors alone; nearly 4.3 billion transistors in a 512MB stick of RAM; hundreds of millions of transistors in the motherboard chipset, video processor, and video RAM; and millions more in the other adapter cards and logic boards in the system. Not only must each of these billions of interconnected transistors function properly, they must all operate in an orderly fashion within strictly enforced timing windows, some of which are measured in picoseconds (trillionths of a second)! When you realize that your laptop will lock up or crash if any one of these transistors fails to operate properly and on time, and/or if any one of the billions of circuit paths and interconnections between the transistors or devices containing them fails in any way, it is a wonder that laptops work at all! Note A typical mobile processor such as the Intel Mobile Pentium 4-M contains 55 million transistors, whereas the latest mobile processor from Intel, the Pentium M, has 77 million transistors. The Pentium M is the processor component of Intel's Centrino technology, which also includes a sophisticated chipset (the Intel 915 Express) and the Intel PRO/Wireless 2200 Wi-Fi IEEE 802.11b/g wireless network adapter. The latest mobile processor from AMD, the Athlon XP-M, contains 37.5 million transistors. It has a 512KB L2 cache and uses AMD's PowerNow! technology to dynamically control the processor's power usage, which helps to optimize the laptop's battery life.
Every time I turn on one of my systems and watch it boot up, I think about the billions upon billions of components and trillions upon trillions of machine/program steps and sequences that have to function properly to get there. As you can now see, there are many opportunities for problems to arise. Although modern laptop computers are exponentially more complicated than their predecessors, from another point of view, they have also become simpler and more reliable. When you consider the complexity of the modern laptop computers, it is not surprising that occasionally problems do arise. However, modern design and manufacturing techniques have made laptop computers more reliable and easier to service despite their ever-increasing internal complexity. Today's systems have fewer and fewer replaceable components and individual parts, which is sort of a paradox. The truth is that as laptop computers have become more complex, they have become simpler and easier to service in many ways as well! Desktop and Laptop Components Compared Although laptop and portable computers use the same operating systems and external peripherals as their desktop siblings, internally they are much different. Although there are industry standards for processors, memory, hard drives, and other components inside a typical laptop computer, they are much different from the standards supported by a typical desktop computer, as you can see from Table 16.1. Table 16.1. Desktop and Laptop Component StandardsComponent Type | Desktop Standard | Laptop Standard | Notes |
|---|
Memory module | DIMM (168, 184-pin); RDRAM (184, 232-pin) | SODIMM (144-pin, 200-pin); SORIMM (160-pin) | SO stands for small outline. SODIMMs and SORIMMs are physically smaller than desktop memory modules. Older systems often use proprietary modules. | Hard disk | ATA/IDE (40-pin) Serial ATA; 3.5-inch form factor | ATA/IDE (44-pin); 2.5-inch form factor or proprietary swappable | Laptop versions of ATA/IDE use a single connector for power and data. Models that support swappable drives usually allow special types of hard, floppy, and optical drives to be swapped in place of each other. | Processor | Socket 478, Socket 754, Socket 775 processors | Mobile processors | Mobile processors use lower voltages and are sometimes optimized for different chipsets than standard processors. | Modem | PCI card or integrated | Built-in or Mini PCI card | Typical Mini PCI modems also support 10/100 Ethernet networks. | 10/100 Ethernet | PCI card or integrated into motherboard | Built-in or Mini PCI card | Typical Mini PCI 10/100 Ethernet network adapters also provide modem functions. | Floppy drive | 34-pin floppy interface | Proprietary fixed or proprietary swappable | Different models from the same vendor might use the same swappable floppy drive, but different brands are not interchangeable. | Optical (CD, DVD, rewritable) drive | 40-pin ATA/IDE interface | Proprietary fixed or proprietary swappable | Different models from the same vendor might use the same swappable optical drive, but different brands are not interchangeable. | Power supply | LPX (12-pin) or ATX (20-pin) | Proprietary | Some older models have built-in power supplies, but most use an external "brick" AC/DC power converter. |
As you can see from Table 16.1, many of the components used in notebook computers follow different standards than those used in desktop computers. As a consequence, most parts cannot be freely interchanged between different models and brands of notebook computers the way they can between desktop computers. However, many of the parts listed in Table 16.1, as well as the CMOS battery used to maintain BIOS settings, can normally be removed for upgrades or repairs. Devices that are normally not industry standard (and therefore not generically replaceable) include the following: Motherboard CPU heatsink/fan Chassis Video card (integrated into the motherboard chipset, or a separate graphics chip might be built in to the motherboard) LCD display panel Modem (if not part of a Mini PCI card; it might be integrated into the motherboard on some systems) Sound card (might be integrated into the motherboard chipset or might be a separate chip built in to the motherboard) Speakers Keyboard (built in) Pointing device (TrackPoint or touchpad)
Although many of these components may not be industry standard, they can occasionally be repaired or replaced (depending on the specific make, model, and implementation of the component). From a hardware troubleshooting/repair perspective, any one of these components could be either improperly installed (configured) or defective. If improperly installed or configured, the component can be "repaired" by merely reinstalling or configuring it properly. If truly defective, the component can be replaced. When any laptop or desktop PC is broken down into its basic replaceable parts, you can see that it really isn't too complicated, which is why I've spent my career helping people easily perform their own repairs and upgrades, and even build entire systems from scratch. Reinstall or Replace? When you are dealing with hardware problems, the first simple truth to understand is that you do not normally repair anything; you reinstall or replace it instead. Reinstall comes from the fact that the many laptop hardware problems are due to a particular component being improperly installed or configured. I remember hearing from IBM many years ago that it had found 60% or more of the problems handled by their service technicians were due to improper installation or configuration, meaning the hardware was not actually defective. This was in fact the major impetus behind the Plug and Play revolution, which has eliminated the need to manually configure jumpers and switches on most hardware devices, minimizing the expertise needed to install hardware properly, and thus also minimizing installation, configuration, and resource-conflict problems. Still, Plug and Play has sometimes been called "Plug and Pray," because it does not always work perfectly, sometimes requiring manual intervention to get things to work properly. Although most laptop hardware is built in to the system or attaches to hot-swappable connections such as PC Card or CardBus slots, USB ports or IEEE 1394a (FireWire 400, i.LINK) ports, problems with BIOS configuration, Windows configuration, or improper internal connections can still cause laptop hardware to fail. Replace comes from the economics of the situation with computer hardware. The bottom line is that it financially is much cheaper to replace a failed component with a new one than to repair it. Modern boards use surface-mounted chips that have pin spacing measured in hundredths of an inch, requiring sophisticated and expensive equipment to attach and solder the chip. Even if you could figure out which chip had failed and had the equipment to replace it, the chips themselves are usually sold in quantities of thousands, and obsolete chips are normally not available. The net effect of all this is that the replaceable components in your laptop have become disposable technology, including drives and LCD panels. Even a component as comprehensive as the motherboard is replaced rather than repaired. Sources for Laptop Computer Parts Obtaining known-working components for use with desktop computers is fairly simple because most components can be swapped between different brands and models of PCs. However, this is a more challenging task when you are supporting laptop and portable computers. Here are some ways to make parts-swapping easier: Buy identical laptop computers whenever possible. As I discuss in Chapter 17, "Portable Resource Guide," different lines of laptop computers from the same vendor can vary greatly because most laptop computers are produced by one of several offshore (primarily Taiwanese) OEM vendors. If you buy multiple units of the same model, you can use one as a parts source for others. If you cannot afford to buy identical models, try to buy models in the same product family to improve the odds of interchanging parts. Determine the "real" OEM manufacturer of the laptop(s) you support. Review sources such as PC Magazine sometimes identify the actual maker of a particular laptop. In Chapter 17, I provide the names and websites for the major OEM makers of laptops. This information might enable you to contact the vendor directly for parts or at least determine which other brands/models might be similar to yours. Another method of determining this information is the FCC ID Search Page at https://gullfoss2.fcc.gov/prod/oet/cf/eas/reports/GenericSearch.cfm. Enter the FCC ID from the computer to determine its manufacturer. Keep broken/defective laptops for parts. Even if a laptop has suffered a catastrophic failure such as a broken LCD panel or motherboard, it can still provide replacements for keyboard, drive, power supply, and other modules for identical or similar models. Save parts removed during upgrades for use in testing or as spares. If you upgrade memory, drives, or batteries and the components you replaced still work, keep them for use as replacements for identical or similar models.
As an alternative to contacting the vendor for replacement parts using the contact information in Chapter 17, you might want to contact third-party vendors that specialize in notebook componentseither OEM or equivalents. Some of these vendors (listed in alphabetical order) include the following: Advanced Computer Services Sells new, used, and pulled parts for IBM, Compaq, and Toshiba desktop and laptop computers as well as computers and other types of parts. www.partsandsystems.com 2262 South Arlington Road, Akron, OH 44319 Phone: 330-785-5500 Fax: 330-785-5501 Altech Sells new, used, and refurbished notebook parts as well as other types of computer components. www.altechco.com 10612B Hempstead, Houston, TX 77092 Phone: 713-680-9323 Fax: 713-680-3519 Chhabra Enterprises, LLC Sells used, refurbished, and new laptop/notebook batteries, drives, and other components for major brands of laptop computers to end users. www.betterdealcomputers.com 344 Fee Fee Road, Maryland Heights, MO 63043 Phone: 314-770-1070 Fax: 314-770-0935 Service shops and stores can order from the sister company, LaptopUniverse.com (same street address and phone number). Computer Parts Unlimited Distributes parts for major brand-name notebook computers. www.cpumart.com 3949 Heritage Oak Court, Simi Valley, CA 93063 Phone: 800-644-4494 Fax: 805-306-2599 Express Technology Incorporated Distributes parts for Compaq, Dell, IBM, and other major notebook and desktop computer and peripheral vendors. Offers a model-specific lookup system for some brands. www.etiexpress.com 410 South Perry Lane, Suite 2, Tempe, AZ 85281 Phone: 480-921-2888 Fax: 480-921-0454 IDParts, Inc. Specializes in replacement LCD displays for most recent laptop computers. Also replaces defective LCD displays and repairs laptops. www.idparts.com Corporate office: 1009 Omeide Park, Greensburg, PA 15601-8608 Phone: 724-838-9588 Fax: 724-838-9589 Wisconsin location: 2000 O'Neil Road, Suite 200, Hudson, WI 54016-8167 Phone: 715-531-0393 Fax: 715-531-0394 See the website to determine which location to contact for your specific computer model. SourceOne Computer Products, Inc. Sells laptop parts for most major brands. Also performs repairs. www.sourceonecomputer.com 8343 North Steven Road, Milwaukee, WI 53223 Phone: 414-355-9448 Fax: 414-355-9778
Troubleshooting by Replacing Parts There are several ways to troubleshoot a laptop, but in the end it often comes down to simply reinstalling or replacing parts. This process is more effective with desktop systems because more of their components are industry standard and readily replaceable. However, it's still a plausible way to solve problems with defective laptops. You just have a smaller pool of parts that you can easily replace. Regardless, that is why I normally use a very simple "known-good spare" technique that requires very little in the way of special tools or sophisticated diagnostics. In its simplest form, say you have two identical laptops sitting side by side. One of them has a hardware problem; in this example, let's say the removable memory module (SODIMM or small outline dual inline memory module) is defective. Depending on how the SODIMM is defective and where the defect lies, this could manifest itself in symptoms from a completely dead system to one that boots up normally but crashes when running Windows or software applications. You observe that the system on the left has the problem, but the system on the right works perfectly, and they are otherwise identical. The simplest technique for finding the problem would be to swap the memory module from one system with another, one at a time, retesting after each swap. Note Although many laptop components require you to disassemble the computer to access them, you can access most laptop memory modules by flipping over the computer and removing a small cover on the bottom of the unit.
At the point when the SODIMMs were swapped, upon powering up and testing (in this case, testing is nothing more than allowing the system to boot up and to run some of the installed applications), you find that the problem has now moved from one system to the other. Knowing that the last item swapped over was the SODIMM, you have just identified the source of the problem! This did not require an expensive ($2K or more) memory test machine or any diagnostics software. Because components such as SODIMMs are not economical to repair, replacing the defective SODIMM would be the final solution. Although very simplistic, this is often the quickest and easiest way to identify a problem component as opposed to specifically testing each item with diagnostics. Instead of having an identical system standing by to borrow parts from, most technicians will have an inventory of what they call known-good spare parts. This means parts that have been previously used, are known to be functional, and can be used to replace a suspicious part in a problem machine. Note that this is different from new replacement parts, because when you open up a box containing a new component, you really can't be 100% sure it works. I've been in situations in which I've had a defective component, replaced it with another (unknown to me) defective new component, and the problem remained. Not knowing that the new part I just installed was also defective, I wasted a lot of time checking other parts that were not the problem. The reason is that so few parts are needed to make up a laptop computer, and the known-good parts don't always have to be the same (for example, a smaller-capacity hard disk or memory module can be used to verify that the original, higher-performance component has failed). Troubleshooting by the Bootstrap Approach Another method that can be useful for troubleshooting a malfunctioning laptop is the bootstrap approach, which is especially good for what seems to be a dead system. This approach involves taking the system apart, stripping it down to the bare-minimum necessary functional components, and testing it to see if it works. Because laptops have fewer removable components, this approach can be a little trickier than when using it on a desktop PC. However, even with portables, the bootstrap troubleshooting approach is still viable. For example, to prep a laptop for testing, you would disconnect or remove the following items: Printer Network cable External mouse and keyboard External modem External floppy drive USB devices Port replicator Main battery Hard disk SODIMMs (except for one; note that many laptops have nonremovable memory along with one or more sockets for removable memory; in such cases, you should take out all removable memory) Bay devices (drives, battery, and so on) PC Cards
After you've removed these components, power up the system to see if it works. If any of the removed components are defective, removing them should enable the system to start up, at least to the point where the Power On Self Test (POST) or splash (logo) screen is visible on the display. If the system displays this information, you know that the motherboard, CPU, RAM, video circuits, and LCD display are functional. If you don't see this information, turn off the system and plug an external monitor into the laptop computer and try starting it again. If the external display shows the startup information, but the internal display does not, the system might be configured improperly. If you can get the system to a minimum of components that are functional and the system starts, reinstall or add one part at a time, testing the system each time you make a change to verify that it still works and that the part you added or changed was not the cause of a problem. For example, add an external floppy drive and try booting from a bootable floppy disk. If that works, then try adding a swappable hard drive. Essentially, you are rebuilding the system, using the existing parts, but doing it one step at a time. If the system fails to start up properly after you add a component, it's likely you've found the source of your problems. Note If the laptop won't boot even after you disconnect all optional hardware, there might be a problem with the Power On Self Test (POST). See "Problems During the POST," later in this chapter, for solutions and testing procedures. The single most important step to follow when you run a laptop in bootstrap mode is to remove the main battery and run the laptop from AC power. Defective batteries can cause laptops to crash, get stuck in suspend or sleep modes, and other problems.
Many times, problems can be caused by corrosion on contacts or connectors, so often the mere act of disassembling and reassembling accessible components on a laptop "magically" repairs it. Over the years I've disassembled, tested, and reassembled many systems only to find no problems after the reassembly. How can merely taking a system apart and reassembling it repair a problem? Although it may seem that nothing was changed and everything is installed exactly like it was before, in reality the mere act of unplugging and replugging renews all the slot and cable connections between devices, which is often all the system needs. Here are some useful troubleshooting tips: Eliminate unnecessary variables or components that are not pertinent to the problem. Reinstall, reconfigure, or replace only one component at a time. Test after each change you make. Keep a detailed record (write it down) of each step you take. Don't give up! Every problem has a solution. If you hit a roadblock, take a break and work on another problem. A fresh approach the next day often reveals things you overlooked. Don't overlook the simple or obvious. Double- and triple-check the installation and configuration of each component. Keep in mind that batteries and power adapters are two of the most failure-prone parts in a laptop computer, as well as some of the most overlooked components. A "known-good" spare power adapter is highly recommended to use for testing suspect systems. If a system runs without the battery but fails when the battery is installed, the battery is defective and should be replaced. Cables and connections are also a major cause of problems. Keep replacements of all types on hand. Don't rule out consulting a pro. Whereas most problems with desktop systems can be resolved with your own blood, sweat, and tears, with laptops sometimes the only viable solution is to consult the manufacturer of the laptop or the business from which you purchased it.
Before starting any system troubleshooting, you should perform a few basic steps to ensure a consistent starting point and to enable isolating the failed component: 1. | Turn off the system and any peripheral devices. Disconnect all external peripherals from the system.
| 2. | Make sure the system is plugged into a properly grounded power outlet.
| 3. | If the LCD panel has a brightness control, make sure the display is set to at least two-thirds of the maximum. The brightness or brightness/contrast control might use a sliding switch or keyboard controls. Consult the display documentation for more information on how to adjust these settings. If you can't get any video display on the built-in LCD panel but the system seems to be working, plug in an external monitor and press the key combination needed to send video output to an external display.
| 4. | To enable the system to boot from a hard disk, make sure no media are in a removable storage drive. In the case of laptops, this usually is either the floppy disk drive or CD/DVD-ROM drive (or both). Alternatively, put a known-good bootable floppy or CD with DOS or diagnostics on it in the drive for testing.
| 5. | Turn on the system. Check the chassis fan (if any) and the lights on the system front panel. If the fan doesn't spin and the lights don't light, the power supply or motherboard might be defective.
Note The exhaust fan on a given laptop computer model might be located on the left or right side or the rear of the system. Laptop computers use very small and quiet fans, so use your hand to determine whether the fan is blowing air; you probably won't be able to hear it. | 6. | Observe the Power On Self Test (POST). If no errors are detected, the system beeps once and boots up. Errors that display onscreen (nonfatal errors) and do not lock up the system offer a text message that varies according to BIOS type and version. Record any errors that occur and refer to the BIOS error codes listed later in this chapter for more information on any specific codes you see. Errors that lock up the system (fatal errors) are indicated by a series of audible beeps. Beep codes for popular BIOS chips are also listed later in this chapter.
| 7. | Confirm that the operating system loads successfully.
|
Problems During the POST Problems that occur during the POST are usually caused by incorrect hardware configuration or installation. Actual hardware failure is a far less frequent cause. The POST reports errors three ways: Onscreen error messages Beep codes Hex codes
Some onscreen error messages are self-explanatory, whereas numeric error messages require you to look up the error in a listing for the BIOS version the computer uses. To determine the meaning of the beep codes generated by the POST, you also need to look up the beep codes in a listing for the BIOS version the computer uses. On a typical desktop computer, hex codes (which change during the boot process and can be used to determine startup problems) can be displayed through the use of a POST diagnostics card that plugs into a PCI or ISA slot. Although notebook computers lack these slots, some notebook computers have BIOS chips that direct hex code output to the parallel port, where a device such as the MicroPOST from Ultra-X (about $60; visit www.uxd.com) can display it (see Figure 16.1). POST diagnostic devices such as MicroPOST include lists of hex codes for popular BIOSes. Figure 16.1. Using the Ultra-X MicroPOST to read POST codes (the code displayed is 04) from a typical laptop computer. 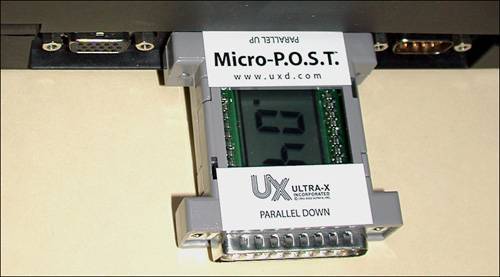
Note According to Ultra-X, almost all IBM and most newer Toshiba notebook computers output POST hex codes to the parallel port. Some Compaq and other brands of notebook computers also output POST codes to the parallel port. However, Dell notebooks do not support this feature. Some desktop computers also support parallel-port POST code output. It's important to realize that a given computer's support for parallel-port output of POST hex codes is determined by the BIOS revision the computer uses. If you update the BIOS on a particular laptop (or desktop) computer, that computer might support parallel-port POST output, or it might lose support for parallel-port POST output.
Regardless of type, if you have a POST error, be sure to check the following: Are all cables correctly connected and secured? Are the configuration settings correct in Setup for the devices you have installed? In particular, ensure the processor, memory, and hard drive settings are correct. Are all drivers properly installed? Are all resource settings on add-in and peripheral devices set so that no conflicts exist (for example, two add-in devices sharing the same interrupt)? Are PC Card/CardBus adapters and swappable disk drives installed correctly? Is a bootable hard disk (properly partitioned and formatted) installed? Does the BIOS support the drive you have installed? If so, are the parameters entered correctly? If you are booting from floppy disk, is the disk installed in drive A: bootable? Are all memory modules installed correctly? Try reseating them.
Hardware Problems After Booting If problems occur after the system has been running and without your having made any hardware or software changes, a hardware fault possibly has occurred. Here is a list of items to check in that case: Try reinstalling the software that has crashed or refuses to run. Use the Reset button to restart the computer. It might be recessed and require a paperclip or pen point on some models. Check for loose cables, a marginal power supply, or other random component failures. A transient voltage spike, power outage, or brownout might have occurred. Symptoms of voltage spikes include a flickering video display, unexpected system reboots, and the system not responding to user commands. Reload the software and try again. Try reseating the removable memory modules if installed.
Problems Running Software Problems running application software (especially new software) are usually caused by or related to the software itself, or they are due to the fact that the software is incompatible with the system. Here is a list of items to check in that case: Does the system meet the minimum hardware requirements for the software? Check the software documentation to be sure. Check to see whether the software is correctly installed. Reinstall it if necessary. Check to see whether the latest drivers are installed. You can use Windows Update or download updated drivers directly from the laptop or peripheral vendors' website. Scan the system for viruses using the latest antivirus software and updated signature files.
Note Many laptops use integrated video, which borrows part of the main memory for video use. On recent systems, this can result in as much as 32MB or more of memory being "lost" to system use. For example, a system with 128MB of RAM with 32MB dedicated to video has only 96MB (128MB 32MB) available for system (Windows) use. When you are determining whether a system has enough memory, be sure to consider the net amount of memory available after video requirements have been met.
Problems with Adapter Cards Because laptops use PC Card and CardBus adapter cards, which are configured by Windows, it's pretty difficult to have IRQ or other conflicts. However, in rare cases it can happen if the cards' settings can be changed manually and you decide to start fiddling around with them. On a notebook computer that runs Microsoft Windows, various types of driver issues are the mostly likely cause of adapter card problems. To solve these problems with Windows, view the card's properties in the Windows Device Manager and follow the recommendations given for cards that are not working (yellow exclamation point) or have been disabled (red X). In most cases, the first thing to try is to install updated drivers that match the hardware and work with the operating system version in use. Note To open the Windows Device Manager in Windows XP, right-click the My Computer icon and select Properties. Select the Hardware tab and click the Device Manager button.
Diagnostics This section describes several levels of diagnostic software that are either included with your system or are available from your system manufacturer as well as third parties. It describes how you can get the most from this software. It also details the various ROM BIOS audio codes and error codes and examines aftermarket diagnostics and public-domain diagnostic software. Diagnostics Software Several types of diagnostic software are available for laptops. Some diagnostic functions are integrated into the laptop hardware or into peripheral devices, such as PC Card or CardBus cards and their driver/setup software, whereas others take the form of operating system utilities or separate software products. This software, some of which is included with the system when purchased, assists users in identifying many problems that can occur with a computer's components. In many cases, these programs can do most of the work in determining which component is defective or malfunctioning. The types of diagnostic software are as follows: POST The Power On Self Test operates whenever any laptop is powered up (switched on). These routines are contained within the motherboard ROM as well as the ROM chip on expansion cards. Manufacturer-supplied diagnostics software Many of the larger manufacturers (especially high-end, name-brand manufacturers such as IBM, Hewlett-Packard, Dell, and others) make special diagnostics software expressly designed for their systems. This manufacturer-specific software normally consists of a suite of tests that thoroughly examine the system. In some cases, these utilities are included with the system, or you can download these diagnostics from the manufacturer's online services at no charge (otherwise, you might have to purchase them). Many vendors include a limited version of one of the aftermarket packages customized for use with their systems. In some older IBM and Compaq systems, the diagnostic software is installed on a special partition on the hard drive and can be accessed during startup. This was a convenient way for those system manufacturers to ensure that users always had diagnostics available. Peripheral diagnostics software Many hardware devices ship with specialized diagnostics software designed to test their particular functions. A network adapter usually includes a diagnostic specific to that adapter on a disk, also normally with the drivers. Other devices or adapters also might provide a diagnostic program or disk, usually included with the drivers for these devices. Operating system diagnostics software Operating systems, such as Windows 9x/Me and Windows NT/2000/XP, include a variety of diagnostic software utilities designed to identify and monitor the performance of various components in the computer. Aftermarket diagnostics software A number of manufacturers make general-purpose diagnostics software for laptops. This type of software is often bundled with other system maintenance and repair utilities to form a general laptop software toolkit.
The Power On Self Test When IBM first began shipping the original PC in 1981, it included safety features that had never before been seen in a personal computer. These features included the Power On Self Test (POST) and parity-checked memory. Although parity-checked memory, or even error correcting code (ECC) memory, is no longer available in most low-end chipsets, every laptop still executes a POST when you turn it on. The following subsections provide more detail on the POST, a series of program routines buried in the motherboard's ROM BIOS chip that test all the main system components at power-on time. This series of routines is partially responsible for the delay when you turn on your laptop; the computer executes the POST before loading the operating system. We've already covered some of the features and functions of the POST in the previous sections. The following subsections review some of that material but also more thoroughly cover the output beeps and codes that specific BIOSes generate. What Is Tested? Whenever you start up your computer, it automatically performs a series of tests that check the primary components in your system, such as the CPU, ROM, motherboard support circuitry, memory, and major peripherals. These tests are brief and are designed to catch hard (not intermittent) errors. The POST procedures are not very thorough compared with available disk-based diagnostics. The POST process provides error or warning messages whenever it encounters a faulty component. Although the diagnostics performed by the system POST are not very thorough, they are the first line of defense, especially when it comes to detecting severe motherboard problems. If the POST encounters a problem severe enough to keep the system from operating properly, it halts the system boot process and generates an error message that often identifies the cause of the problem. These POST-detected problems are sometimes called fatal errors because they prevent the system from booting. How Are Errors Reported? The POST on a laptop or notebook system normally provides two types of output messages: audio codes and onscreen text messages. POST errors can be revealed in the following ways: Beep codes are used for fatal errors only, which are errors that occur so early in the process that video circuits and other devices are not yet functional. Because no display is available, these codes take the form of a series of beeps that identify the faulty component. When your computer is functioning normally, you should hear one short beep when the system starts up at the completion of the POST, although some systems (such as Compaq's) beep once or twice at the end of a normal POST. If a problem is detected, a different number of beeps sounds, sometimes in a combination of short and long tones. Onscreen messages are brief messages that attempt to indicate a specific failure. These messages can be displayed only after the video adapter card and display have been initialized. These different types of error messages are BIOS dependent and vary among BIOS manufacturers, and in some cases even among different BIOSes from the same manufacturer. The following subsections list the codes used by the most popular ROM BIOS versions (AMI, Award, Phoenix, and IBM BIOS), but you should consult your motherboard or ROM BIOS manufacturer for the codes specific to your board and BIOS. AMI BIOS POST Error Codes Laptops that use the AMI BIOS use the beep codes in Table 16.2 to report the problems indicated. The corrective actions listed in this table were originally written for desktop computers, so I've adapted them for use with laptop computers. Table 16.2. AMI BIOS POST Beep CodesBeeps | Error Description | Action | Notes for Laptop Users |
|---|
1 | DRAM Refresh Error | Clean the memory contacts and reseat the modules. Remove all modules except the first bank. Replace the memory. Replace the power supply. Replace the motherboard. | If the system has no removable memory installed, the built-in memory or the motherboard has failed, and the system must be serviced or replaced. | 2 | Memory Parity Error | Replace the memory. Replace the power supply. Replace the motherboard. | This error is unlikely to apply to most recent systems because most laptops don't use parity-checked memory. | 3 | Base 64KB Memory Failure | Replace the memory. Replace the power supply. Replace the motherboard. | If the system has no removable memory installed, the built-in memory or the motherboard has failed, and the system must be serviced or replaced. | 4 | System Timer Failure | Check for proper motherboard installation, foreign objects causing shorts, loose screws, and over-tightened screws. Remove and clean the first bank of memory and reseat the module. Replace the memory. Replace the motherboard. | If there are no loose components or screws inside the laptop, the motherboard has probably failed, and the system must be serviced or replaced. This problem can also be caused by a memory error in the first bank of memory. | 5 | Processor Error | Check for proper motherboard installation, foreign objects causing shorts, loose screws, and over-tightened screws. Make sure the processor and heat sink are installed properly (remove and reseat). Replace the processor. Replace the motherboard. | Remove the processor only if the processor is installed in a ZIF socket. Be sure to replace the thermal material between the processor and the heatsink with approved material after removing the old thermal material from both the processor and the heatsink. If the processor is soldered to the motherboard, the system must be serviced or replaced. | 6 | Gate A20 Failure | Caused by a defective keyboard controller. Replace the keyboard controller on the motherboard. | The keyboard controller normally allows Gate A20 to switch the processor to protected mode. | 7 | Virtual Mode Processor Exception Error | Make sure the processor and heat sink are installed properly (remove and reseat). Replace the processor. Replace the motherboard. | Be sure to replace the thermal material between the processor and the heatsink with approved material after removing the old thermal material from both the processor and the heatsink. | 8 | Display Memory Read/Write Error | Check the video card for proper installation. Try replacing the video card memory. Replace the video card. Replace the motherboard. | Laptops must be serviced or replaced because their video is built in to the motherboard or integrated into the chipset. | 9 | ROM Checksum Error | Try reseating the motherboard ROM chip. Try reflashing the motherboard ROM. Replace the motherboard. | If the ROM BIOS is soldered in place, follow the directions to reflash the BIOS as your first step. | 10 | CMOS Shutdown Register Read/Write Error | Replace the CMOS battery. Replace the motherboard. | The CMOS battery is often a proprietary module that uses a short cable to plug into the motherboard. | 11 | Cache Memory Bad | Make sure cache settings in BIOS Setup are properly configured. Replace the processor. Replace the motherboard. | All modern processors (Pentium II and newer; AMD Athlon and newer) contain the cache memory used by the system. | 1 long, 3 short | Conventional/Extended Memory Error | Clean the memory contacts and reseat the modules. Remove all modules except the first bank. Replace the memory. Replace the power supply. Replace the motherboard. | If the system has no removable memory installed, the built-in memory or the motherboard has failed, and the system must be serviced or replaced. | 1 long, 8 short | Display/Retrace Error | Check the video card for proper installation. Try replacing the video card memory. Replace the video card. Replace the motherboard. | Laptops must be serviced or replaced because their video is built in to the motherboard or integrated into the chipset. | AMI BIOS codes used by permission of American Megatrends, Inc. |
Award BIOS and Phoenix FirstBIOS POST Error Codes Currently, only one standard beep code exists in the Award BIOS (also known as the Phoenix FirstBIOS). A single long beep followed by two short beeps indicate that a video error has occurred and that the BIOS cannot initialize the video screen to display any additional information. If multiple or continuous beeps occur with an Award BIOS, this usually indicates problems with the power supply or memory (refer to Tables 16.3 and 16.4). Table 16.3. Award BIOS/Phoenix FirstBIOS POST Beep CodesBeeps | Error Description | Action | Notes for Laptop Users |
|---|
One long, two short | Video Card Error | Check the video card for proper installation. Try replacing the video card memory. Replace the video card. Replace the motherboard. | Laptops must be serviced or replaced because their video is built in to the motherboard or integrated into the chipset. | One long, three short | Video Card Error | Check the video card for proper installation. Try replacing the video card memory. Replace the video card. Replace the motherboard. | Laptops must be serviced or replaced because their video is built in to the motherboard or integrated into the chipset. | Continuous Beeps | Memory Error | Clean the memory contacts and reseat the modules. Remove all modules except the first bank. Replace the memory. Replace the power supply. Replace the motherboard. | If the system has no removable memory installed, the built-in memory or the motherboard has failed, and the system must be serviced or replaced. |
Table 16.4. Award BIOS POST Onscreen Error MessagesMessage | Description |
|---|
BIOS ROM checksum error - System halted | The checksum of the BIOS code in the BIOS chip is incorrect, indicating the BIOS code might have become corrupt. Contact your system dealer to replace the BIOS. | CMOS battery failed | The CMOS battery is not functional. Replace the CMOS battery. Contact a laptop parts dealer to determine the type and location of the CMOS battery used in your laptop. | CMOS checksum error - Defaults loaded | The checksum of CMOS is incorrect, so the system loads the default equipment configuration. A checksum error can indicate that CMOS has become corrupt. This error might have been caused by a weak battery. Check the battery and replace it if necessary. | CPU at nnnn | Displays the running speed of the CPU. | Press ESC to skip memory test | You can press Esc to skip the full memory test. | Floppy disk(s) fail | Can't find or initialize the floppy drive controller or the drive. Make sure the controller is installed correctly. If no floppy drives are installed or connected to the computer, be sure the Diskette Drive selection in Setup is set to NONE or AUTO. | HARD DISK initializing. Please wait a moment | Some hard drives require extra time to initialize. | HARD DISK INSTALL FAILURE | Can't find or initialize the hard drive controller or the drive. Make sure the controller is installed correctly. If no hard drives are installed, be sure the Hard Drive selection in Setup is set to NONE. | Hard disk(s) diagnosis fail | The system might run specific disk diagnostic routines. This message appears if one or more hard disks return an error when the diagnostics run. | Keyboard error or no keyboard present | Can't initialize the keyboard. Make sure the keyboard is attached (installed) correctly and no keys are pressed during POST. If you have removed the integrated keyboard to install a component, make sure you reconnected and reinstalled the keyboard correctly. If you use an external keyboard, shut down the laptop, unplug the keyboard, and restart the system using the integrated keyboard. | Keyboard is locked out - Unlock the key | This message usually indicates that one or more keys have been pressed during the keyboard tests. Be sure no objects are resting on the keyboard. | Memory Test: | This message displays during a full memory test, counting down the memory areas being tested. | Memory test fail | If POST detects an error during memory testing, additional information appears giving specifics about the type and location of the memory error. If the memory location with the error is found in removable memory, swap memory modules and retry the system. If the memory location is found in built-in memory, service or replace the laptop. | Override enabled - Defaults loaded | If the system can't boot using the current CMOS configuration, the BIOS can override the current configuration with a set of BIOS defaults designed for the most stable, minimal-performance system operations. | Press TAB to show POST screen | System OEMs might replace Phoenix Technologies' Award BIOS POST display with their own proprietary displays. Including this message in the OEM display permits you to switch between the OEM display and the default POST display. | Primary master hard disk fail | POST detects an error in the primary master IDE hard drive. If the drive is swappable, or if you have replaced the original drive with a new drive, shut down the computer, recheck the drive installation, and restart the system. | Primary slave hard disk fail | POST detects an error in the primary IDE hard drive. If your system supports multiple hard disks with a swappable bay, shut down the system, eject and reconnect the additional hard disk, and restart the system. | Resuming from disk, Press TAB to show POST screen | Phoenix Technologies offers a save-to-disk feature for notebook computers. This message might appear when you restart the system after a save-to-disk shutdown. | Secondary master hard disk fail | POST detects an error in the secondary master IDE hard drive. If your system supports multiple hard disks with a swappable bay, shut down the system, eject and reconnect the additional hard disk, and restart the system. | Secondary slave hard disk fail | POST detects an error in the secondary slave IDE hard drive. If your system supports multiple hard disks with a swappable bay, shut down the system, eject and reconnect the additional hard disk, and restart the system. |
Phoenix BIOS POST Error Codes The beep codes listed in Tables 16.5 and 16.6 are for the current version of Phoenix BIOS, version 4.0, release 6.1. Other versions have somewhat different beeps and Port 80h codes. Table 16.5. Phoenix BIOS 5.x and Earlier POST Beep CodesBeeps | Error Description | Action | Notes for Laptop Users |
|---|
1-2 | Video Card Error | Check the video card for proper installation. Try replacing the video card memory. Replace the video card. Replace the motherboard. | Laptops must be serviced or replaced because their video is built in to the motherboard or integrated into the chipset. | 1-3 | CMOS RAM Read/ Write Error | Replace the CMOS battery. Replace the motherboard. | The CMOS battery is a proprietary model on most notebooks. Check the cable connection from the battery to the motherboard. | 1-1-4 | ROM Checksum Error | Try reseating the motherboard ROM chip. Try re-flashing the motherboard ROM. Replace the motherboard. | If the ROM BIOS is soldered in place, follow the directions to re-flash the BIOS as your first step. | 1-2-1 | Timer Error | Check for proper motherboard installation, foreign objects causing shorts, loose screws, and over-tightened screws. Replace the motherboard. | If there are no loose components or screws inside the laptop, the motherboard has probably failed and the system must be serviced or replaced. | 1-2-2 | DMA Initialization Error | Check for proper motherboard installation, foreign objects causing shorts, loose screws, and over-tightened screws. Replace the motherboard. | If there are no loose components or screws inside the laptop, the motherboard has probably failed and the system must be serviced or replaced. | 1-2-3 | DMA Page Register Read/Write Error | Check for proper motherboard installation, foreign objects inside causing shorts, loose screws, and over-tightened screws. Replace the motherboard. | If there are no loose components or screws the laptop, the motherboard has probably failed and the system must be serviced or replaced. | 1-3-1 | RAM Refresh Verification Error | Clean the memory contacts and reseat the modules. Remove all modules except the first bank. Replace the memory. Replace the power supply. Replace the motherboard. | If the system has no removable memory installed, the built-in memory or the motherboard has failed and the system must be serviced or replaced. | 1-3-3 | First 64KB RAM Multibit Data Line Error | Clean the memory contacts and reseat the modules. Remove all modules except the first bank. Replace the memory. Replace the power supply. Replace the motherboard. | If the system has no removable memory installed, the built-in memory or the motherboard has failed and the system must be serviced or replaced. | 1-3-4 | First 64KB RAM Odd/Even Logic Error | Clean the memory contacts and reseat the modules. Remove all modules except the first bank. Replace the memory. Replace the power supply. Replace the motherboard. | If the system has no removable memory installed, the built-in memory or the motherboard has failed and the system must be serviced or replaced. | 1-4-1 | First 64KB RAM Address Line Error | Clean the memory contacts and reseat the modules. Remove all modules except the first bank. Replace the memory. Replace the power supply. Replace the motherboard. | If the system has no removable memory installed, the built-in memory or the motherboard has failed and the system must be serviced or replaced. | 1-4-2 | First 64KB RAM Parity Error | Clean the memory contacts and reseat the modules. Remove all modules except the first bank. Replace the memory. Replace the power supply. Replace the motherboard. | If the system has no removable memory installed, the built-in memory or the motherboard has failed and the system must be serviced or replaced. | 3-1-1 | Slave DMA Register Error | Check for proper motherboard installation, foreign objects causing shorts, loose screws, and over-tightened screws. Replace the motherboard. | If there are no loose components or screws inside the laptop, the motherboard has probably failed and the system must be serviced or replaced. | 3-1-2 | Master DMA Register Error | Check for proper motherboard installation, foreign objects causing shorts, loose screws, and over-tightened screws. Replace the motherboard. | If there are no loose components or screws inside the laptop, the motherboard has probably failed and the system must be serviced or replaced. | 3-1-3 | Master Interrupt Mask Register Error | Check for proper motherboard installation, foreign objects causing shorts, loose screws, and over-tightened screws. Replace the motherboard. | If there are no loose components or screws inside the laptop, the motherboard has probably failed and the system must be serviced or replaced. | 3-1-4 | Slave Interrupt Mask Register Error | Check for proper motherboard installation, foreign objects causing shorts, loose screws, and over-tightened screws. Replace the motherboard. | If there are no loose components or screws inside the laptop, the motherboard has probably failed and the system must be serviced or replaced. | 3-2-4 | Keyboard Controller Error | Check for proper motherboard installation, foreign objects causing shorts, loose screws, and over-tightened screws. Replace the keyboard. Replace the motherboard. Replace the processor. | If there are no loose components or screws inside the laptop, the motherboard has probably failed and the system must be serviced or replaced. | 3-3-4 | Screen Initialization Error | Check the video card for proper installation. Try replacing the video card memory. Replace the video card. Replace the motherboard. | Laptops must be serviced or replaced because their video is built in to the motherboard or integrated into the chipset. | 3-4-1 | Screen Retrace Error | Check the video card for proper installation. Try replacing the video card memory. Replace the video card. Replace the motherboard. | Laptops must be serviced or replaced because their video is built in to the motherboard or integrated into the chipset. | 3-4-2 | Video ROM Error | Check the video card for proper installation. Try replacing the video card memory. Replace the video card. Replace the motherboard. | Laptops must be serviced or replaced because their video is built in to the motherboard or integrated into the chipset. | 4-2-1 | Timer Interrupt Error | Check for proper motherboard installation, foreign objects causing shorts, loose screws, and over-tightened screws. Replace the motherboard. | If there are no loose components or screws inside the laptop, the motherboard has probably failed and the system must be serviced or replaced. | 4-2-2 | Shutdown Error | Check for proper motherboard installation, foreign objects causing shorts, loose screws, and over-tightened screws. Replace the keyboard. Replace the motherboard. Replace the processor. | If there are no loose components or screws inside the laptop, the motherboard has probably failed and the system must be serviced or replaced. | 4-2-3 | Gate A20 Error | Check for proper motherboard installation, foreign objects causing shorts, loose screws, and over-tightened screws. Replace the keyboard. Replace the motherboard. Replace the processor. | If there are no loose components or screws inside the laptop, the motherboard has probably failed and the system must be serviced or replaced. | 4-2-4 | Unexpected Interrupt In Protected Mode | Check for a bad expansion card. Check for proper motherboard installation, foreign objects causing shorts, loose screws, and over-tightened screws. Replace the motherboard. | Remove any PC Card or CardBus cards and retry. | 4-3-1 | RAM Address Error >FFFh | Clean the memory contacts and reseat the modules. Remove all modules except the first bank. Replace the memory. Replace the power supply. Replace the motherboard. | If the system has no removable memory installed, the built-in memory or the motherboard has failed and the system must be serviced or replaced. | 4-3-3 | Interval Timer Channel 2 Error | Check for proper motherboard installation, foreign objects causing shorts, loose screws, and over-tightened screws. Replace the motherboard. | If there are no loose components or screws inside the laptop, the motherboard has probably failed and the system must be serviced or replaced. | 4-3-4 | Real Time Clock Error | Replace the CMOS battery. Replace the motherboard. | If replacing the CMOS battery fails to solve the problem, the motherboard has probably failed and the system must be serviced or replaced. | 4-4-1 | Serial Port Error | Reset the port configuration in BIOS Setup. Disable the port. | | 4-4-2 | Parallel Port Error | Reset the port configuration in BIOS Setup. Disable the port. | | 4-4-3 | Math Coprocessor Error | Check for proper motherboard installation, foreign objects causing shorts, loose screws, and over-tightened screws. Make sure the processor and heat sink are installed properly (remove and reseat). Replace the processor. Replace the motherboard. | Be sure to replace the thermal material between the processor and the heatsink with approved material after removing the old thermal material from both the processor and the heatsink. | Low 1-1-2 | System Board Select Error | Check for proper motherboard installation, foreign objects causing shorts, loose screws, and over-tightened screws. Make sure the processor and heat sink are installed properly (remove and reseat). Replace the processor. Replace the motherboard. | Be sure to replace the thermal material between the processor and the heatsink with approved material after removing the old thermal material from both the processor and the heatsink. | Low 1-1-3 | Extended CMOS RAM Error | Replace the CMOS battery. Replace the motherboard. | The CMOS battery is a proprietary model on most notebooks. Check the cable connection from the battery to the motherboard. |
Table 16.6. Phoenix BIOS 6.x and Later POST Beep CodesBeeps | Error Description | Description/Action | Notes for Laptop Users |
|---|
1-2-2-3 | BIOS ROM Checksum Error | Try reseating the motherboard ROM chip. Try re-flashing the motherboard ROM. Replace the motherboard. | If the ROM BIOS is soldered in place, follow the directions to re-flash the BIOS as your first step. | 1-3-1-1 | DRAM Refresh Error | Clean the memory contacts and reseat the modules. Remove all modules except the first bank. Replace the memory. Replace the power supply. Replace the motherboard. | If the system has no removable memory installed, the built-in memory or the motherboard has failed and the system must be serviced or replaced. | 1-3-1-3 | 8742 Keyboard Controller Error | Check for proper motherboard installation, foreign objects causing shorts, loose screws, and over-tightened screws. Replace the keyboard. Replace the motherboard. Replace the processor. | If there are no loose components or screws inside the laptop, the motherboard has probably failed and the system must be serviced or replaced. | 1-3-4-1 | Memory Address Line Error | Clean the memory contacts and reseat the modules. Remove all modules except the first bank. Replace the memory. Replace the power supply. Replace the motherboard. | If the system has no removable memory installed, the built-in memory or the motherboard has failed and the system must be serviced or replaced. | 1-3-4-3 | Memory Low Byte Data Error | Clean the memory contacts and reseat the modules. Remove all modules except the first bank. Replace the memory. Replace the power supply. Replace the motherboard. | If the system has no removable memory installed, the built-in memory or the motherboard has failed and the system must be serviced or replaced. | 1-4-1-1 | Memory High Byte Data Error | Clean the memory contacts and reseat the modules. Remove all modules except the first bank. Replace the memory. Replace the power supply. Replace the motherboard. | If the system has no removable memory installed, the built-in memory or the motherboard has failed and the system must be serviced or replaced. | 2-1-2-3 | ROM Copyright Error | Try reseating the motherboard ROM chip. Try re-flashing the motherboard ROM. Replace the motherboard. | In many cases, reseating the ROM chip is not possible and the system must be serviced or replaced. | 2-2-3-1 | Unexpected Interrupts | Check for a bad expansion card. Check for proper motherboard installation, foreign objects causing shorts, loose screws, and over-tightened screws. Replace the motherboard. | Remove all nonessential components and retry. If the system still fails, it needs to be serviced or replaced. | 1-2 | Video Card Error | Check the video card for proper installation. Try replacing the video card memory. Replace the video card. Replace the motherboard. | In most cases, the laptop must be serviced or replaced. |
IBM ThinkPad BIOS Error Codes Because laptops use different technologies than desktop computers, IBM developed a special range of beep codes for its ThinkPad notebook computers. The beep codes, the symptoms they list, and the recommended actions are detailed in Table 16.7. Table 16.7. IBM ThinkPad BIOS Beep CodesBeep Code/Symptom | Action |
|---|
One beep and a blank, unreadable, or flashing LCD. | Reseat the LCD connector.
Replace the LCD assembly.
Reseat or replace the DIMMs.
Replace the motherboard. | One long and two short beeps and a blank or unreadable LCD. | Reseat or replace the DIMMs.
Replace the LCD assembly.
Replace the motherboard. | Two short beeps with error codes. | POST error. See error codes. | Two short beeps and a blank screen. | Reseat or replace the DIMMs. Replace the motherboard. | Three short beeps, pause, three more short beeps, and one short beep. | Reseat or replace the DIMMs.
Replace the motherboard. | One short beep, pause, three short beeps, pause, three more short beeps, and one short beep. Only the cursor appears. | Reinstall the operating system. | Four cycles of four short beeps and a blank screen. | Replace the security chip.
Replace the motherboard. | Five short beeps and a blank screen. | Replace the motherboard. |
The codes in Table 16.8 are especially for IBM's line of ThinkPad laptop computers. Table 16.8. IBM ThinkPad-Specific BIOS POST Numeric Error CodesCode | Message | Action |
|---|
0175 | Bad CRC1 - The EEPROM checksum is not correct. | Reflash the BIOS and replace the motherboard. | 0176 | System Security - The system has been tampered with. | This message is displayed if you remove the security chip and reinstall it or install a new one. Run BIOS Setup, load the defaults, and save the settings. | 0177 | Bad SVP data, stop POST task. | The Supervisor password is corrupt. Replace the motherboard. | 0182 | Bad CRC2. Enter BIOS Setup and load Setup Defaults. | Run BIOS Setup, load the defaults, and save the settings. | 0185 | Bad startup sequence settings. Enter BIOS Setup and load setup defaults. | Run BIOS Setup, load the defaults, and save the settings. | 0187 | EAIA data access error - The access to EEPROM is failed. | Reflash the BIOS. Replace the motherboard. | 0188 | Invalid RFID serialization information area or bad CRC2 - The EEPROM checksum is not correct. | Reflash the BIOS. Replace the motherboard. | 0189 | Invalid RFID configuration information area - The EEPROM checksum is not correct. | Reflash the BIOS. Replace the motherboard. | 0190 | Critical low-battery error. | Charge the battery (replace it if necessary). | 0191 | System Security, invalid Remote Change requested. | Run BIOS Setup, load the defaults, and save the settings. | 0192 | System Security, IBM Embedded Security hardware tamper detected. | Run BIOS Setup and select Config, IBM Security Chip, Clear IBM Security Chip. Replace the security chip. Replace the motherboard. | 0195 | Security hardware tamper detected. | Run BIOS Setup and select Config, IBM Security Chip, Clear IBM Security Chip. Replace the security chip. Replace the motherboard. | 0196 | Security hardware removed. | Run BIOS Setup and select Config, IBM Security Chip, Clear IBM Security Chip. Replace the security chip. Replace the motherboard. | 0197 | Invalid remote change requested. | The remote configuration for the security chip has failed. Confirm the operation and try again. | 0199 | System Security - IBM Security password retry count exceeded. | Occurs if you enter the wrong Supervisor password more than three times in a row. Restart and try again with the correct password. | 01C8 | More than one modem devices are found. Remove one of them. Press <Esc> to continue. | Remove either the Mini PCI modem card or the modem daughtercard. | 01C9 | More than one Ethernet devices are found. Remove one of them. Press <Esc> to continue. | Remove either the Mini PCI Ethernet card or the Ethernet daughtercard. | 0200 | Hard disk error, the hard disk is not working. | Reseat the hard disk, load the BIOS Setup defaults, and replace the drive. | 021x | Keyboard error. | Test the keyboard (replace it if necessary). | 0220 | Monitor type error, monitor type does not match the one specified in CMOS. | Run BIOS Setup, load the defaults, and save the settings. | 0230 | Shadow RAM error, shadow RAM fails at offset nnnn. | Reseat or replace the SODIMMs. Replace the motherboard. | 0231 | System RAM error, system RAM fails at offset nnnn. | Reseat or replace the SODIMMs. Replace the motherboard. | 0232 | Extended RAM error, extended RAM fails at offset nnnn. | Reseat or replace the SODIMMs. Replace the motherboard. | 0250 | System battery error, system battery is dead. | Replace the backup battery and run BIOS Setup to reset the date and time. | 0251 | System CMOS checksum bad, default configuration used. | Replace the backup battery and run BIOS Setup to reset the date and time. | 0252 | Password checksum bad, the password is cleared. | Reset the password by running BIOS Setup. | 0260 | System timer error. | Replace the backup battery and run BIOS Setup to reset the date and time. | 0270 | Real time clock error. | Replace the backup battery and run BIOS Setup to reset the date and time. | 0271 | Date and time error, neither the date nor the time is set in the computer. | Run BIOS Setup to reset the date and time. | 02B2 | Incorrect drive A type. | Run BIOS Setup, load the defaults, and save the settings. Replace floppy drive. | 02F4 | EISA CMOS not writable. | Run BIOS Setup, load the defaults, and save the settings. Replace the backup battery. | 02F5 | DMA test failed. | Reseat or replace the SODIMMs. Replace the motherboard. | 02F6 | Software NMI failed. | Reseat or replace the SODIMMs. Replace the motherboard. | 02F7 | Fail-safe timer NMI failed. | Reseat or replace the SODIMMs. Replace the motherboard. | 1801 | Attached docking station is not supported. | Remove the docking station or port replicator. | 1802 | Unauthorized network card is plugged in - Power off and remove the Mini-PCI network card. | Remove the Mini PCI network card. |
Table 16.9 lists the BIOS POST error messages that are specific to IBM ThinkPad laptop computers Table 16.9. IBM ThinkPad-Specific BIOS POST Error MessagesError Message/Symptom | Action |
|---|
No beep, power-on indicator on, LCD blank, and no POST. | Make sure every connector is connected tightly and correctly. Reseat or replace the DIMMs. Replace the motherboard. | No beep, power-on indicator on, and LCD blank during POST. | Reseat or replace the DIMMs. Replace the motherboard. | Device address conflict. | Run BIOS Setup, load the defaults, and save the settings. Replace the backup battery. | Allocation error for device. | Run BIOS Setup, load the defaults, and save the settings. Replace the backup battery. | Failing bits: nnnn. | Reseat or replace the DIMMs. Replace the motherboard. | Invalid system configuration data. | Reseat or replace the DIMMs. Replace the motherboard. | I/O device IRQ conflict. | Run BIOS Setup, load the defaults, and save the settings. Replace the backup battery. | Operating system not found. | Reseat the hard disk. Check the drive and operating system for proper installation. Reinstall the operating system. Replace the hard disk. | Hibernation error. | Restore the system configuration to what it was before the computer entered hibernation mode. If the memory size has been changed, re-create the hibernation file. | Fan error. | Check or replace the fan. | Thermal sensing error. | Replace the motherboard. | The power-on password prompt appears. | A power-on password or a Supervisor password is set. Type the password and press Enter. | The hard-disk password prompt appears. | A hard disk password is set. Type the password and press Enter. | The DOS full screen looks smaller. | Run BIOS Setup or the ThinkPad Configuration program and set the screen expansion function. |
POST Memory Count On some systems, the POST also displays the results of its system memory test on the LCD. The last number displayed is the amount of memory that tested successfully. For example, a system might display the following message: 131072 KB OK
The number displayed by the memory test (the example indicates that 128MB of RAM is installed) should agree with the total amount of memory installed on the system motherboard. Some older systems display a slightly lower total because they deduct part or all of the 384KB of upper memory area (UMA) from the count. This memory test is performed before any system software loads, so many memory managers or device drivers you might have installed do not affect the results of the test. If the POST memory test stops short of the expected total, the number displayed can indicate how far into the system memory array a memory error lies. This number can help you identify the exact module that is at fault and can be a valuable troubleshooting aid in itself. Note The memory test reflects the total amount of memory installed in a system, including any memory set aside for integrated video.
General-Purpose Diagnostics Programs A large number of professional third-party diagnostics programs are available for laptop systems. Technicians use these commercial programs to perform testing of new systems (often called burn-in testing) or testing of existing systems either in the shop or in the field. Most of the commercial laptop diagnostics can test all your laptop's key components. In addition, specific programs are available to test memory, floppy drives, hard disks, video adapters, and most other areas of the system. Here are some of the programs I recommend most highly: Tip Before trying a commercial diagnostic program to solve your problem, look in your operating system. Most operating systems today provide at least some of the diagnostic functions that diagnostic programs do. You might be able to save some time and money.
Unfortunately, no clear leader exists in the area of diagnostic software. Each program has unique advantages, and as a result, no program is universally better than another. When deciding which diagnostic programs, if any, to include in your arsenal, look for the features you need. One of the most popular is AMIDiag from AMI. This program runs on virtually any desktop or laptop PC and tests most of the hardware in the system. AMIDiag is available in a native Windows version that also supports third-party diagnostics modules or in a DOS version that can be used to test hardware, regardless of the operating system, by using a DOS boot disk to start the system. Operating System Diagnostics In many cases, it might not be necessary to purchase third-party diagnostic software because your operating system has all the diagnostic tools you need. Windows 9x/Me and 2000/XP include a large selection of programs that enable you to view, monitor, and troubleshoot the hardware in your system. Some of these include the following: Windows Device Manager Displays installed hardware, resources in use, and conflicts/problems with installed hardware. Can also be used to update drivers. DirectX Diagnostics Tests 3D graphics and sound features. Microsoft System Information Displays hardware and software information in more detail than Windows Device Manager. ScanDisk/CHKDSK Checks the disk file system and surface for errors. Event Viewer Gives a chronological list of errors that Windows encounters while the system is running. Windows Troubleshooters A series of mini-programs that assist with troubleshooting specific hardware and software problems.
|