Monitoring Active Directory
|
When you’re working with any networked operating system, the data that defines that network is extremely sensitive. Active Directory is the main store of information for your network. It includes the names of all the network users, the machines that connect to the network, the domain controllers, and even the applications you use on the network. It’s possible to add information stores to Active Directory so that you can store other information that it originally didn’t possess, such as the user settings for your custom application. It’s impossible to calculate the value of Active Directory to you as a developer.
In the grand scheme of things, Active Directory is relatively secure. Even Windows includes safeguards that make it difficult for just anyone to break into Active Directory and steal its secrets. The use of replication and multiple copies tends to reduce the risk of contamination—multiple stores means redundancy that keeps Active Directory safe. However, no matter how safe you think a network resource is, it still requires monitoring because crackers can usually find a way around your security measures. With this in mind, the following sections describe techniques you can use to monitor your setup.
Using the ADSI Viewer Utility
The Active Directory Services Interface (ADSI) Viewer enables you to see the schema for Active Directory. From a security perspective, the ADSI Viewer helps you detect changes in both the schema and content of Active Directory. The schema controls the structure of the database. Knowing the schema helps you to work with Active Directory, change its contents, and even add new schema elements. In order to control the kinds of data stored for the applications you create, you must know the Active Directory schema. Otherwise, you could damage the database (given sufficient rights) or at least prevent your application from working correctly.
| Note | If you’re using the original version of Visual Studio .NET, you’ll find the AdsVw application in the \Program Files\Microsoft Visual Studio .NET\Common7\Tools\Bin folder. Visual Studio .NET 2003 might not come with this tool. However, you can obtain it as part of any of the Windows operating system Resource Kits or as part of the Platform SDK. (See http://msdn.microsoft.com/library/en-us/sdkintro/sdkintro/obtaining_the_complete_sdk.asp for instructions on obtaining the entire Platform SDK.) If you want to download just the tool, try the Core SDK download site at http://www.microsoft.com/msdownload/platformsdk/sdkupdate/. |
When you first start ADSI Viewer, you’ll see a New dialog box that allows you to choose between browsing the current objects in the database or making a specific query. You’ll use the browse mode when performing research on Active Directory schema structure. The query approach provides precise information fast when you already know what you need to find.
In most cases, you’ll begin your work with Active Directory by browsing through it. This means you’ll select Object Viewer at the New object dialog box. Once you do that, you’ll see a New Object dialog box like the one shown in Figure 12.1. Notice that this dialog already has the LDAP path for my server entered into it. If you’re using Windows 2000, you can also use a WinNT path.
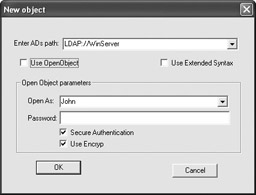
Figure 12.1: The New Object dialog box enables you to create a connection to the server.
This figure shows a sample ADs Path entry. You’ll need to supply Active Directory path information, which usually means typing LDAP:// followed by the name of your server (WinServer, in my case). If you’re using Windows 2000 to access Active Directory, you’ll want to clear the Use OpenObject option when working with an LDAP path and check it when using a WinNT path.
Once you’ve filled in the required information in the New Object dialog box, click OK. If you’ve entered all of the correct information and have the proper rights to access Active Directory, then you’ll see a dialog box similar to the one shown in Figure 12.2. (Note that I’ve expanded the hierarchical display in this figure.)
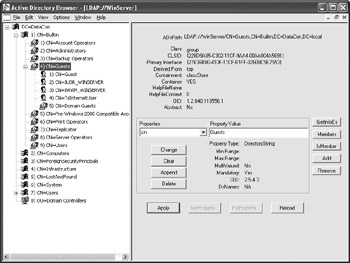
Figure 12.2: Opening a new object browser allows you to see the Active Directory schema for your server.
This is where you’ll begin learning about Active Directory. On the left side of the display is the hierarchical database structure. Each of these elements is an Active Directory object. Clicking the plus signs next to each object will show the layers of objects beneath. Highlighting an object displays detailed information about it in the right pane. For example, in Figure 12.2, you’re seeing the details about the Guests user group object for the server. The heading for this display includes object class information, help file location, and whether the object is a container used to hold other objects.
Below the header are the properties for the object. You can choose one of the properties from the Properties list box and see its value in the Property Value field. Active Directory is extensible, which means that you can add new properties to an existing object, change an existing property, or delete properties that you no longer need. If you want to add a new property, all you need to do is type its name in the Properties list box and assign it a value in the Property Value field, then click Append. This doesn’t make the change final; however, you still need to click Apply at the bottom of the dialog box. Deleting a property is equally easy. Just select it in the Properties list box, and then click Delete. Clicking Apply will make the change final.
Leaf properties often have additional features that you can change. For example, the user object shown in Figure 12.3 helps you to change the user password and determine user group affiliation. When working with a computer object, you’ll can determine the computer status and even shut it down if you’d like.
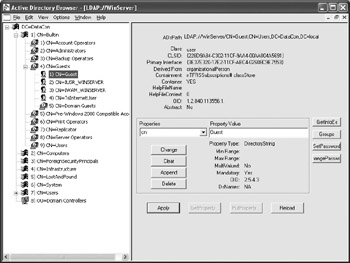
Figure 12.3: Some containers and leaf objects provide special buttons that help you perform tasks.
The method you use to access Active Directory affects the ADSI Viewer display. For example, Figure 12.4 shows the information for the same server using WinNT instead of LDAP for access. Notice that you garner less information in the left pane using WinNT. You’ll also find that the WinNT method produces fewer property entries. The advantage of using the WinNT path is that more of the information appears in human readable form. For example, if you want to check the date the user last logged in under LDAP, you’d better be prepared to convert a 64-bit timer tick value to the time and date. The WinNT version provides this value in human readable form.
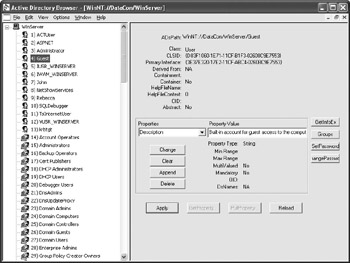
Figure 12.4: Use the WinNT path to access hard to read information.
Other Active Directory Tools
Microsoft provides a wealth of Active Directory tools—the only problem is finding them. You can find a list of the most important tools at http://www.microsoft.com/windows2000/en/advanced/help/sag_ADcmdTools.htm. Most of these tools appear as part of the Windows Resource Kit (the Web site shows the Windows 2000 Resource Kit, but other resource kits have similar tools). In some cases, the tools also appear as links in Microsoft Knowledge Base articles, as separate downloads for Visual Studio, or as part of another package.
One of the more interesting tools is ASDIEdit—an MSC snap-in you can download separately or obtain as part of the Windows Resource Kit. Figure 12.5 shows a typical view of this tool. As you can see, it provides an Explorer interface with the hierarchical presentation of Active Directory on the left pane and the details in the right pane.
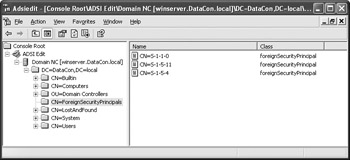
Figure 12.5: A typical view of the ADSIEdit too
You can easily use this tool as a substitute for the ADSI Viewer. In fact, some developers prefer this tool because it’s easier to use. However, the ADSIEdit tool lacks some of the flexibility of the ADSI Viewer—you can’t make queries against Active Directory as an example. In addition, you might find that this tool skips some of the details. Even so, it’s a particularly good tool to have for quick monitoring because you have less setup to consider. To change any particular entry in the list, right-click the entry and choose Properties from the context menu. You’ll see a Properties dialog box with capabilities similar to those found in ADSI Viewer.
| Tip | Microsoft often hides tool updates in service packs. For example, you can find both the ADSIEdit and the SDCheck tool in the Windows 2000 SP3 Support Tools download at http://www.microsoft.com/windows2000/downloads/servicepacks/sp3/supporttools.asp. |
Another interesting tool to consider if you’re having security issues with an application is SDCheck. This tool verifies that all user rights have propagated throughout the system correctly. In addition, it verifies the inheritance status of the various rights to ensure that the user has the correct permissions. Using this tool can save you hours of troubleshooting time when you think that an application error could have its roots in an incorrect security setting.
|
EAN: 2147483647
Pages: 168