Encrypting and Decrypting Files
|
One of the most common tasks you can perform with cryptography is data encryption. In fact, you’ll perform this task far more often than any other cryptography task (such as encrypting code or digital signatures). The .NET Framework provides access to a number of data storage methodologies. For example, you can store information in files or memory structures. The form that data takes can also vary from straight text to a variety of XML-based formats. The fact remains that you’re working with data that requires protection.
The sections that follow consider a specific case of data encryption and decryption—the data file. The target is a simple text file that you’ll find in the \Chapter 07 folder of the source code located on the Sybex Web site. Although the data is simple by design to make the encryption and decryption techniques clearer, the techniques shown will work with any kind of data.
Using Symmetric Cryptography
This section of the chapter shows how to encrypt and decrypt simple text using the symmetric methodology. The example uses the RijndaelManaged algorithm class based on the discussion in the “Beware of the Cracked Symmetric Algorithm” section of the chapter. Listing 7.3 shows an example of the encryption portion of the process. The decryption portion is almost the same with a few minor differences. You’ll find this example in the \Chapter 07\C#\Crypto and \Chapter 07\VB\Crypto folders of the source code located on the Sybex Web site.
Listing 7.3 Encrypting Data Using Symmetric Cryptography
private void btnEncrypt_Click(object sender, System.EventArgs e) { FileStream FIn; // Input file. FileStream FOut; // Output file. Byte[] Data = new Byte[100]; // Temporary buffer. int Counter = 0; // Total converted. int ReadByte = 0; // Currently read counter. CryptoStream CryptStream; // Cryptographic stream. RijndaelManaged RM; // Encryption Algorithm. byte[] Key = {0x01, 0x02, 0x03, 0x04, // Encryption Key. 0x05, 0x06, 0x07, 0x08, 0x09, 0x10, 0x11, 0x12, 0x13, 0x14, 0x15, 0x16}; byte[] IV = {0x01, 0x02, 0x03, 0x04, // Initialization vector. 0x05, 0x06, 0x07, 0x08, 0x09, 0x10, 0x11, 0x12, 0x13, 0x14, 0x15, 0x16}; // Open the input and output files. FIn = new FileStream(txtInput.Text, FileMode.Open, FileAccess.Read); FOut = new FileStream(txtEncrypt.Text, FileMode.OpenOrCreate, FileAccess.Write); // Create the cryptographic stream. RM = new RijndaelManaged(); CryptStream = new CryptoStream(FOut, RM.CreateEncryptor(Key, IV), CryptoStreamMode.Write); // Encrypt the file. while(Counter < FIn.Length) { ReadByte = FIn.Read(Data, 0, 100); CryptStream.Write(Data, 0, ReadByte); Counter = Counter + ReadByte; } // Close the open stream and files. CryptStream.Close(); FIn.Close(); FOut.Close(); } No matter which symmetric encryption technology you choose, they all rely on the cipher chaining method of encryption. The encryption algorithm uses the previous cipher block in a chain of blocks to determine the encryption seed for the current block. Of course, there’s no previous block for the first block of code, so you must supply a seed value for the encryption algorithm called the initialization vector (IV). Consequently, all of these encryption techniques require that you provide both a Key and an IV Byte array as basic input values. Notice how these two values work with the RM.CreateEncryptor() method. As the example shows, the CSP is part of this constructor call, so you don’t use the Key and IV with the CSP, but you do use it to create the data transfer object.
| Warning | The Key and IV values shown in Listing 7.3 are for demonstration purposes only. Don’t use values such as these for your own code (I chose them specifically because you shouldn’t use these values). Make sure you choose unique Byte arrays for both values. Anything you can do to make it harder for a cracker to discover the input for your encrypted files is worth the effort. |
As you can see from the example code, the idea is to open an input and an output file. The input file contains the plain text that you want to encrypt. After you open the two files, you need to create an algorithm object to encrypt the data and a stream for handling the encryption.
Notice the CreateEncryptor() method call in the CryptoStream() constructor. You would replace this with a CreateDecryptor() call in the decryption portion of the code.
After the code creates the required stream, it simply reads from the input file, encrypts the data, and sends the data to the output file. It’s important to track how many bytes the input file actually contained or you’ll obtain some odd results from the encryption portion of the program. Once the output is complete, you close the stream first, and then the two files. Make sure you follow this order or you’ll receive an error from the application. The output file will also lose data because CLR doesn’t flush the CryptoStream object until you close it.
Figure 7.9 shows the results of using the encryption portion of the program. Notice that the text is completely garbled (see the TempCrypt.TXT file). However, the decryption portion of the program proves that the original text is easy to recover (see the TempDecrypt.TXT file).

Figure 7.9: Viewing the output of the cryptographic program shows that the text is completely garbled.
Using Asymmetric Cryptography
The asymmetric method is different from the symmetric method shown in Listing 7.3. You perform a two-step process to encrypt a file using this technique as shown in Listing 7.4. The first step is to create a key, which is actually harder than you might think. The .NET Framework provides a number of ways to perform this task, but the best way is to create a key every time you want to encrypt a file, and then find secure storage for that key for the decryption process. You’ll find this example in the \Chapter 07\C#\Asymmetric and \Chapter 07\VB\Asymmetric folders of the source code located on the Sybex Web site.
Listing 7.4 Creating a Key Pair
public frmMain() { String KeyPath; // The location of the key. CspParameters Params; // Cryptographic parameters. FileStream KeyFile; // Key disk storage. Char[] KeyData; // Key data as a Char array. Byte[] KeyConv; // Converted key data. StringBuilder KeyString; // Key data as a String. Int32 Counter; // Loop counter. // Required for Windows Form Designer support InitializeComponent(); // Create the key path string. KeyPath = Application.ExecutablePath; KeyPath = KeyPath.Substring(0, KeyPath.LastIndexOf(@"\") + 1) + "SpecialKey"; // Define the cryptographic parameters. Params = new CspParameters(); Params.KeyContainerName = "TemporarySpecialKey"; Params.KeyNumber = 1; Params.ProviderName = "Microsoft RSA SChannel Cryptographic Provider"; Params.ProviderType = 12; Params.Flags = CspProviderFlags.UseMachineKeyStore; // Detect the presence of a key pair file. if (!File.Exists(KeyPath)) { // Generate a key pair. RSACrypto = new RSACryptoServiceProvider(2048, Params); // Convert the key data for storage. KeyData = RSACrypto.ToXmlString(true).ToCharArray(); KeyConv = new Byte[KeyData.Length]; for (Counter = 0; Counter < KeyData.Length; Counter++) KeyConv[Counter] = Convert.ToByte(KeyData[Counter]); // Save the key to a file. KeyFile = File.Open(KeyPath, FileMode.CreateNew); KeyFile.Write(KeyConv, 0, RSACrypto.ToXmlString(true).Length); KeyFile.Close(); } else { // Open the key file for reading. KeyFile = File.Open(KeyPath, FileMode.Open); KeyConv = new Byte[KeyFile.Length]; KeyFile.Read(KeyConv, 0, (Int32)KeyFile.Length); KeyFile.Close(); // Convert the key file. KeyString = new StringBuilder(KeyConv.Length); for (Counter = 0; Counter < KeyConv.Length; Counter++) KeyString.Append(Convert.ToChar(KeyConv[Counter])); // Create the key. RSACrypto = new RSACryptoServiceProvider(2048, Params); RSACrypto.FromXmlString(KeyString.ToString()); } } The code begins by creating a key path. You can store the key anywhere safe, but the example uses a file so that you can see how certain elements of the key generation work. In general, you’ll need to produce a file that contains the public key to send to others, but you might want to keep the private/public key pair on your machine. It’s relatively easy to use the machine’s key storage for this purpose. Unfortunately, if you have to reformat the hard drive or lose contact with the machine for other reasons, the key is also lost. Although the machine’s key storage is safer than using a file, it’s also beneficial to create a file for the private/public key pair to store in an offsite location so you can recover your data should an emergency occur.
Next, the code creates a CspParameters object. Although this object is optional, you should create it so that you can better control the encryption process. Otherwise, the system will make all of the critical decisions for you. This object has four fields and one property that you should fill with data. Microsoft’s documentation says you should look at the Windows CryptoAPI documentation for details on everything. In short, this object is almost undocumented.
The KeyContainerName property contains a simple string that identifies the key container. A single container can contain multiple keys. You would use this name if you wanted to access the key using the machine’s store. If you plan to create just a disk version of the key or if you want to use the default key container, you don’t need to include this value.
The KeyNumber property is the number of the key within the container. Unless you create multiple keys for a given container, set this value to 1.
The ProviderName property is where things get interesting. You must supply a specific text value—one that the system supports, but these values don’t appear in the .NET documentation. The fastest way to locate these values is to look in the WinCrypt.H file found in the \Program Files\Microsoft Visual Studio .NET 2003\Vc7\PlatformSDK\Include folder. The supported names include:
-
Microsoft Base Cryptographic Provider v1.0
-
Microsoft Enhanced Cryptographic Provider v1.0
-
Microsoft Strong Cryptographic Provider
-
Microsoft RSA Signature Cryptographic Provider
-
Microsoft RSA SChannel Cryptographic Provider
-
Microsoft Base DSS Cryptographic Provider
-
Microsoft Base DSS and Diffie-Hellman
-
Microsoft Enhanced DSS and Diffie-Hellman
-
Microsoft DH SChannel Cryptographic Provider
-
Microsoft Base Smart Card Crypto Provider
-
Microsoft Enhanced RSA and AES Cryptographic Provider
Unfortunately, not every server supports every potential CSP. Look again at Figure 7.7. The CSP field of this figure contains a list of the CSPs supported by your server and tells you which of these values you can use for your program.
The ProviderType field value must match the ProviderName field value because this is the numeric equivalent of that field. Again, you’ll find the values you need in the WinCrypt.H file. Table 7.1 shows a list of typical values, the Visual C++ define value, and their associated strings.
| Constant | Visual C++ Define | Associated String |
|---|---|---|
| 1 | PROV_RSA_FUL | Any string so long as you use the RSA provider |
| 2 | PROV_RSA_SIG | Microsoft RSA Signature Cryptographic Provider |
| 3 | PROV_DSS | Microsoft Base DSS Cryptographic Provider |
| 4 | PROV_FORTEZZA | sed with Skipjack encryption and the Key Exchange Algorithm (KEA)—not supported by the .NET Framework |
| 5 | PROV_MS_EXCHANGE | Used with C. Adams and S. Tavares (CAST) encryption and the RSA algorithm—not supported by the .NET Framework |
| 6 | PROV_SS | Supported by the .NET Framework for Internet applications, but not used for desktop applications |
| 12 | PROV_RSA_SCHANNE | Microsoft RSA SChannel Cryptographic Provider |
| 13 | PROV_DSS_DH | Microsoft Base DSS and Diffie-Hellman |
| 14 | PROV_EC_ECDSA_SIG | Used for Windows CE development |
| 15 | PROV_EC_ECNRA_SIG | Used for Windows CE development |
| 16 | PROV_EC_ECDSA_FUL | Used for Windows CE development |
| 17 | PROV_EC_ECNRA_FUL | Used for Windows CE development |
| 18 | PROV_DH_SCHANNE | Microsoft DH SChannel Cryptographic Provider |
| 20 | PROV_SPYRUS_LYNKS | Used for Windows CE development |
| 21 | PROV_RNG | Used for Windows CE development |
| 22 | PROV_INTEL_SEC | Used for Windows CE development |
| 23 | PROV_REPLACE_OWF | This entry isn’t documented anywhere |
| 24 | PROV_RSA_AES | Microsoft Enhanced RSA and AES Cryptographic Provider |
The Flags property can have one of two values from the CspProviderFlags enumeration. When you define a KeyContainerName field value, use the UseMachineKeyStore value as shown in the example. If you keep the KeyContainerName field value blank, use the UseDefaultKeyContainer value.
Now that you have everything needed to create a key, it’s time to see if the key file exists using the File.Exists() method. If the file doesn’t exist, the code creates a new RSACryptoServiceProvider object that includes the key length and the Params defined earlier. Windows ties the size of the key to the CSP that you use. When you’re unsure as to which values you can use, look at the display in Figure 7.7, select the CSP you want to use, and view the pertinent key sizes in the Key Size field entries.
The code performs a two-step conversion of the key. First, it converts the key into an XML string. The ToXmlString() method argument determines if the CLR outputs just a public key (false) or both a public and private key (true). Second, the code converts the XML string into a Byte array. After the code changes the key data into a Byte array, it outputs it to a file for later retrieval. Figure 7.10 shows the results of the conversion. Notice that you can read the various values, which is why you want to keep this key locked in a safe place.
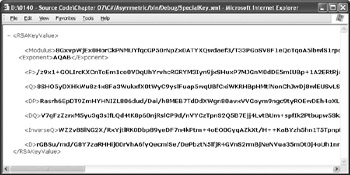
Figure 7.10: Viewing the output of the cryptographic program shows that the text is completely garbled.
The process for reading the saved key into memory is the reverse of saving it. First, the code reads the data into a Byte array. Second, it uses the FromXmlString() method to read the information into the key.
Once you have a key, you use it to encrypt or decrypt a file. Listing 7.5 shows an example of the encryption portion of the process. The decryption portion is almost the same with a few minor differences.
Listing 7.5 Encrypting and Decrypting Data Using Asymmetric Cryptography
private RSACryptoServiceProvider RSACrypto; // The key pair. private void btnEncrypt_Click(object sender, System.EventArgs e) { FileStream FIn; // Input file. FileStream FOut; // Output file. Byte[] InData; // Input buffer. Byte[] OutData; // Output buffer. int Counter = 0; // Total converted counter. int ReadByte = 0; // Currently read counter. // Open the input and output files. FIn = new FileStream(txtInput.Text, FileMode.Open, FileAccess.Read); FOut = new FileStream(txtEncrypt.Text, FileMode.OpenOrCreate, FileAccess.Write); // Initialize the buffers. InData = new Byte[100]; OutData = new Byte[256]; // Encrypt the file. while(Counter < FIn.Length) { // Determine if we’re encrypting a partial packet. if ((FIn.Length - Counter) < 100) { // If so, create a small encryption value. InData = new Byte[FIn.Length - Counter]; ReadByte = FIn.Read(InData, 0, (Int32)(FIn.Length - Counter)); } else // Otherwise, create a full encryption value. ReadByte = FIn.Read(InData, 0, 100); // Output the encrypted data. OutData = RSACrypto.Encrypt(InData, false); FOut.Write(OutData, 0, OutData.Length); Counter = Counter + ReadByte; } // Close the open stream and files. FIn.Close(); FOut.Close(); } Unlike the symmetric processing method, you have to be very careful about block sizes when using the asymmetric method. The code shows that the OutData array contains 256 bytes. This value depends on the size of key you use. For example, when you use a 1,024-byte key, the block size is 128 bytes. If you don’t use the proper sized blocks, decryption can become impossible. The error message will simply read, “bad data.” When you see this error message, check your block size to make sure you’re using the correct size for the key and CSP.
The encryption process is only a little more complex than the symmetric method. You must ensure that the InData array contains only enough entries for the remaining data on the last pass.
Otherwise, the decrypted file will contain the wrong number of bytes and include corrupted data at the end of the file.
Deriving a Key from a Password
Just about every program that performs cryptography asks the user for a password. The password acts as part of the input for generating the cryptographic key. The example in this section demonstrates a method for accepting a password as input from the user and generating an encryption key from it. You won’t actually use the key to encrypt data—you can see these techniques in Listings 7.3 through 7.5. Listing 7.6 shows how to use the CryptDeriveKey() method. You’ll find this example in the \Chapter 07\C#\PasswordKey and \Chapter 07\VB\PasswordKey folders of the source code located on the Sybex Web site.
Listing 7.6 Generating a Key from a Password
private void btnTest_Click(object sender, System.EventArgs e) { PasswordDeriveBytes PDB; // Creates the key. RC2CryptoServiceProvider RC2CSP; // Contains the key. Int32 IVSize; // Required IV size. Byte[] IV; // Initialization vector. Int32 Counter; // Loop counter. StringBuilder Output; // An output string. Byte[] Seed = {0x01, 0x02, 0x03, 0x04, // PDB seed value. 0x05, 0x06, 0x07, 0x08, 0x09, 0x10, 0x11, 0x12, 0x13, 0x14, 0x15, 0x16}; // Create the PasswordDeriveBytes object. PDB = new PasswordDeriveBytes(txtPassword.Text, Seed, "MD5", 5); // Initialize the key. RC2CSP = new RC2CryptoServiceProvider(); // Initialize the IV. IVSize = RC2CSP.BlockSize / 8; IV = new Byte[IVSize]; for (Counter = 0; Counter < IV.Length; Counter++) IV[Counter] = Convert.ToByte(Counter); // Create a key. RC2CSP.Key = PDB.CryptDeriveKey("RC2", "MD5", RC2CSP.KeySize, IV); // Display a result. Output = new StringBuilder(); Output.Append("The Generated Key:\r\n"); for (Counter = 0; Counter < RC2CSP.Key.Length; Counter++) { Output.Append(RC2CSP.Key.GetValue(Counter)); Output.Append(" "); } MessageBox.Show(Output.ToString(), "Key Output", MessageBoxButtons.OK, MessageBoxIcon.Information); } The example begins by creating a PasswordDeriveBytes object. This object is the key to working with user passwords. Notice that the constructor for this object accepts the password, a seed value (range of Byte values), the hash method you want to use, and the number of hash iterations used to generate the PasswordDeriveBytes object. The main use for the resulting object is to generate a cryptographic key based on the user’s password.
The next step is to create the IV value for the cryptographic key. This value is a specific length, and you compute it by dividing the number of bits in the RC2CSP.BlockSize property by 8 to obtain the number of bytes for the IV Byte array. Because you don’t know the size of the IV array at the outset, you need to create a method of generating byte values that you can reproduce later. The example uses a simple progression of numbers, but this isn’t sufficient to keep crackers at bay.
At this point, the code generates the cryptographic key using the CryptDeriveKey() method. You must supply a cryptographic algorithm name, the hashing algorithm name, the size of the key you want, and the IV. For maximum compatibility, use the RC2CSP.KeySize property to obtain the key size. The application ends by displaying the resulting key.
|
EAN: 2147483647
Pages: 168
- Chapter I e-Search: A Conceptual Framework of Online Consumer Behavior
- Chapter XIV Product Catalog and Shopping Cart Effective Design
- Chapter XVI Turning Web Surfers into Loyal Customers: Cognitive Lock-In Through Interface Design and Web Site Usability
- Chapter XVII Internet Markets and E-Loyalty
- Chapter XVIII Web Systems Design, Litigation, and Online Consumer Behavior