Chapter 6: Managing SAS Output
Printing
Introduction to Printing in SAS within the Windows Environment
By default, SAS under Windows uses Microsoft Windows print settings so that you can manage your output in the same manner as you manage output from other Windows applications. When you use Windows print settings, you use Windows TrueType fonts and fonts that are supported by your printers.
You can also use Universal Printing with the Output Delivery System. In the Windows environment, you enable Universal Printing by specifying the UNIVERSALPRINT option and the UPRINTMENUSWITCH option. The information in this section focuses on using Windows printing. For information about using Universal Printing, see SAS Language Reference: Concepts and UPRINTMENUSWITCH System Option on page 570.
For details about using Windows printing, see your Windows documentation. Producing Graphics on page 184 discusses how to route graphics from your SAS session to printers.
Printing from within a SAS Window
Overview of Printing From Within a SAS Window
Printing from SAS for Windows is much like printing in other Windows applications where you print using a toolbar button or a dialog box. You specify printing options using the Print, Print Setup, and Page Setup dialog boxes. As in other Windows applications, you can preview a printed page using the preview facility.
Setting Print Options
Use the Print dialog box to set the following print options:
-
Change a printer destination
-
Specify the window to print
-
Print line numbers, page numbers , and in color
-
Print as a bitmap
-
Print to a file
-
Print the contents of the clipboard
-
Print multiple copies
-
Print a range of pages or selected text
-
Collate copies.
To access the Print dialog box, select
File – Print

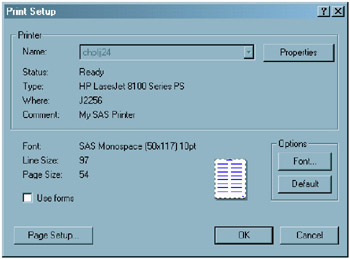
Display 6.1: The Print Dialog Box
Use the Print Setup dialog box to set the following print options:
-
Change fonts
-
Use Forms.
To access the Print Setup dialog box, select
File – Page Setup
Display 6.2: The Print Setup Dialog Box
Use the Page Setup dialog box to set the following print options:
-
Change the paper size
-
Change the paper source
-
Specify the orientation (portrait or landscape)
-
Set the margin sizes.
To access the Page Setup dialog box, select
File – Page Setup
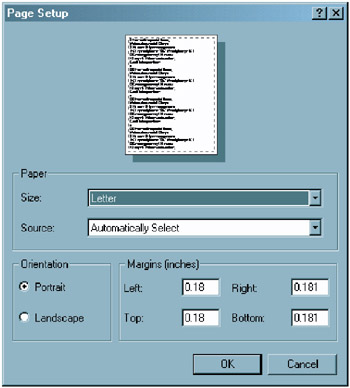
Display 6.3: Page Setup Dialog Box
You can specify document properties for the selected printer by selecting
File – Print – Properties
Windows That Can Be Printed
Not all SAS windows can be printed. To determine if a SAS window can be printed, make the window the active window. If the Print toolbar button or the Print command in the File menu is active, the window can be printed.
The print output is a bitmap of the window if the Print toolbar button is active and the Print command in the File menu is not. An example of a window that would be printed as a bitmap is the SAS System Options window.
Printing a Window
To print the contents of a window, make the window the active window and do one of the following:
-
To print using the current print settings, click the Print toolbar button.
-
To change the print options and then print, select
File – Print
and select your printing options.
The Print dialog box might differ somewhat from what you see on your system, depending on which Windows operating environment you use to run SAS, and on the active SAS window.
Changing the Printer
SAS consults these sources for default printer settings, in order of precedence:
-
the value of the SYSPRINT system option
-
the Windows default printer.
The destination printer is determined by the value of the SYSPRINT system option, which is displayed in the Name box of the Print dialog box.
To change the printer:
-
Select
File – Print
-
Click in the Name list box and select a printer.
Using the SYSPRINT and PRTPERSISTDEFAULT system options, you can specify a printer when you start SAS as shown in the following table:
| Printer | Action |
|---|---|
| the Windows default printer | Do not specify the SYSPRINT system option when you start SAS. |
| a specific printer | Start SAS with the SYSPRINT system option. |
| the printer specified in the previous SAS session | Start SAS with the PRTPERSISTDEFAULT system option each time you start SAS. |
If both SYSPRINT and PRTPERSISTDEFAULT system options are specified when SAS starts, the destination printer is determined by the value of the SYSPRINT system option. For more information about these system options, see SYSPRINT System Option on page 566 and PRTPERSISTDEFAULT System Option on page 536.
Alternatively, you can change the destination printer by using an OPTIONS statement or by using the SAS System Options window. To change the printer using the SAS System Options window:
-
Select
Tools – Options – System
-
Select the Log and procedure output control folder and then select the Procedure output folder.
-
Double-click Sysprint .
-
Type a printer name as it appears in the Windows Printer folder in the New Value box and click OK . The printer name is case-sensitive.
The information about the printer in the Print dialog box, the Status , Type , Where , and Comment fields, displays information that is obtained from the Windows operating environment.
Changing the Print Font
The print font options enable you to change the font, the font style, the point-size, and the script. When you change the font size, SAS recalculates the maximum LINESIZE and PAGESIZE values that are displayed in the Print Setup dialog box.
To specify a print font:
-
Select
File – Print Setup – Font
-
Select Font , Font Style , and Size .
-
Click OK .
Note: SAS formats tabular and columnar reports assuming the use of a monospace font. Use of a proportionally spaced font might produce improperly formatted reports.
Alternatively, you can change the font using the SYSPRINTFONT system option when you start SAS, using an OPTIONS statement, or using the SAS System Option window. Using the SYSPRINTFONT system options requires an exact match of the font face-name and printer names .
To modify SYSPRINTFONT using the SAS System Option window,
-
Select
Tools – Options – System
-
Select the Log and procedure output control folder and then select the Procedure output folder.
-
Right- click Sysprintfont and select Modify Value from the pop-up menu.
-
Type the font value in the New Value text box. Enclose the value in parentheses.
-
Click OK .
The following SYSPRINTFONT system option sets the font to Arial, bold, and italic for the printer named "second-floor":
sas -sysprintfont="Arial" bold italic named "second-floor";
For more information, see SYSPRINTFONT System Option on page 567.
Setting Up the Printed Page
Setting up a page involves specifying the paper, the orientation of the paper, and the margins. You set up the page by using the Page Setup dialog box or by using system options.
To open the Page Setup dialog box select
File – Page Setup
The following table describes the Page Setup dialog box options and their related system options.
| Page Setup Option | Description | Setting the Option | Related System Option |
|---|---|---|---|
| Orientation | Specifies to print the page vertically or horizontally. | To print the page vertically, select Portrait . To print the page horizontally, select Landscape . | ORIENTATION |
| Margins | Specifies the amount of space to leave blank from the top, bottom, left, and right edges of the paper | Type the number of inches in the Left , Right , Top , and Bottom fields. | LEFTMARGIN, RIGHTMARGIN, TOPMARGIN, BOTTOMMARGIN |
| Paper size | Specifies the size of paper to print on. See the table below for a list of some paper types. | Click the Size box andselectapapersize. | PAPERSIZE |
| Paper source | Specifies the source of the paper, such as a printer tray, envelope or manual feeder, or specifies to automatically select the paper source. | Click the Source box and select a paper source. | PAPERSOURCE |
Alternatively, you can set the page setup options using system options in the OPTIONS statement or from the SAS System Options window. To set page setup options from the SAS System Options window:
-
Select
Tools – Options – System – Log and procedure output control – ODS printing
-
Place the cursor over the appropriate system option and double- click the right mouse button.
-
Type a new value and click OK .
CAUTION:
-
Modifying print options by using the Windows printing dialog boxes might change the values of SAS printing system options, which might cause unpredictable output. If you set printing options using SAS system options such as LINESIZE and PAGESIZE, and then use the Windows printing dialogs to set printing options, the SAS system options are set to the values specified in the Windows print dialog boxes.
Support for a particular paper size is printer dependent. The following is a list of some paper size names:
| LETTER | Letter, 8-1/2-by-11-inch paper |
| LEGAL | Legal, 8-1/2-by-14-inch paper |
| A4 | A4 Sheet, 210-by-297-millimeter paper |
| CSHEET | C Sheet, 17-by-22-inch paper |
| DSHEET | D Sheet, 22-by-34-inch paper |
| ESHEET | E Sheet, 34-by-44-inch paper |
| LETTERSMALL | Letter Small, 8-1/2-by-11-inch paper |
| TABLOID | Tabloid, 11-by-17-inch paper |
| LEDGER | Ledger, 17-by-11-inch paper |
| STATEMENT | Statement, 5-1/2-by-8-1/2-inch paper |
| EXECUTIVE | Executive, 7-1/4-by-10-1/2-inch paper |
| A3 | A3 sheet, 297-by-420-millimeter paper |
| A4SMALL | A4 small sheet, 210-by-297-millimeter paper |
| A5 | A5 sheet, 148-by-210-millimeter paper |
| B4 | B4 sheet, 250-by-354-millimeter paper |
| B5 | B5 sheet, 182-by-257-millimeter paper |
| FOLIO | Folio, 8-1/2-by-13-inch paper |
| QUARTO | Quarto, 215-by-275-millimeter paper |
| 10X14 | 10-by-14-inch paper |
| 11X17 | 11-by-17-inch paper |
| NOTE | Note, 8-1/2-by-11-inch paper |
| ENV_9 | #9 Envelope, 3-7/8 by 8-7/8 inches |
| ENV_10 | #10 Envelope, 4-1/8 by 9-1/2 inches |
| ENV_11 | #11 Envelope, 4-1/2 by 10-3/8 inches |
| ENV_12 | #12 Envelope, 4-3/4 by 11 inches |
| ENV_14 | #14 Envelope, 5 by 11-1/2 inches |
| ENV_DL | DL Envelope, 110 by 220 millimeters |
| ENV_C5 | C5 Envelope, 162 by 229 millimeters |
| ENV_C3 | C3 Envelope, 324 by 458 millimeters |
| ENV_C4 | C4 Envelope, 229 by 324 millimeters |
| ENV_C6 | C6 Envelope, 114 by 162 millimeters |
| ENV_C65 | C65 Envelope, 114 by 229 millimeters |
| ENV_B4 | B4 Envelope, 250 by 353 millimeters |
| ENV_B5 | B5 Envelope, 176 by 250 millimeters |
| ENV_B6 | B6 Envelope, 176 by 125 millimeters |
| ENV_ITALY | Italy Envelope, 110 by 230 millimeters |
| ENV_MONARCH | Monarch Envelope, 3-7/8 by 7-1/2 inches |
| ENV_PERSONAL | 6-3/4 Envelope, 3-5/8 by 6-1/2 inches |
| FANFOLD_US | U.S. Standard Fanfold, 14-7/8-by-11-inch paper |
| FANFOLD_STD_GERMAN | German Standard Fanfold, 8-1/2-by-12-inch paper |
| FANFOLD_LGL_GERMAN | German Legal Fanfold, 8-1/2-by-13-inch paper |
Print Options That Affect the Line Size and Page Size
The line size is the number of characters that can fit on one line. The page size is the number of lines on a page. The line size and the page size that appear in the Print Setup dialog box are automatically calculated based on these print options:
| From the Print Setup Dialog Box | From the Page Setup Dialog Box | From the Font Dialog Box |
|---|---|---|
|
|
|
Although you cannot set the linesize and pagesize from the dialog box, you can adjust them by changing these print settings. The LINESIZE and PAGESIZE system options also change when you modify these print options.
CAUTION:
-
Modifying print options by using the Windows printing dialog boxes might change the values of SAS printing system options, which might cause unpredictable output. If you set printing options using SAS system options such as LINESIZE and PAGESIZE, and then use the Windows printing dialogs to set printing options, the SAS system options are set to the values specified in the Windows print dialog boxes.
Printing Line Numbers, Page Numbers, and in Color
Options for printing line numbers, page numbers, and in color are available in the Additional Printing Options dialog box. To open this dialog box, click Options in the Print dialog box.
The Options button is enabled only for windows that allow the printing of these options.
It is not necessary for you to turn on line numbers in your window or specify the NUMBER system option in order to print line numbers and page numbers. Color printing is available when you print to a color printer and the window that you are printing supports color printing.
Printing a Window as a Bitmap
The following table lists the bitmap forms that are available and how to print them:
| Bitmap Form | Print Dialog Box Selection |
|---|---|
| Print the active SAS window | Select Print as bitmap |
| Print the SAS window |
|
| Print the entire screen |
|
| Fill an entire page with the bitmap | Select Force Bitmaps to fill page |
Setting the Number of Copies to Print
In the Print dialog box Number of copies box, you can either type in the number of copies that you want or you can use the up and down arrows to select the number of copies that you want. If your printer supports collation, the Collate box is active. Under Windows NT, SAS does not collate its output pages.
You can also set the number of copies to print by setting the COPIES system option either in an OPTIONS statement or in the SAS System Options window.
To set the number of copies by using the SAS System Options window:
-
Select
Log and procedure output control – ODS Printing
-
Double-click Copies .
-
In the New Value box, type the number of copies and click OK .
Setting the Page Range to Print
Use these settings in the Print dialog box to select the pages that you want to print:
-
To print all pages, select All .
-
To print a range of pages:
-
Select Pages .
-
Type the beginning page in the from box.
-
Type the ending page in the to box.
-
-
To print only what you have selected in the window, select Selection . The Selection option is available only when you have made a selection.
Previewing Your Output Before You Print
How to Preview a Window
To see how the contents of a window will appear as printed output:
-
Select the window you want to preview
-
Select
File – Print Preview
Alternatively, you can click the Print Preview toolbar button or type dlgprtpreview in the command bar.
Features of the Print Preview Window
The following table lists the features of the Print Preview window.
| Task | Action |
|---|---|
| Navigate through the pages | Use Next or Previous |
| Zoom in or out | Click Zoom or the page. |
| Determine the current page | The status bar displays the current page and total number of pages in the document. |
| Get help | Click Help |
| Print the window | Click Print |
| Close the Print Preview window | Click Close |
For a list of keyboard shortcuts that you can use in the Print Preview windows, see Keyboard Shortcuts within Print Preview on page 621.
Print Preview Shortcut Keys
In the Print Preview window, you can navigate by using the following shortcut keys:
| Key | Action in Full Page Mode | Action in Zoom Mode |
|---|---|---|
| PgDn | Advance to next page | Scroll down on current page |
| PgUp | Go back to previous page | Scroll up on current page |
| Ctrl+PgDn | none | Scroll right on current page |
| Ctrl+PgUp | none | Scroll left on current page |
| Ctrl+Home | Go to first page | Go to first page |
| Ctrl+End | Go to last page | Go to last page |
Not all SAS windows support the Print Preview feature.
Using SAS Print Forms
Setting Print Options to Use Forms
To use a form to print from SAS:
-
Select
File – Print Setup
-
Select the Use Forms check box.
If the Use Forms check box does not appear in the Print Setup dialog box, use the PRTSETFORMS system option to enable it. For more information, see PRTSETFORMS System Option on page 537.
When you print, SAS prints your output with the current print form.
To use forms in a batch SAS session, use the NOHOSTPRINT system option. When NOHOSTPRINT is specified, the Use Forms check box is selected and SAS uses the linesize, pagesize, and font settings that are specified in your SAS form.
Specifying the Current Print Form
To specify a print form as the current print form, do one of the following:
-
Type FORMNAME CLEAR in the command bar to use the default form.
-
Type FORMNAME form-name in the command bar to use a specific form.
-
Specify the FORMS system option in your SAS configuration file or in the SAS System Options window.
To learn the name of the current form, issue the FORMNAME command with no parameters. The form name is displayed in the message area of the status line.
The FORMNAME command is not supported for all windows. If it is not supported, SAS displays the following message in the status bar:
ERROR: Unrecognized command FORMNAME
Creating a Print Form
The FSFORM command opens the FORM window, in which you can define print forms to use when you print SAS output. You can specify printer, page formats, margins, fonts, and printer control language in a FORM entry.
SAS print forms are especially useful when you use the PRINT command from within an interactive SAS session and when you print from SAS/AF windows.
To invoke the FORM window, issue the following command:
-
FSFORM catalog-name.form-name
See the SAS Help and Documentation for more information about the FSFORM command.
Although the majority of the frames in the FORM window are the same across all operating environments, the first frame that you see after issuing the FSFORM command is the Printer Selection frame, which lists the printers that you are able to use under Windows. Display 6.4 on page 176 shows the default information for this frame.
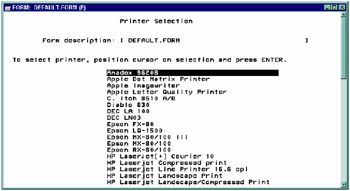
Display 6.4: Printer Selection Frame
To navigate though the FORM window frames for a printer:
-
Click a printer name or select a printer and press ENTER.
-
From the Tools menu, select Next Screen and Previous Screen to move through the frames.
The information in the Printer Selection frame is also site-dependent, so the printer list at your site will be different from the one shown in Display 6.4 on page 176.
The Printer Selection frame appears only when you create a new print form. After you create a form, it is stored in your user profile catalog or in the catalog that was specified with the FSFORM command (entry type FORM). The next time you modify this form, the Printer Selection frame is skipped . You cannot return to the Printer Selection frame from the second FORM window frame.
Printing with SAS Commands
If you prefer typing commands to using menus , you can use the PRINT or SPRINT command to print the contents of the active window. The SPRINT command is not available for all windows. For more information on these commands, refer to the SAS Help and Documentation.
These SAS commands open the print dialog boxes:
| Command | Dialog Box |
|---|---|
| DLGPRT | |
| DLGPAGESETUP | Page Setup |
| DLGPRTSETUP | Print Setup |
| DLGPRTPREVIEW | Print Preview |
Sending DATA Step Output to a Printer
You may want to spool your DATA step output to a printer instead of to a file. Use the FILENAME statement and the PRINTER device-type keyword to accomplish this, as in the following example:
filename myfile printer; data _null_; set sashelp.shoes; file myfile; where stores ge 25;'; put _all_; run;
In this example, the PRINTER device-type keyword specifies to print the output to the printer that is specified in the SYSPRINT system option. For more information, see SYSPRINT System Option on page 566.
Sending Printed Output to a File
Using the Print Dialog Box to Print to a File
You can send your printed output to a file by selecting the Print to File check box in the Print dialog box, and then specifying the name of a file to print to. This is not the same as a save operation; the resulting printer file contains all the printer control language that is necessary to support whatever options you have chosen with the Printer Setup dialog box, such as fonts and page orientation. In most cases, this printer file is not readable with a text editor; it is meant only to be sent to the printer.
Using the FILENAME Statement to Print to a File
You can route printed output to a file by using the FILENAME statement, which is useful for routing DATA step output. Here is an example:
filename myfile printer altdest='c:\results.dat'; data _null_; set sashelp.shoes; file myfile; where stores ge 25; put _all_; run;
In this example, the output from the DATA step is routed to a file, yet still contains all the printer control information that is necessary for you to use your printer to produce formatted output.
Using the FILE Printer Option in Windows
Another method of sending printed output to a file is to direct the output to the FILE: device instead of to a printer in the Windows printer Properties dialog box Ports page. If you assign the FILE : device to a printer, Windows prompts you for a filename each time that you print. When you send output to a file, the contents of the file are overwritten if the file already exists. For more information about changing printer properties, see your Windows documentation.
Printing in Batch Mode
When you run SAS jobs in batch mode, you do not have access to the Print and Printer Setup dialog boxes, but you can still use the Windows printer. Use the SYSPRINT system option to specify your default printer (and the SYSPRINTFONT system option to specify your printer font, if you want) as described in SYSPRINT System Option on page 566. For example, suppose your SAS configuration file contains the following option:
-sysprint "f2hp5"
Then, your SAS program might contain the following statements:
filename myfile printer; data _null_; set sashelp.shoes; file myfile; where stores ge 25; put _all_; run;
When you submit your job, SAS uses the SYSPRINT printer specification to spool your output from the DATA step to the Windows printer.
Default Printer Details
SAS looks for a default printer as follows (in order of precedence, first to last):
-
the SYSPRINT system option value
-
the Windows system default printer.
To see the value of the SYSPRINT system, open the Print Setup dialog box either by
-
selecting
File – Print Setup
-
entering DLGPRTSETUP in the command bar.
If you start SAS with the PRTPERSISTDEFAULT system option and not with the SYSPRINT system option, SAS sets the SYSPRINT system option to the name of the destination printer from the previous SAS session.
For information about changing the printer, see Changing the Printer on page 169.
Canceling a Print Job
You can cancel a print job while SAS is spooling a print file to a folder or to the Windows Printer by clicking Cancel in the Print Abort dialog box. The Print Abort dialog box appears only while SAS is spooling a print file to its destination. Small files spool to a destination quickly and the Print Abort dialog box dismisses before you have a chance to cancel the print job.
You can specify when you want to enable or suppress the Print Abort dialog box by using the PRTABORTDLGS system option. See the following table for valid PRTABORTDLGS values.
| When to Display the Print Abort Dialog Box | PRTABORTDLGS Value |
|---|---|
| Printing either to a file or to a printer | BOTH |
| Never | NEITHER |
| Only when printing to a file | FILE |
| Only when printing to a printer | PRINTER |
For more information, see PRTABORTDLGS System Option on page 536.
EAN: 2147483647
Pages: 187