Viewing Your Show
| After you plan and set up your PowerPoint presentation, it's time to present it. To do this, select Slide Show, View Show or press F5. NOTE Before presenting your show live, you should preview it to test content, flow, and narration. After you determine that your show itself is flawless, you should work on perfecting your delivery, particularly if you don't deliver live presentations very often. By simulating live conditions as much as possible in your practice sessions, you'll increase your odds of delivering a perfect presentation. PowerPoint presents a show using the settings you enter in the Set Up Show dialog box. For example, you can view in a browser or full screen, depending on what you entered in this dialog box. Whether you need to advance each slide manually depends on your choices in this dialog box. How you navigate the presentation also depends on how you view it:
TIP Displaying a scrollbar can make it easier for viewers to navigate your show. Specify whether to display a scrollbar in the Set Up Show dialog box. TIP To present the show starting with the current slide, click the Slide Show button in the lower-left corner of the window. Navigating a Show Full ScreenIf you choose to present your PowerPoint slideshow by a speaker, the presentation appears full screen. If you set up your show without automatic timing, you have to manually move among the slides during the show. Table 9.1 lists all the ways PowerPoint gives you to navigate a slideshow. Table 9.1. Slideshow Actions
TIP Right-click anywhere on the screen and choose Help from the shortcut menu to display this list of shortcuts within your slideshow. NOTE The capability to toggle a black or white screen is a useful tool. For example, if you want to explain a detailed concept and want your audience to focus on what you're saying and not on the slide, you can temporarily make the screen either black or white. This is also useful during breaks for long presentations.
TIP Although the options on this menu are useful, you'll probably want to avoid using these features during an actual presentation because a break in your flow can be distracting. One case in which you might want to do so during a presentation would be when you have to go back to previous slides to answer questions or clarify a point and don't want to page through numerous slides to do so. Setting Pointer OptionsYou can use or hide an arrow pointer during a PowerPoint presentation. The arrow pointer can help you draw the audience's attention to objects on your slides. To turn on the arrow, move the mouse. You can also right-click and choose Arrow. The arrow appears as a standard mouse pointer arrow on your screen, which you can use to point to specific areas. By default, the arrow disappears after three seconds of inactivity, and reappears whenever you move the mouse. This setting is fine for most presentations, but you can choose to have the arrow always or never appear. To do so, right-click and choose Pointer Options, Arrow Options from the menu that appears. Then choose one of these three commands:
Figure 9.15 shows the standard arrow pointer with which most people are familiar. Figure 9.15. Use a pointer during your slide presentation. Using Ink to Mark Your Presentation
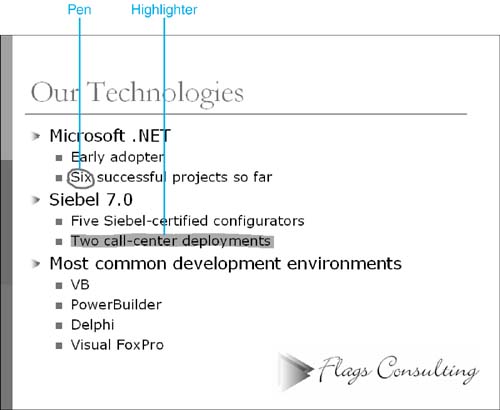
PowerPoint gives you three kinds of ink:
Use the pens to draw. You can draw shapes and objects to emphasize a point, circle important words, or even write text (challenging with a mouse, easy with a pen tablet or a Tablet PC). Use the highlighter to highlight text and objects on the screen. To use ink, right-click, choose Pointer Options, and choose the kind of ink to use (Ballpoint Pen, Felt Tip Pen, or Highlighter). Your mouse cursor becomes a dot (when you choose a pen) or a colored bar (when you choose highlighter). Click and hold the mouse button, and then drag the cursor to make your mark. Figure 9.16 shows some ink markings. Figure 9.16. Use a pen or the highlighter to draw attention to elements in the presentation. You can choose your ink's color. When you set the ink color for one pen, you set it for both. But the highlighter's ink color is independent of the pens. To set ink color, choose a pen or the highlighter and right-click. From the menu that appears, choose Pointer Options, Ink Color, and choose the color to use. You can also preset the pens' ink color in the Set Up Show dialog box. You can erase your markings, too. To erase a specific ink marking, right-click and choose Pointer Options, Eraser from the menu that appears. The mouse cursor looks like an eraser. Click an ink marking to erase it. To erase all of your ink markings, right-click and choose Pointer Options, Erase All Ink on Slide from the menu that appears or press the letter E. You can choose your pen color in the Set Up Show dialog box, or you can set it by right-clicking, choosing Pointer Options, Pen Color, and selecting a color from the list that appears. After you finish delivering your presentation, PowerPoint asks whether you want to keep your annotations. If you click Yes, the annotations become drawing objects in the presentation. |
 For more information about the Set Up Show dialog box,
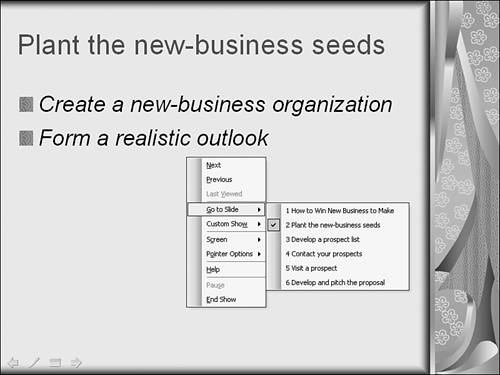

EAN: 2147483647
Pages: 261