Foundation Concepts and Terms
| < Day Day Up > |
| In the course of this book, we'll be referring to some structures and concepts that might be unfamiliar to some readers. In this section, we'll define the terms we'll be using throughout. You should become familiar with them before proceeding to subsequent chapters. Windows APIThe Windows application programming interface (API) is the system programming interface to the Microsoft Windows operating system family, including Windows 2000, Windows XP, Windows Server 2003, Windows 95, Windows 98, Windows Millennium Edition (Me), and Windows CE. Each operating system implements a different subset of the Windows API. Windows 95, Windows 98, Windows Me, and Windows CE are not addressed in this book. Note
Prior to the introduction of 64-bit versions of Windows XP and Windows Server 2003, the programming interface to the 32-bit version of the Windows operating systems was called the Win32 API, to distinguish it from the original 16-bit Windows API, which was the programming interface to the original 16-bit versions of Windows. In this book, the term Windows API refers to the 32-bit interface to Windows 2000 and both the 32-bit and 64-bit programming interfaces to Windows XP and Windows Server 2003. The Windows API consists of thousands of callable functions, which are divided into the following major categories:
This book focuses on the internals of the key base services, such as processes and threads, memory management, I/O, and security.
Services, Functions, and RoutinesSeveral terms in the Windows user and programming documentation have different meanings in different contexts. For example, the word service can refer to a callable routine in the operating system, a device driver, or a server process. The following list describes what certain terms mean in this book:
Processes, Threads, and JobsAlthough programs and processes appear similar on the surface, they are fundamentally different. A program is a static sequence of instructions, whereas a process is a container for a set of resources used when executing the instance of the program. At the highest level of abstraction, a Windows process comprises the following:
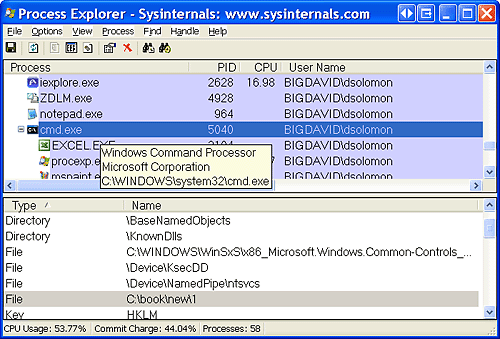
Each process also points to its parent or creator process. However, if the parent exits, this information is not updated. Therefore, it is possible for a process to point to a nonexistent parent. This is not a problem, as nothing relies on this information being present. The following experiment illustrates this case.
A number of tools for viewing (and modifying) processes and process information are available. The following experiments illustrate the various views of process information you can obtain with some of these tools. These tools are included within Windows itself and within the Windows Support Tools, Windows Debugging Tools, Windows resource kits, the Platform SDK, and from http://www.sysinternals.com. Many of these tools show overlapping subsets of the core process and thread information, sometimes identified by different names. Probably the most widely used tool to examine process activity is Task Manager. (Interestingly, there is no such thing as a "task" in the Windows kernel, so Task Manager is really a tool to manage processes.) The following experiment shows the difference between what Task Manager lists as applications and processes.
Process Explorer, from http://www.sysinternals.com, shows more details about processes and threads than any other available tool, which is why you will see it used in a number of experiments throughout the book. The following are some of the unique things that Process Explorer shows or enables:
Process Explorer also provides easy access to information available through other tools from one central place, such as:
An introductory experiment using Process Explorer follows.
A thread is the entity within a process that Windows schedules for execution. Without it, the process's program can't run. A thread includes the following essential components:
The volatile registers, stacks, and private storage area are called the thread's context. Because this information is different for each machine architecture that Windows runs on, this structure, by necessity, is architecture-specific. The Windows GetThreadContext function provides access to this architecture-specific information (called the CONTEXT block).
Although threads have their own execution context, every thread within a process shares the process's virtual address space (in addition to the rest of the resources belonging to the process), meaning that all the threads in a process can write to and read from each other's memory. Threads cannot accidentally reference the address space of another process, however, unless the other process makes available part of its private address space as a shared memory section (called a file mapping object in the Windows API) or unless one process has the right to open another process to use cross-process memory functions such as ReadProcessMemory and WriteProcessMemory. In addition to a private address space and one or more threads, each process has a security identification and a list of open handles to objects such as files, shared memory sections, or one of the synchronization objects such as mutexes, events, or semaphores, as illustrated in Figure 1-2. Figure 1-2. A process and its resources
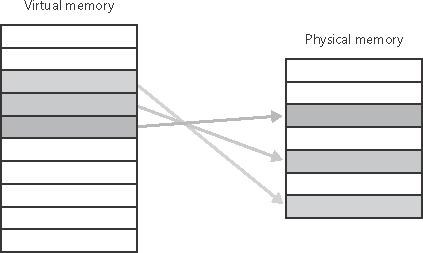
Every process has a security context that is stored in an object called an access token. The process access token contains the security identification and credentials for the process. By default, threads don't have their own access token, but they can obtain one, thus allowing individual threads to impersonate the security context of another process including processes running on a remote Windows system without affecting other threads in the process. (See Chapter 8 for more details on process and thread security.) The virtual address descriptors (VADs) are data structures that the memory manager uses to keep track of the virtual addresses the process is using. These data structures are described in more depth in Chapter 7. Windows provides an extension to the process model called a job. A job object's main function is to allow groups of processes to be managed and manipulated as a unit. A job object allows control of certain attributes and provides limits for the process or processes associated with the job. It also records basic accounting information for all processes associated with the job and for all processes that were associated with the job but have since terminated. In some ways, the job object compensates for the lack of a structured process tree in Windows yet in many ways it is more powerful than a UNIX-style process tree. You'll find out much more about the internal structure of jobs, processes and threads, the mechanics of process and thread creation, and the thread-scheduling algorithms in Chapter 6. Virtual MemoryWindows implements a virtual memory system based on a flat (linear) address space that provides each process with the illusion of having its own large, private address space. Virtual memory provides a logical view of memory that might not correspond to its physical layout. At run time, the memory manager, with assistance from hardware, translates, or maps, the virtual addresses into physical addresses, where the data is actually stored. By controlling the protection and mapping, the operating system can ensure that individual processes don't bump into one another or overwrite operating system data. Figure 1-3 illustrates three virtually contiguous pages mapped to three discontiguous pages in physical memory. Figure 1-3. Mapping virtual memory to physical memory
Because most systems have much less physical memory than the total virtual memory in use by the running processes, the memory manager transfers, or pages, some of the memory contents to disk. Paging data to disk frees physical memory so that it can be used for other processes or for the operating system itself. When a thread accesses a virtual address that has been paged to disk, the virtual memory manager loads the information back into memory from disk. Applications don't have to be altered in any way to take advantage of paging because hardware support enables the memory manager to page without the knowledge or assistance of processes or threads. The size of the virtual address space varies for each hardware platform. On 32-bit x86 systems, the total virtual address space has a theoretical maximum of 4 GB. By default, Windows allocates half this address space (the lower half of the 4 GB virtual address space, from x00000000 through x7FFFFFFF) to processes for their unique private storage and uses the other half (the upper half, addresses x80000000 through xFFFFFFFF) for its own protected operating system memory utilization. The mappings of the lower half change to reflect the virtual address space of the currently executing process, but the mappings of the upper half always consist of the operating system's virtual memory. Windows 2000 Advanced Server, Windows 2000 Datacenter Server, Windows XP (SP2 and later), and Windows Server 2003 support boot-time options (the /3GB and /USERVA qualifiers in Boot.ini, described in Chapter 5) that give processes running specially marked programs (the large address space aware flag must be set in the header of the executable image) the ability to use up to 3 GB of private address space (leaving 1 GB for the operating system). This option allows applications such as database servers to keep larger portions of a database in the process address space, thus reducing the need to map subset views of the database. Figure 1-4 shows the two virtual address space layouts supported by 32-bit Windows. Figure 1-4. Address space layouts for 32-bit Windows
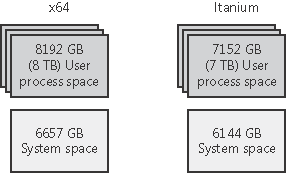
Although 3 GB is better than 2 GB, it's still not enough virtual address space to map very large (multigigabyte) databases. To address this need on 32-bit systems, Windows provides a mechanism called Address Windowing Extension (AWE), which allows a 32-bit application to allocate up to 64 GB of physical memory and then map views, or windows, into its 2-GB virtual address space. Although using AWE puts the burden of managing mappings of virtual to physical memory on the programmer, it does address the need of being able to directly access more physical memory than can be mapped at any one time in a 32-bit process address space. 64-bit Windows provides a much larger address space for processes: 7152 GB on Itanium systems and 8192 GB on x64 systems. Figure 1-5 shows a simplified view of the 64-bit system address space layouts. (For a detailed description, see Chapter 7.) Note that these sizes do not represent the architectural limits for these platforms, but rather implementation limits in the current versions of 64-bit Windows. Figure 1-5. Address space layouts for 64-bit Windows
Details of the implementation of the memory manager, including how address translation works and how Windows manages physical memory, are described in Chapter 7. Kernel Mode vs. User ModeTo protect user applications from accessing and/or modifying critical operating system data, Windows uses two processor access modes (even if the processor on which Windows is running supports more than two): user mode and kernel mode. User application code runs in user mode, whereas operating system code (such as system services and device drivers) runs in kernel mode. Kernel mode refers to a mode of execution in a processor that grants access to all system memory and all CPU instructions. By providing the operating system software with a higher privilege level than the application software has, the processor provides a necessary foundation for operating system designers to ensure that a misbehaving application can't disrupt the stability of the system as a whole. Note
Although each Windows process has its own private memory space, the kernel-mode operating system and device driver code share a single virtual address space. Each page in virtual memory is tagged as to what access mode the processor must be in to read and/or write the page. Pages in system space can be accessed only from kernel mode, whereas all pages in the user address space are accessible from user mode. Read-only pages (such as those that contain executable code) are not writable from any mode. Windows doesn't provide any protection to private read/write system memory being used by components running in kernel mode. In other words, once in kernel mode, operating system and device driver code has complete access to system space memory and can bypass Windows security to access objects. Because the bulk of the Windows operating system code runs in kernel mode, it is vital that components that run in kernel mode be carefully designed and tested to ensure that they don't violate system security. This lack of protection also emphasizes the need to take care when loading a third-party device driver, because once in kernel mode the software has complete access to all operating system data. This vulnerability was one of the reasons behind the driver-signing mechanism introduced in Windows, which warns the user if an attempt is made to add an unauthorized (unsigned) driver. (See Chapter 9 for more information on driver signing.) Also, a mechanism called Driver Verifier helps device driver writers to find bugs (such as buffer overruns or memory leaks). Driver Verifier is also explained in Chapter 7. As you'll see in Chapter 2, user applications switch from user mode to kernel mode when they make a system service call. For example, a Windows ReadFile function eventually needs to call the internal Windows routine that actually handles reading data from a file. That routine, because it accesses internal system data structures, must run in kernel mode. The transition from user mode to kernel mode is accomplished by the use of a special processor instruction that causes the processor to switch to kernel mode. The operating system traps this instruction, notices that a system service is being requested, validates the arguments the thread passed to the system function, and then executes the internal function. Before returning control to the user thread, the processor mode is switched back to user mode. In this way, the operating system protects itself and its data from perusal and modification by user processes. Note
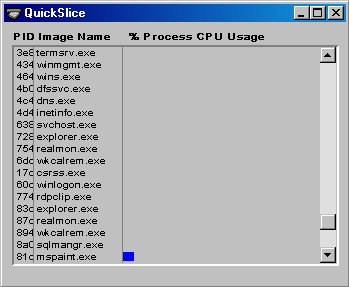
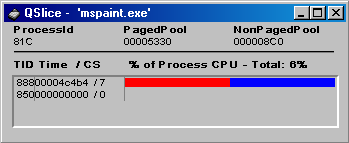
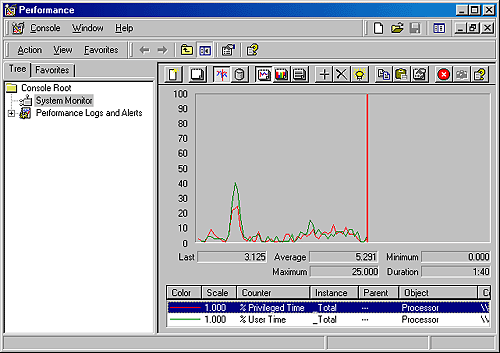
Thus, it's normal for a user thread to spend part of its time executing in user mode and part in kernel mode. In fact, because the bulk of the graphics and windowing system also runs in kernel mode, graphics-intensive applications spend more of their time in kernel mode than in user mode. An easy way to test this is to run a graphics-intensive application such as Microsoft Paint or Microsoft Pinball and watch the time split between user mode and kernel mode using one of the performance counters listed in Table 1-2.
Terminal Services and Multiple SessionsTerminal Services refers to the support in Windows for multiple interactive user sessions on a single system. With Windows Terminal Services, a remote user can establish a session on another machine, log in, and run applications on the server. The server transmits the graphical user interface to the client, and the client transmits the user's input back to the server. (This is different than X windows on UNIX systems, which permit running individual applications on a server system with the display remoted to the client, because the entire user session is remoted, not just a single application.) The first login session at the physical console of the machine is considered the console session, or session zero. Additional sessions can be created through the use of the remote desktop connection program (Mstsc.exe) or on Windows XP systems through the use of fast user switching (described later). The capability to create a remote session is supported on Windows 2000 Server systems but not Windows 2000 Professional. Windows XP Professional permits a single remote user to connect to the machine, but if someone is logged in at the console, the workstation is locked (that is, someone can be using the system either locally or remotely, but not at the same time). Windows 2000 Server and Windows Server 2003 Standard Edition support two simultaneous remote connections. (This is to facilitate remote management for example, use of management tools that require being logged in to the machine being managed.) Windows 2000 Advanced Server, Datacenter Server, Windows Server 2003 Enterprise Edition, and Datacenter Edition can support more than two sessions if appropriately licensed and configured as a terminal server. Although Windows XP Home and Professional editions do not support multiple remote desktop connections, they do support multiple sessions created locally through a feature called fast user switching. (This feature is disabled on Windows XP Professional if the system joins a domain.) When a user chooses to disconnect their session instead of log off (for example, by clicking Start, clicking Log Off, and choosing Switch User or by holding down the Windows key and pressing "L"), the current session (that is, the processes running in that session and all the sessionwide data structures that describe the session) remains in the system and the system returns to the main logon screen. If a new user logs in, a new session is created. For applications that want to be aware of running in a terminal server session, there are a set of Windows APIs for programmatically detecting that as well as for controlling various aspects of terminal services. (See the Platform SDK for details.) Chapter 2 describes briefly how sessions are created and has some experiments showing how to view session information with various tools, including the kernel debugger. The "Object Manager" section in Chapter 3 describes how the system namespace for objects is instantiated on a per-session basis and how applications that need to be aware of other instances of themselves on the same system can accomplish that. Finally, Chapter 7 covers how the memory manager sets up and manages sessionwide data. Objects and HandlesIn the Windows operating system, an object is a single, run-time instance of a statically defined object type. An object type comprises a system-defined data type, functions that operate on instances of the data type, and a set of object attributes. If you write Windows applications, you might encounter process, thread, file, and event objects, to name just a few examples. These objects are based on lower-level objects that Windows creates and manages. In Windows, a process is an instance of the process object type, a file is an instance of the file object type, and so on. An object attribute is a field of data in an object that partially defines the object's state. An object of type process, for example, would have attributes that include the process ID, a base scheduling priority, and a pointer to an access token object. Object methods, the means for manipulating objects, usually read or change the object attributes. For example, the open method for a process would accept a process identifier as input and return a pointer to the object as output. Note
The most fundamental difference between an object and an ordinary data structure is that the internal structure of an object is hidden. You must call an object service to get data out of an object or to put data into it. You can't directly read or change data inside an object. This difference separates the underlying implementation of the object from code that merely uses it, a technique that allows object implementations to be changed easily over time. Objects provide a convenient means for accomplishing the following four important operating system tasks:
Not all data structures in the Windows operating system are objects. Only data that needs to be shared, protected, named, or made visible to user-mode programs (via system services) is placed in objects. Structures used by only one component of the operating system to implement internal functions are not objects. Objects and handles (references to an instance of an object) are discussed in more detail in Chapter 3. SecurityWindows was designed from the start to be secure and to meet the requirements of various formal government and industry security ratings, such as the Common Criteria for Information Technology Security Evaluation (CCITSE) specification. Achieving a governmentapproved security rating allows an operating system to compete in that arena. Of course, many of these required capabilities are advantageous features for any multiuser system. The core security capabilities of Windows include: discretionary (need-to-know) protection for all shareable system objects (such as files, directories, processes, threads, and so forth), security auditing (for accountability of subjects, or users and the actions they initiate), password authentication at logon, and the prevention of one user from accessing uninitialized resources (such as free memory or disk space) that another user has deallocated. Windows has two forms of access control over objects. The first form discretionary access control is the protection mechanism that most people think of when they think of operating system security. It's the method by which owners of objects (such as files or printers) grant or deny access to others. When users log in, they are given a set of security credentials, or a security context. When they attempt to access objects, their security context is compared to the access control list on the object they are trying to access to determine whether they have permission to perform the requested operation. Privileged access control is necessary for those times when discretionary access control isn't enough. It's a method of ensuring that someone can get to protected objects if the owner isn't available. For example, if an employee leaves a company, the administrator needs a way to gain access to files that might have been accessible only to that employee. In that case, under Windows, the administrator can take ownership of the file so that you can manage its rights as necessary. Security pervades the interface of the Windows API. The Windows subsystem implements object-based security in the same way the operating system does; the Windows subsystem protects shared Windows objects from unauthorized access by placing Windows security descriptors on them. The first time an application tries to access a shared object, the Windows subsystem verifies the application's right to do so. If the security check succeeds, the Windows subsystem allows the application to proceed. The Windows subsystem implements object security on a number of shared objects, some of which were built on top of native Windows objects. The Windows objects include desktop objects, window objects, menu objects, files, processes, threads, and several synchronization objects. For a comprehensive description of Windows security, see Chapter 8. RegistryIf you've worked at all with Windows operating systems, you've probably heard about or looked at the registry. You can't talk much about Windows internals without referring to the registry because it's the system database that contains the information required to boot and configure the system, systemwide software settings that control the operation of Windows, the security database, and per-user configuration settings (such as which screen saver to use). In addition, the registry is a window into in-memory volatile data, such as the current hardware state of the system (what device drivers are loaded, the resources they are using, and so on) as well as the Windows performance counters. The performance counters, which aren't actually "in" the registry, are accessed through the registry functions. See Chapter 4 for more on how performance counter information is accessed from the registry. Although many Windows users and administrators will never need to look directly into the registry (because you can view or change most configuration settings with standard administrative utilities), it is still a useful source of Windows internals information because it contains many settings that affect system performance and behavior. (If you decide to directly change registry settings, you must exercise extreme caution; any changes might adversely affect system performance or, worse, cause the system to fail to boot successfully.) You'll find references to individual registry keys throughout this book as they pertain to the component being described. Most registry keys referred to in this book are under HKEY_LOCAL_MACHINE, which we'll abbreviate throughout as HKLM. For further information on the registry and its internal structure, see Chapter 4. UnicodeWindows differs from most other operating systems in that most internal text strings are stored and processed as 16-bit-wide Unicode characters. Unicode is an international character set standard that defines unique 16-bit values for most of the world's known character sets. (For more information about Unicode, see http://www.unicode.org as well as the programming documentation in the MSDN Library.) Because many applications deal with 8-bit (single-byte) ANSI character strings, Windows functions that accept string parameters have two entry points: a Unicode (wide, 16-bit) and an ANSI (narrow, 8-bit) version. The Windows 95, Windows 98, and Windows Millennium Edition implementations of Windows don't implement all the Unicode interfaces to all the Windows functions, so applications designed to run on one of these operating systems as well as Windows typically use the narrow versions. If you call the narrow version of a Windows function, input string parameters are converted to Unicode before being processed by the system and output parameters are converted from Unicode to ANSI before being returned to the application. Thus, if you have an older service or piece of code that you need to run on Windows but this code is written using ANSI character text strings, Windows will convert the ANSI characters into Unicode for its own use. However, Windows never converts the data inside files it's up to the application to decide whether to store data as Unicode or as ANSI. In previous editions of Windows, Asian and Middle East editions were a superset of the core U.S. and European editions and contained additional Windows functions to handle more complex text input and layout requirements (such as right-to-left text input). As of Windows 2000, all language editions contain the same Windows functions. Instead of having separate language versions, Windows has a single worldwide binary so that a single installation can support multiple languages (by adding various language packs). Applications can also take advantage of Windows functions that allow single worldwide application binaries that can support multiple languages. |
| < Day Day Up > |
EAN: 2147483647
Pages: 158
